Three.js + Blender Game Dev
Yesterday I started working on a new game, tentatively titled “Trolley Problems: A Eulogy for Social Norms”. This will be my second game with Three.js and Blender (though the first, The Founder, is still not totally finished) and I thought it’d be helpful to document this process.
The game isn’t very far at this point. This video shows its current state:
The basic process was: 1) create the chair model in Blender and 2) load the chair into Three.js.
Blender
I won’t give a Blender modeling tutorial here (this was suggested as a good resource to start), but the theater chair model was quickly made by extruding a bunch from a cube.
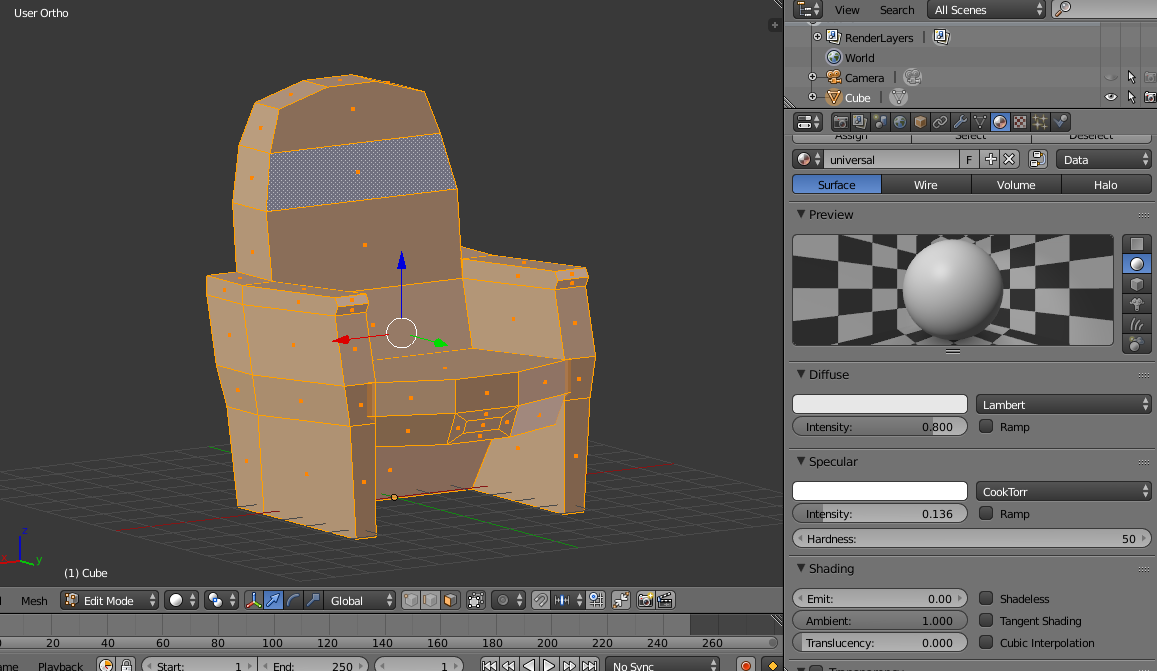
A lot of the model’s character comes out in the texturing. I like to keep textures really simple, just combinations of solid colors. The way I do it is with a single texture file that I gradually add to throughout a project. Each pixel is a color, so the texture is basically a palette.
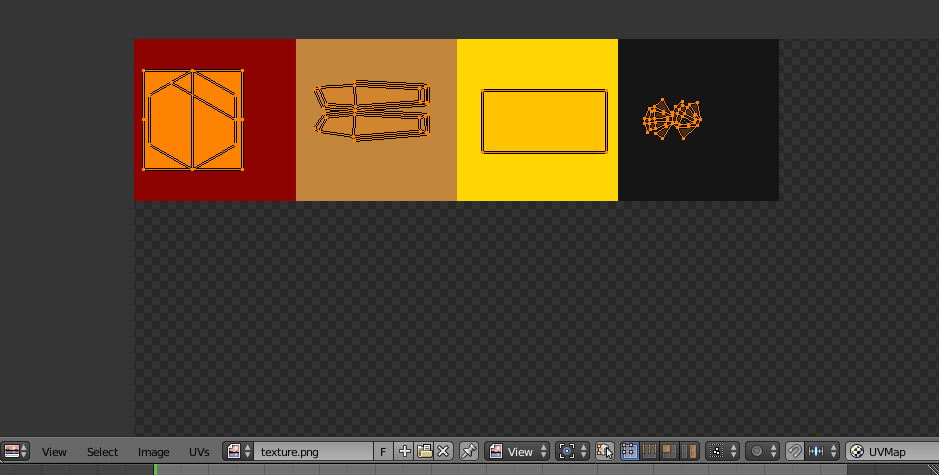
In Blender I just select the faces I want to have a particular color, use the default UV map unwrapping (while in Edit Mode, hit U and select Unwrap) and then in UV/Image Editor (with the texture file selected in the dropdown, see image below) I just drag the unwrapped faces onto the appropriate colors.
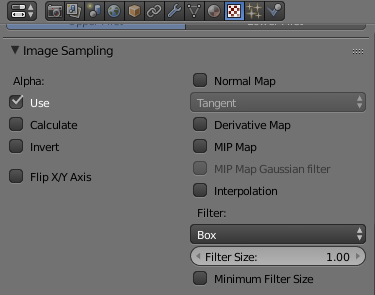
There is one thing you have to do to get this texture rendering properly. By default, Blender (like almost every other 3D program) will try to scale your textures.
In the texture properties window (select the red-and-white checker icon in the Properties window, see below), scroll down and expand the Image Sampling section. Uncheck MIP Map and Interpolation, then set Filter to Box (see below for the correct settings). This will stop Blender from trying to scale the texture and give you the nice solid color you want.

Here’s a Blender render of the outcome:

Exporting to Three.js
One of the best things about Three.js is that there is a Blender-to-Three.js exporter. Installation is pretty straightforward (described in the repo here).
To export a Blender object to JSON, select your object (in Object Mode) and select from the menu File > Export > Three (.json).
The export options can be a bit finicky, depending on what you want to export the model for. For a basic static model like this chair the following settings should work fine:
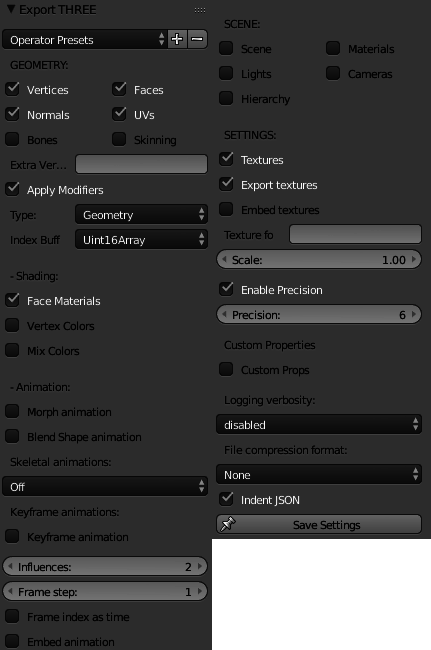
That’s all that Blender’s needed for.
Three.js
This next section involves a bunch of code. I won’t reproduce everything here (you can check out the repo to see the full working example) but I’ll highlight the important parts.
Loading the model
Three.js provides a JSONLoader class which is what loads the exported Blender model. You could just use that and be done with it, but there are a few modifications I make to the loaded model to get it looking right.
const meshLoader = new THREE.JSONLoader();
meshLoader.load('assets/theater_chair.json', function(geometry, materials) {
    // you could just directly use the materials loaded from JSON,
    // but I like to make sure I'm using the proper material.
    // we extract the texture from the loaded material and pass it to
    // the MeshLambertMaterial here
    var texture  = materials[0].map,
        material = new THREE.MeshLambertMaterial({map: texture}),
        mesh = new THREE.Mesh(geometry, material);

    // material adjustments to get the right look
    material.shininess = 0;
    material.shading = THREE.FlatShading;

    // basically what we did with blender to prevent texture scaling
    material.map.generateMipmaps = false;
    material.map.magFilter = THREE.NearestFilter;
    material.map.minFilter = THREE.NearestFilter;

    // increase saturation/brightness
    material.emissiveIntensity = 1;
    material.emissive = {r: 0, g: 0, b: 0};
    material.color = {
        r: 2.5,
        g: 2.5,
        b: 2.5
    };

    mesh.position.set(0,5,0);
    scene.add(mesh);
});
The above code won’t work until we create the scene. I like to bundle the scene-related stuff together into a Scene class:
class Scene {
    constructor(lightColor, groundColor, skyColor, fogColor, fogDistance) {
        this.camera = new THREE.PerspectiveCamera(75, window.innerWidth / window.innerHeight, 1, 1000);
        this.scene = new THREE.Scene();
        this.scene.fog = new THREE.Fog(fogColor, 0, fogDistance);
        var light = new THREE.HemisphereLight(lightColor, 0x777788, 0.75);
        light.position.set(0.5, 1, 0.75);
        this.scene.add(light);

        // setup floor
        var geometry = new THREE.PlaneGeometry(2000, 2000, 100, 100);
        geometry.rotateX(-Math.PI/2);
        var material = new THREE.MeshLambertMaterial({color: groundColor});
        var mesh = new THREE.Mesh(geometry, material);
        this.scene.add(mesh);

        this.renderer = new THREE.WebGLRenderer();
        this.renderer.setClearColor(skyColor);
        this.renderer.setPixelRatio(window.devicePixelRatio);
        this.renderer.setSize(window.innerWidth, window.innerHeight);
        document.body.appendChild(this.renderer.domElement);

        window.addEventListener('resize', this.onWindowResize.bind(this), false);
    }

    render() {
        requestAnimationFrame(this.render.bind(this));
        this.renderer.render(this.scene, this.camera);
    }

    add(mesh) {
        this.scene.add(mesh);
    }

    onWindowResize() {
        this.camera.aspect = window.innerWidth/window.innerHeight;
        this.camera.updateProjectionMatrix();
        this.renderer.setSize(window.innerWidth, window.innerHeight);
    }
}
It can be used like this:
var scene = new Scene();
scene.render();
And the previous code for loading the chair should place the chair into the scene.
First-person interaction
So far you won’t be able to look or walk around the scene, so we need to add some first-person interaction. There are two components to this:
- movement (when you press
WASDor the arrow keys, you move forward/backwards/left/right) - looking around (when you move the mouse)
Movement
In the Scene class the onKeyDown and onKeyUp methods determine, based on what keys you press and release, which direction you should move in. The render method includes some additional code to check which directions you’re supposed to be moving in and adds the appropriate velocity.
The velocity x value moves you right (positive) and negative (negative), the y value moves you up (positive) and down (negative), and the z value moves you forward (negative) and backwards (positive). It’s important to note that the z value is negative in the forward direction because this confused me for a while.
We also keep track of how much time elapsed since the last frame (delta) so we scale the velocity appropriately (e.g. if the last frame update was 0.5s ago, you should move only half as far as you would if it had been 1s ago).
You’ll notice that you can walk through objects which is probably not what you want…we’ll add simple collision detection later to fix this.
Looking around
The key to looking around is the browser’s pointer lock API. The pointer lock API allows you to capture your mouse cursor and its movement.
I’d never done this before, but the Three.js repo includes an example that shows the basic method. So I gutted that and moved the important bits into the Scene class. The full code is available here), but I’ll explain some of it here.
In the Scene class the important method is setupPointerLock, which sets up the pointer lock event listeners. It is pretty straightforward, but basically: there’s an instructions element that, when clicked on, locks the pointer and puts the game into fullscreen.
The onPointerLockChange method toggles the pointer lock controls, so that the controls are only listening when the pointer lock is engaged.
The meat of the actual pointer movement is handled in PointerLock.js. This is directly lifted from the Three.js example implementation. It’s also pretty sparse; it adjusts the yaw and pitch of the camera according to how you move your mouse.
We have to properly initialize these controls though. In the Scene’s constructor the following are added:
    // ...
    this.controls = new THREE.PointerLockControls(this.camera);
    this.scene.add(this.controls.getObject());
    // ...
Collision detection
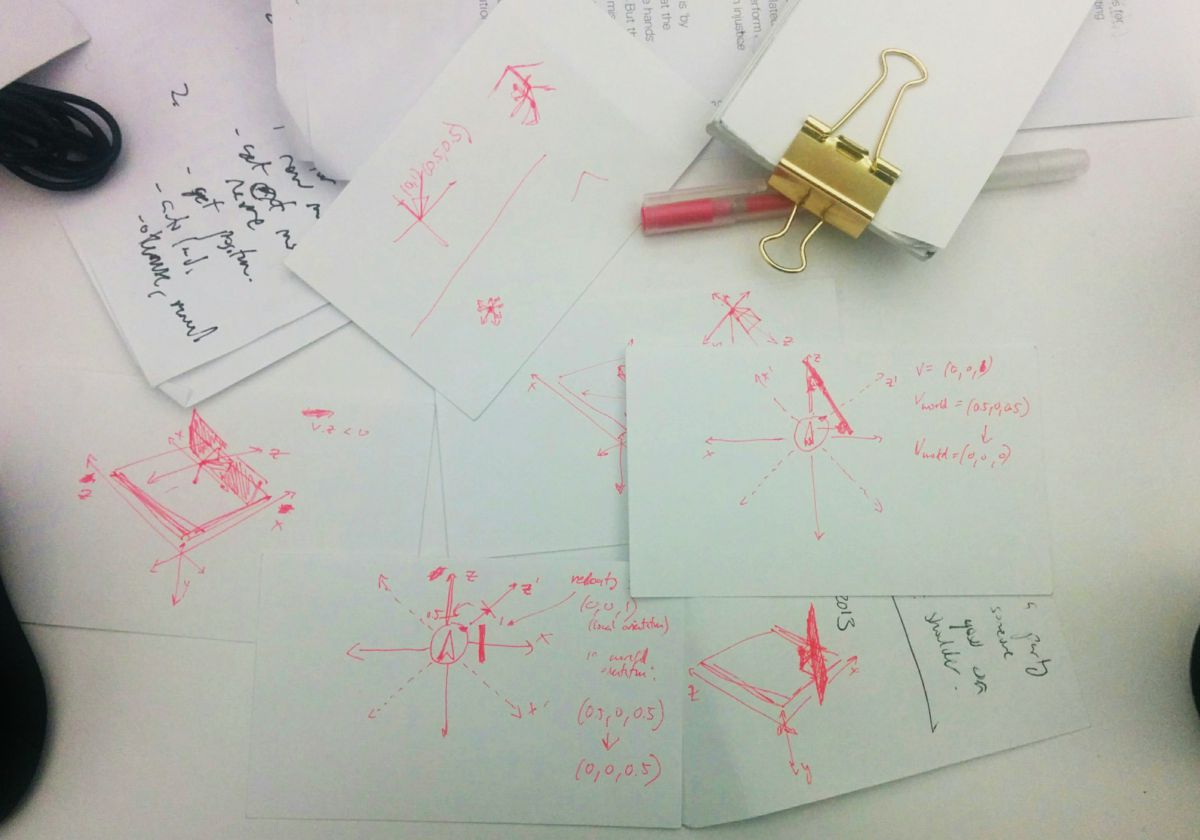
So the last bit here is to prevent the player from walking through stuff. I have a terrible intuition about 3D graphics so this took me way too long. Below are some of my scribbles from trying to understand the problem.
The basic approach is to use raycasting, which involves “casting” a “ray” out from a point in some direction. Then you can check if this ray intersects with any objects and how far away those objects are.
Below are an example of some rays. For example, the one going in front of the object points to (0,0,1). That sounds like it contradicts what I said earlier about the front of the object being in the negative-z direction…it doesn’t quite. This will become important and confusing later.

The rays that I’m using are:
const RAYS = [
  new THREE.Vector3( 0,  0, -1), // back
  new THREE.Vector3( 1,  0, -1), // back-right
  new THREE.Vector3(-1,  0, -1), // back-left
  new THREE.Vector3( 0,  0,  1), // forward
  new THREE.Vector3( 1,  0,  1), // forward-right
  new THREE.Vector3(-1,  0,  1), // forward-left
  new THREE.Vector3( 1,  0,  0), // right
  new THREE.Vector3(-1,  0,  0), // left
  new THREE.Vector3( 0, -1,  0), // bottom
];
Note that the comments in the example on GitHub are incorrect (they have right and left switched…like I said, this was very confusing for me).
Every update we cast these rays and see if they intersect with any objects. We check if those objects are within some collision distance, and if they are, we zero out the velocity in that direction. So, for instance, if you’re trying to move in the negative-z direction (forward) and there’s an object in front of you, we have to set velocity.z = 0 to stop you moving in that direction.
That sounds pretty straightforward but there’s one catch - the velocity is relative to where you’re facing (i.e. the player’s axis), e.g. if velocity.z is -1 that means you’re moving in the direction you’re looking at, which might not be the “true” world negative-z direction.
These rays, unlike velocity, are cast in directions relative to the world axis.
This might be clearer with an example.
Say you’re facing in the positive-x direction (i.e. to the right). When you move forward (i.e. press W), velocity.z will be some negative value and velocity.x will be zero (we’ll say your velocity is (0,0,-1)). This is because according to your orientation, “forward” is always negative-z, even though in the context of the world your “forward” is technically positive-x. Your positive-x (your right) is in the world’s negative-z direction (see how this is confusing??).
Now let’s say an object is in front of you. Because our raycasters work based on the world context, it will say there’s an obstacle in the positive-x direction. We want to zero-out the velocity in that direction (so you’re blocked from moving in that direction). However, we can’t just zero-out velocity.x because that does not actually correspond to the direction you’re moving in. In this particular example we need to zero-out velocity.z because, from your perspective, the obstacle is in front of you (negative-z direction), not to your right (positive-x direction).

The general approach I took (and I’m not sure if it’s particularly robust, but it seems ok for now) is to take your (“local”) velocity, translate it to the world context (i.e. from our example, a velocity of (0,0,-1) gets translated to (1,0,0)). Then I check the raycasters, apply the velocity zeroing-out to this transformed (“world”) velocity (so if there is an obstacle in the positive-x direction, I zero out the x value to get a world velocity of (0,0,0)), then re-translate it back into the local velocity.
Ok, so here’s how this ends up getting implemented.
First I add the following initialization code to the Scene’s constructor:
    // ...
    this.height = 10;
    this.collidable = [];
    this.collisionDistance = 15;
    this.raycaster = new THREE.Raycaster(new THREE.Vector3(), new THREE.Vector3(0, -1, 0), 0, this.height);
    // ...
Whenever you add a mesh and the player shouldn’t be able to walk through it, you need to add that mesh to this.collidable.
Then I add a detectCollisions method onto the Scene class:
detectCollisions() {
    // the quaternion describes the rotation of the player
    var quaternion = this.controls.getObject().quaternion,
        adjVel = this.velocity.clone();

    // don't forget to flip that z-axis so that forward becomes positive again
    adjVel.z *= -1;

    // we detect collisions about halfway up the player's height
    // if an object is positioned below or above this height (and is too small to cross it)
    // it will NOT be collided with
    var pos = this.controls.getObject().position.clone();
    pos.y -= this.height/2;

    // to get the world velocity, apply the _inverse_ of the player's rotation
    // effectively "undoing" it
    var worldVelocity = adjVel.applyQuaternion(quaternion.clone().inverse());

    // then, for each ray
    _.each(RAYS, (ray, i) => {
      // set the raycaster to start from the player and go in the direction of the ray
      this.raycaster.set(pos, ray);

      // check if we collide with anything
      var collisions = this.raycaster.intersectObjects(this.collidable);
      if (collisions.length > 0 && collisions[0].distance <= this.collisionDistance) {
        switch (i) {
          case 0:
            // console.log('object in true back');
            if (worldVelocity.z > 0) worldVelocity.z = 0;
            break;
          case 1:
            // console.log('object in true back-left');
            if (worldVelocity.z > 0) worldVelocity.z = 0;
            if (worldVelocity.x > 0) worldVelocity.x = 0;
            break;
          case 2:
            // console.log('object in true back-right');
            if (worldVelocity.z > 0) worldVelocity.z = 0;
            if (worldVelocity.x < 0) worldVelocity.x = 0;
            break;
          case 3:
            // console.log('object in true front');
            if (worldVelocity.z < 0) worldVelocity.z = 0;
            break;
          case 4:
            // console.log('object in true front-left');
            if (worldVelocity.z < 0) worldVelocity.z = 0;
            if (worldVelocity.x > 0) worldVelocity.x = 0;
            break;
          case 5:
            // console.log('object in true front-right');
            if (worldVelocity.z < 0) worldVelocity.z = 0;
            if (worldVelocity.x < 0) worldVelocity.x = 0;
            break;
          case 6:
            // console.log('object in true left');
            if (worldVelocity.x > 0) worldVelocity.x = 0;
            break;
          case 7:
            // console.log('object in true right');
            if (worldVelocity.x < 0) worldVelocity.x = 0;
            break;
          case 8:
            // console.log('object in true bottom');
            if (worldVelocity.y < 0) worldVelocity.y = 0;
            break;
        }
      }
    });

    // re-apply the player's rotation and re-flip the z-axis
    // so the velocity is relative to the player again
    this.velocity = worldVelocity.applyQuaternion(quaternion);
    this.velocity.z *= -1;
}
This is working for me so far. The code can probably be more concise and I suspect there’s a much more direct route (involving matrix multiplication or something) to accomplish this. But I can wrap my head around this approach and it makes sense :)