Specifically for Linux. I’m using Ubuntu 22.04 and Unity 2021.3.22f1, with nvim-lspconfig.
This was a pretty heinous setup process, so I’m documenting this here to help others who want something similar. The actual setup process isn’t too bad, but figuring out all the individual steps was difficult. I came across a few guides but some were out of date, or were geared towards Windows, or just didn’t work for me.
I should also caveat that I’m writing this shortly after I got this setup working, so I may run into other issues with it once I start developing with it more. For example, there might be issues with new files. If I run into those problems and manage to solve them I’ll update this post.
mono; but crucially not the one from the default package repos. You need to use their official repo; then install: apt install mono-devel mono-complete.
The default Ubuntu package repo version doesn’t include MSBuild so unless you use the official mono repo you’ll get errors like “Could not locate MSBuild instance to register with OmniSharp.” when running omnisharp-roslyn.
The process:
Download a release of omnisharp-roslyn (as mentioned above, I’m using v1.39.6). Extract it somewhere–for me, this was /opt/omnisharp-roslyn. The run file in that directory is what will start the LSP server.
Configure nvim. For me this all goes in ~/.vim/plugin/nvim-lsp.vim, but you can change that to match your own preference. I’m including the whole file but the key parts are what follows -- Omnisharp/C#/Unity. You must specify the path to the omnisharp-roslynrun script.
lua << EOF
localnvim_lsp =require('lspconfig')
-- Use an on_attach function to only map the following keys
-- after the language server attaches to the current buffer
localon_attach =function(client, bufnr)
localfunctionbuf_set_keymap(...) vim.api.nvim_buf_set_keymap(bufnr,...)endlocalfunctionbuf_set_option(...) vim.api.nvim_buf_set_option(bufnr,...)end-- Omnicompletionbuf_set_option('omnifunc','v:lua.vim.lsp.omnifunc')localopts={noremap=true,silent=true }buf_set_keymap('n','gD','<cmd>lua vim.lsp.buf.declaration()<CR>',opts)buf_set_keymap('n','gd','<cmd>lua vim.lsp.buf.definition()<CR>',opts)buf_set_keymap('n','gi','<cmd>lua vim.lsp.buf.implementation()<CR>',opts)buf_set_keymap('n','K','<cmd>lua vim.lsp.buf.hover()<CR>',opts)buf_set_keymap('n','<C-k>','<cmd>lua vim.lsp.buf.signature_help()<CR>',opts)buf_set_keymap('n','[d','<cmd>lua vim.diagnostic.goto_prev()<CR>',opts)buf_set_keymap('n',']d','<cmd>lua vim.diagnostic.goto_next()<CR>',opts)buf_set_keymap('n','gR','<cmd>lua vim.lsp.buf.references()<CR>',opts)end
-- Omnisharp/C#/Unity
localpid =vim.fn.getpid()
localomnisharp_bin ="/opt/omnisharp-roslyn/run"
require'lspconfig'.omnisharp.setup{on_attach=on_attach,flags={debounce_text_changes= 150,},cmd={omnisharp_bin,"--languageserver","--hostPID",tostring(pid)};
}
EOF
Then we need to generate the .sln and .csproj files for our Unity project. There are two ways to do this:
Almost every other guide to this setup says you need to install Visual Studio Code to do this. This then requires that you go into your Unity project, go to Edit > Preferences > External Tools, then set Visual Studio Code to be your External Script Editor. Finally, check all the boxes for Generate .csproj files for:, then press Regenerate project files. This will work, and it’s what I tried first.
The alternative, which I found here, is to run /opt/Unity/2021.3.22f1/Editor/Unity -batchmode -nographics -logFile - -executeMethod UnityEditor.SyncVS.SyncSolution -projectPath . -quit in your project root folder (note that /opt/Unity/2021.3.22f1/Editor/Unity is just where I installed the Unity Editor, so change that to point to your location). This will also work, and appears to work without installing VSCode. The only annoying bit is that a project can only be opened by one instance of the editor at a time, so this won’t work if you already have your project open. Perhaps there’s a way to call it from within Unity?
Finally, one issue I had was that for some reason Assembly-CSharp.csproj wasn’t generated. This led to the Unity framework not being picked up by omnisharp, with errors like “The type or namespace name ‘UnityEngine’ could not be found”. This solved itself by creating a new C# file, e.g. Assets/Foo.cs and then refreshing the project files in the Unity Editor (which I guess causes Unity to compile the scripts and then generate this missing file). No idea if this is necessary though.
Lastly, the LSP server is slow to start up on my machine. Something like 30 seconds. For Rust and TypeScript development I use this plugin, which gives me progress on those LSP servers’ startups, but unfortunately it doesn’t yet work for omnisharp.
NB: Just a couple debugging tips if this doesn’t totally work for you: :LspInfo and :LspLog from within nvim can help you figure out what might be going wrong.
Godot 4 was recently released and brings with it many improvements to GDScript (thankfully addressing most of my pain points with the language), better performance, and several other changes that I can’t yet appreciate. Because the game code is still pretty basic I figured it’d be worthwhile to just migrate to Godot 4 now. It ended up being a good opportunity to refactor some things now that I have a clearer idea of what systems need to be included.
Semi-related to this refactor: I’ve decided to first work on a smaller demo/prototype called Gliss (for glissando) to test out mechanic ideas and the overall development process. The hope is to flesh out all the game designs and systems and then Fugue will just a bigger version with few, if any, new systems & mechanics. My ideal outcome is that Gliss establishes the framework, and the expanding it into Fugue is mostly a matter of authoring more content–characters, locations, etc.
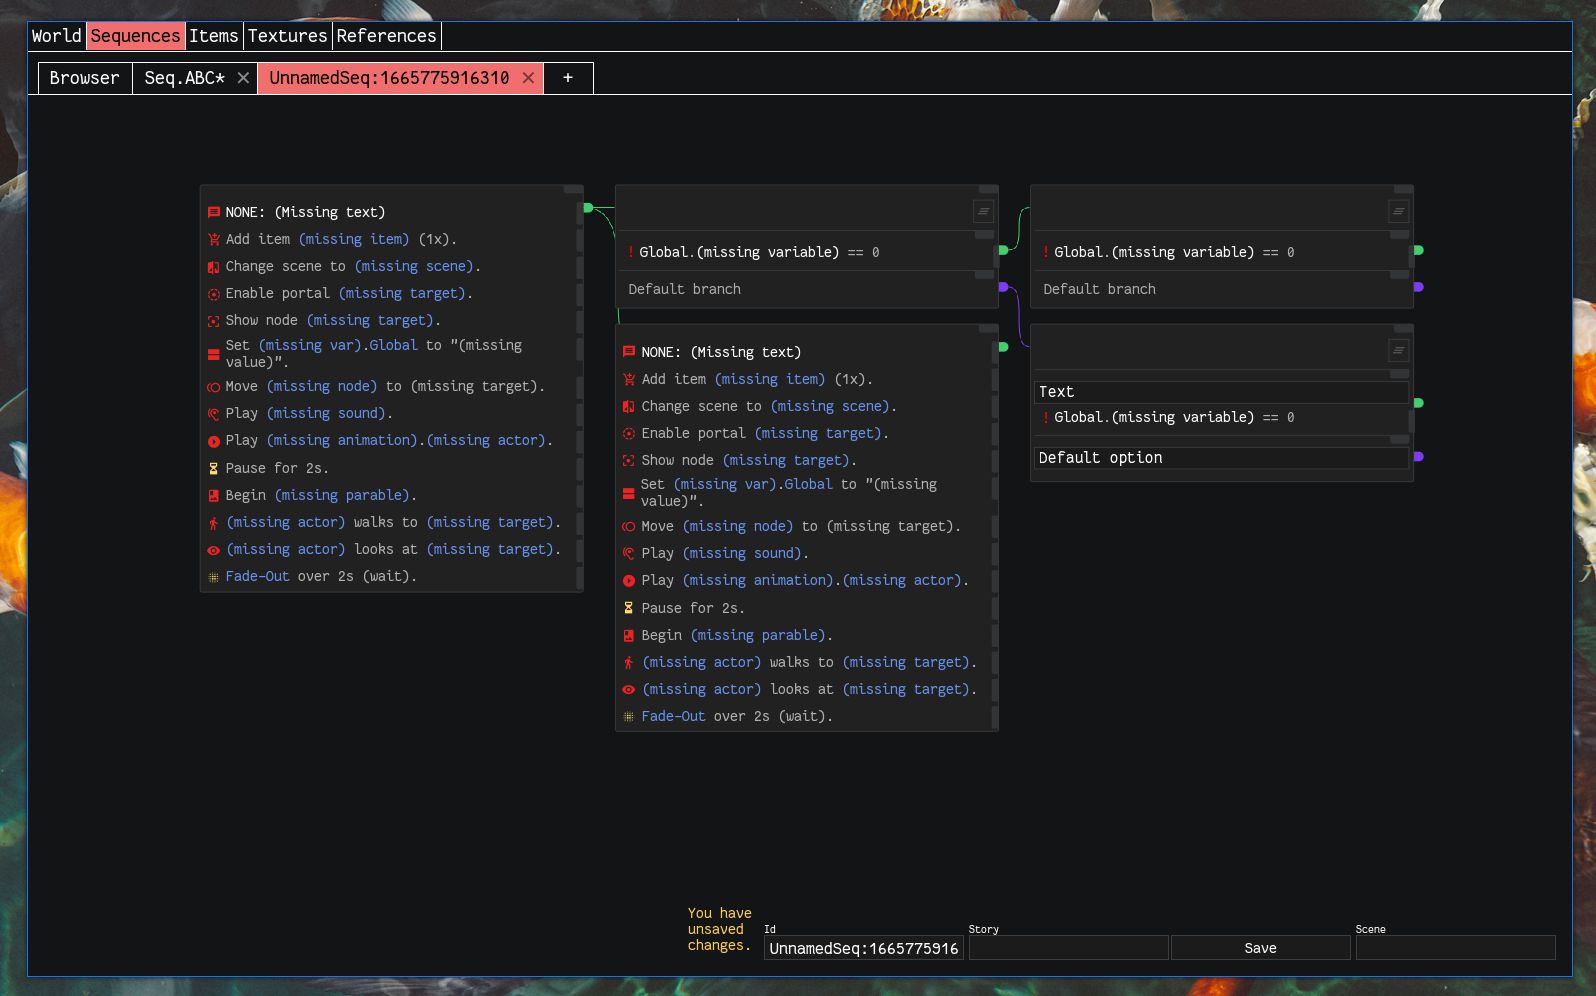
Overhauling the Sequence Editor (verses)
As I was starting to write out more sequence scripts I found the existing editor (below) to be clunky. And when I need to define new script actions (such as skill checks, more on that below), it requires a lot of lift to define the new frontend components and inputs. Just super unwieldy.
The now old sequence editor
I revisited an idea which was to define a special plain-text format for sequence scripts. I never pursued it because I was daunted by the prospect of writing my own custom parser…but I had to do that anyway to parse Godot’s .tscn files, so what’s one more parser?
The process of writing the parser with nom actually wasn’t too bad. The trickiest/most frustrating bits were dealing with error handling (just haven’t fully grokked error handling in Rust in general) and handling recursive parsing (couldn’t figure out a good approach for that and ended up just putting a fixed limit on recursion depth). But otherwise once you get a handle on the combinators (especially with their indispensable guide) the whole effort becomes intuitive.
I also implemented script validation which checks for common issues like requesting nodes or entities that don’t exist in a given scene, or referencing files that don’t exist, or bad sequence script structure (orphaned nodes, invalid branching, etc), and even typos. The goal is to have some assurance that there will be minimal runtime sequence errors.
The end result is verses, a custom Rust crate/program for parsing and validating gliss/fugue sequence script files. This program can be used to parse scripts to JSON (to import them into Godot as custom resources), and the previous hundun sequence editor (pictured above) is now a relatively thin UI on top of it:
The new sequence editor
Now the script is just written in the editor on the left and the parsed sequence graph is displayed on the right. Validation happens live. Now the process of writing sequence scripts is less stop-and-go, more fluid than before. It also means that if I need to quickly edit a script file I can do it easily with a text editor.
The text editor itself is made with CodeMirror, which is an intimidatingly powerful editor library. Here I’ve set it up to have custom syntax highlighting and custom autocomplete, which lets me autocomplete, for example, actor names.
The Skill Check System
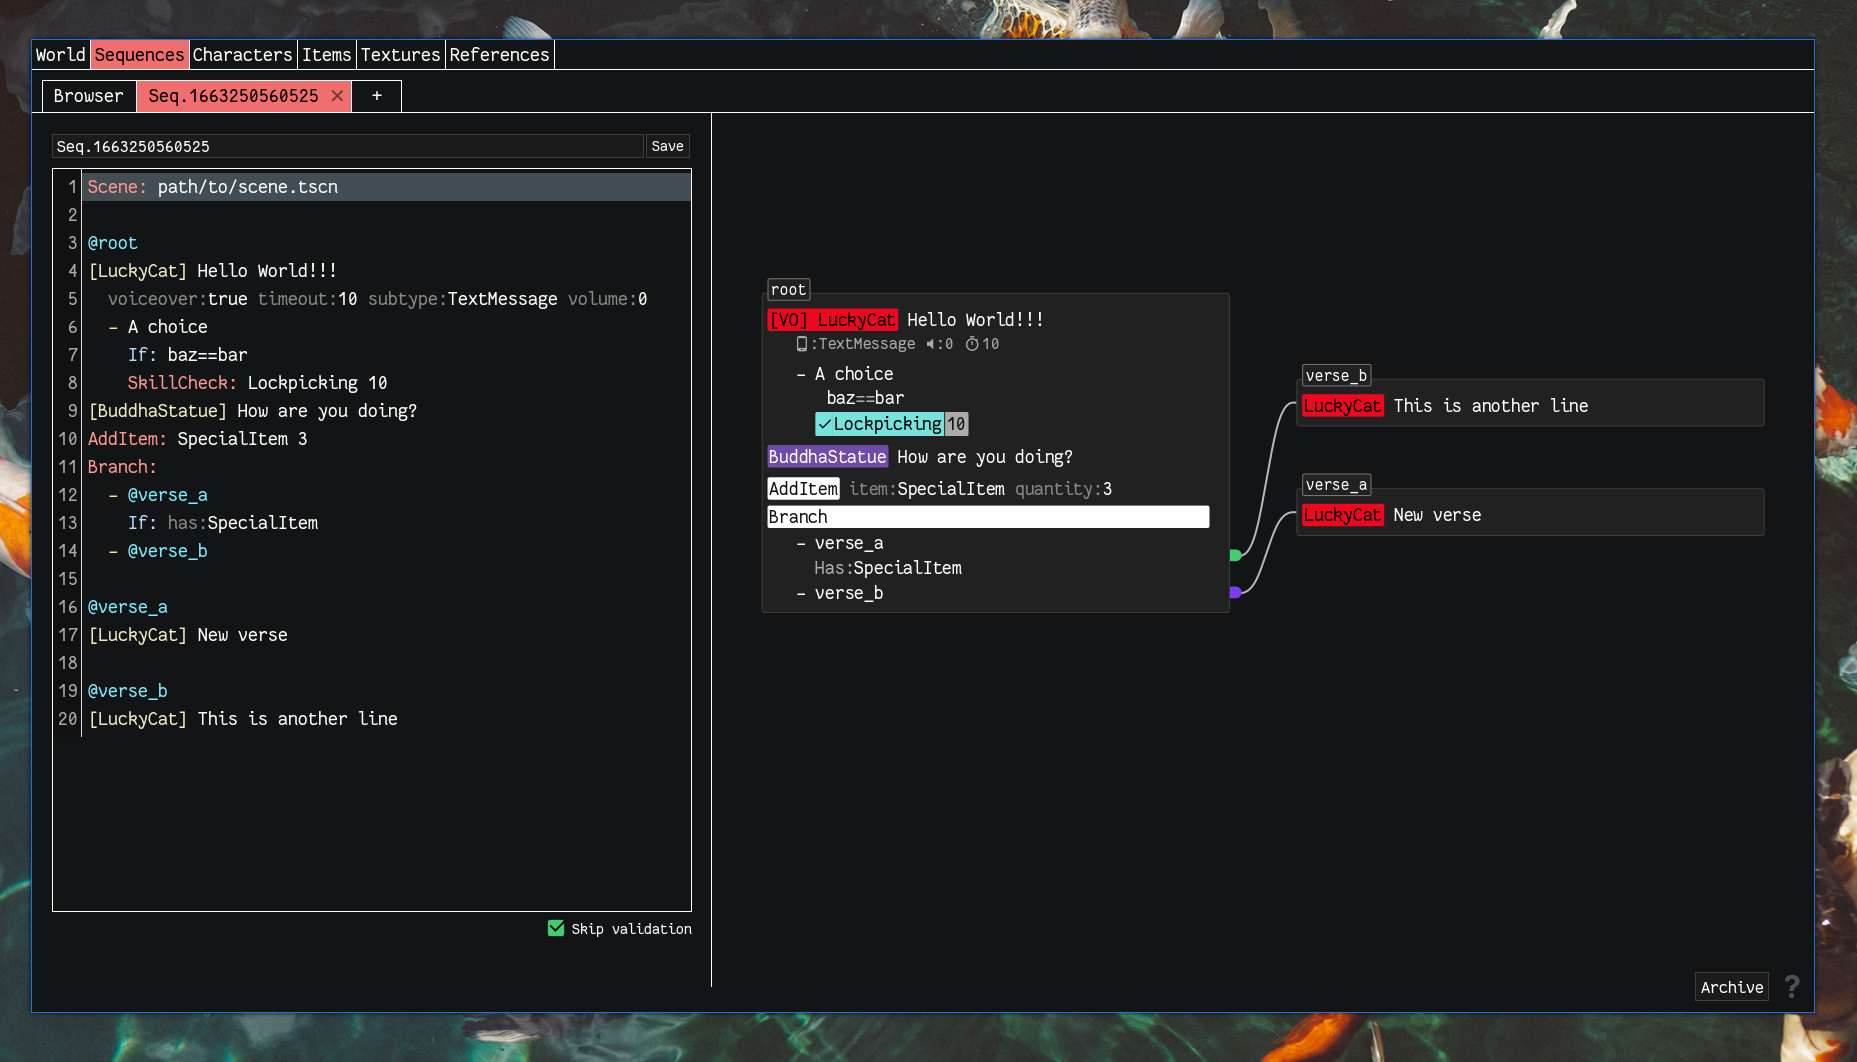
I began working out the skill check system–the raw skill check mechanic itself is very straightforward, just compare the skill level and difficulty and roll to see if you succeed. I designed the actual rolling algorithm to be visualizable, so you’re not just seeing your odds and then the result. Instead, a rough summary is that the skill difficulty sets a number of successful flips you have to achieve, and your skill level determines how many tries you have. So for a skill level of 3 you get 3 tries. Each try lasts until it fails, so it is possible to succeed at a challenge of difficulty 4, even with just a skill level of 3. The probability of a successful flip is tuned to produce the following overall skill check success probabilities (i.e. each flip is not 50/50):
Skill check probabilities
This chart is kind of confusing, but each line represents a different skill level. For example, say the skill is “Lockpicking”. Say your skill level at that is 3 (s=3). You have about a 100% chance of succeeding at any skill check with a difficulty less than 3. You have a very good chance for difficulty of 3 and about a 60% chance for a difficulty of 4.
I’m hoping that the modifiers will be where this system gets more interesting. The modifiers themselves are just straightforward increases/decreases to skill levels, but I want them to be organized in a way that 1) requires interesting character build decisions (through skill progression) and 2) reflects a character’s beliefs about and experiences in the world (that is, characters don’t just mindlessly/mechanically get better at lockpicking; rather, as they get better it changes how they see the world; and how they see the world affects their proficiencies in certain skills).
I need to think more on 1), but the general idea is that each skill has one or two underlying “proficiencies” that are shared with other skills. For example the two proficiencies for “Lockpicking” might be “Hand-Eye Coordination” (which also underlies the “Medical” skill) and “Puzzle-Breaking” (which also underlies the “Digital Evasion” skill). At the 3rd and 5th skill levels you can pick which of the two proficiencies to take a bonus in (a more expansive build), or you can pick a perk (e.g. you get one free lockpicking attempt without using a lockpick, for a more specialized build). This isn’t all that different from typical skill systems.
Whereas 1) are intentional decisions the player makes, 2) reflects playstyle patterns, and so is more indirect. If a character frequently uses intimidation actions, or frequently witnesses them, they may pick up an “insight” of “Violence is the Answer”, which gives bonuses to violence-related skill checks and penalizes non-violent ones. If they are constantly lockpicking and hacking, they may pick up the “Security is a Fiction” insight, which buffs these skills, but the anxiety of this realization means they stress more easily (which connects to the Energy mechanic, which I’m still working out).
Refactoring chargen into clay
What I’m working on now is refactoring the character generation system (formerly chargen) into a separate crate called clay. This is to also streamline some things as with verses, e.g. make it easier to quickly edit characters and bulk generate large amounts of them. hundun will again be mostly just the UI on top and not handle the actual character generation logic.
Next steps
Finish porting clay
Figure out the character export/import into Godot workflow (running into some root motion issues here)
Re-implement sequence script importing using verses
Implement skill check mechanic for testing
Continue developing the core mechanics (e.g. the Energy mechanic)
Food in Mexico, Junji Ito’s new show, apocalyptic 90’s violence, and radioactive whetstones.
Food in Mexico
Kira and I just returned from Mexico (Oaxaca and Mexico City) for a wedding (which was wonderful) and I got to try many foods I’ve never had before. Some of the highlights:
Nanche
Nanche
but only in raspados (a kind of shaved ice) form, where the fruits themselves were suspended in a kind of syrup. The syrup tasted overwhelmingly like butterscotch candies, not so much like Werthers but like the kinds that would come in unlabeled gold reflective foil and be more of a translucent yellow than a solid creamy brown. The fruit itself had some of that butterscotch taste but also tasted a bit like an Asian pear mixed with haw.
Tepache
Tepache is now fairly common as a canned beverage throughout bodegas throughout New York. I’ve only ever had it from a can. This version here had a much stronger molasses taste, and more of a pungent fermented flavor. It might have been a little alcoholic, which is probably absent in the canned versions.
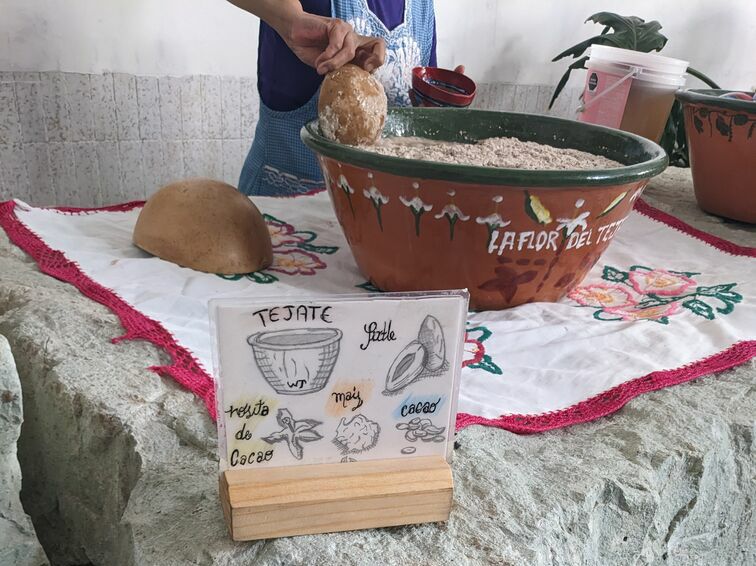
Tejate
Tejate, which is a maize-cacao concoction that also includes pixtle, which I’d never heard of before. Had a nice foamy top and was very easy to drink.
Unknown herb
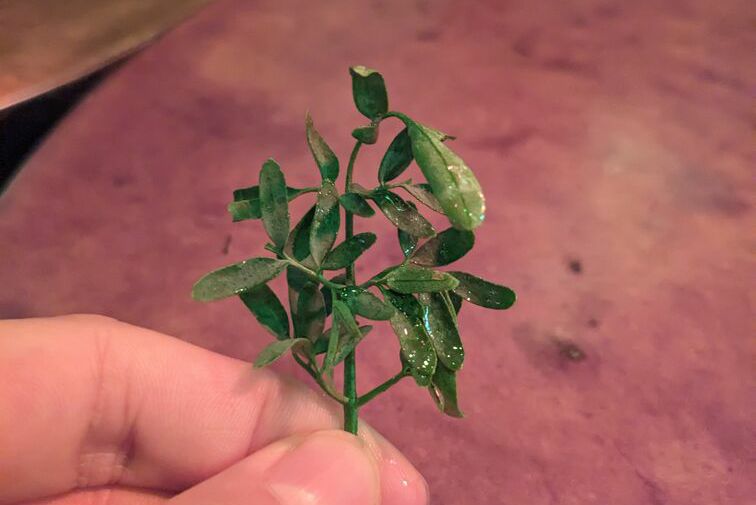
I have no idea what this herb is, but it was a garnish on top of a lime soda I’d ordered. It was bitter and tasted like a combination of artificial chocolate scent (scratch-and-sniff chocolate), artificial peach (like the Haribo gummies), and bubble gum (but like those small Bazooka bubble gums when the flavor is almost all gone and it’s getting difficult to chew). It was interesting at first but quickly became too overwhelming.
Another herb was pápalo, which came on top of a cemita we had. I don’t remember much about how it tasted except that it was kind of like cilantro, but stronger. Separately I also had chepiche as a garnish for a tlayuda, which tasted like an even stronger version of cilantro.
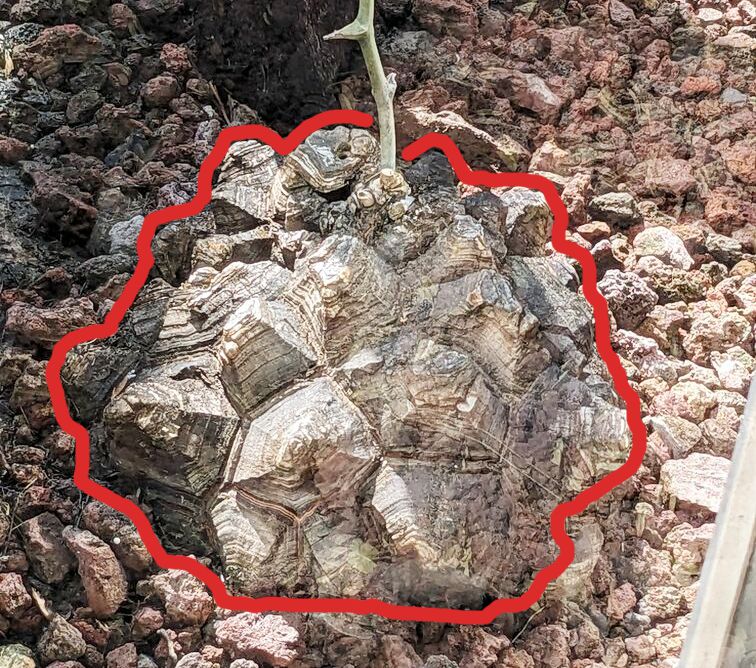
Mexican yam
I didn’t get to try “Mexican yam” but they are unique-looking plants. This one kind of looks like a katamari. It’s hard to discern its silhouette against the backdrop of rocks so I outlined it.
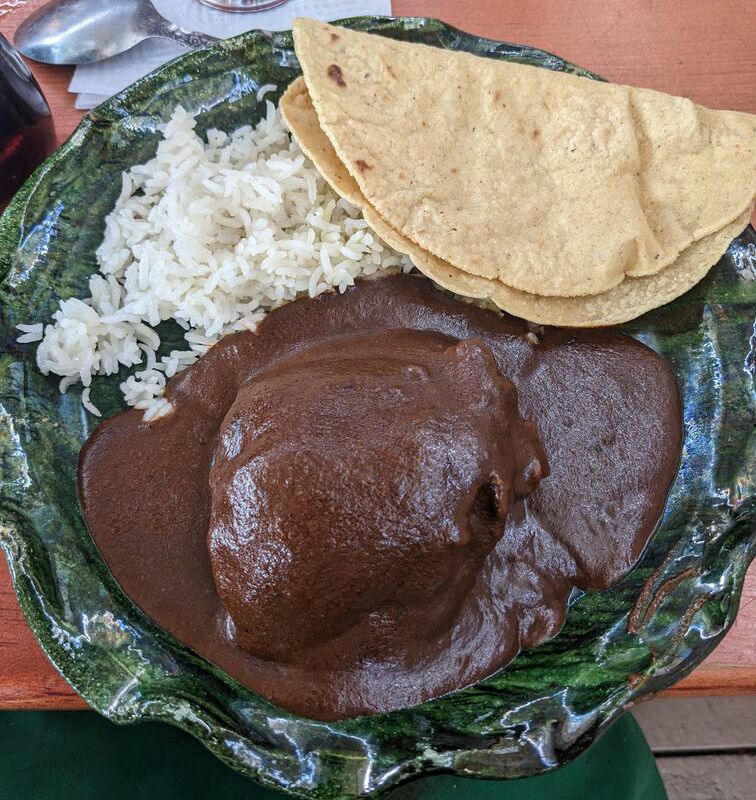
Homemade mole coloradito
Lastly, Kira signed us up for an amazing cooking class where we learned to make this delicious mole coloradito (among other things).
Junji Ito Maniac: Tales of the Macabre
I love Junji Ito’s work but this new anthology series missed the mark. Part of the horror of his work is his grievously detailed illustrations and how he frames the key moment of climactic terror. You’re drawn to linger on the page and absorb each stroke of his line work. But you can’t really linger in an anime, and so the impact of each horrific turn is totally dampened. And the stories often end very abruptly. I didn’t end up finishing it.
The only adaptation of Junji Ito’s that I’ve liked is World of Horror, which I talked about back in 2021. Considering this show, it might be because that game more closely emulates Ito’s style.
Apocalyptic Violence in the 90’s
Waco
Listening to Mother Country Radicals made me curious about the similar patchwork of radical activity in the 90s. I vaguely remember hearing about the Oklahoma City Bombing and references to Waco growing up but not really learning much about it. This 1999 masters thesis, “Political Violence in the United States: Apocalyptic Typologies of Left and Right Wing Political Groups and Their Violence through the Period 1990-1997” (by Gordon Daniel Green), gives an overview of the period from the framework of “apocalyptic” (aka millenarian) movements–i.e. movements that foresaw an impending major shift around which urgent action needed to happen. In particular the imminence of the shift called for violent action (as opposed to e.g. mass political campaigns), and these actions were carried out in small groups. On the left this typology includes animal rights groups (the Animal Liberation Front), environmental groups (Earth Liberation Front, Earth First!), and anti-industrial/technology groups (Deep Ecology, the Unabomber); on the right this includes militia/patriot groups, the Rescue Movement (anti-abortion activism, the Army of God), and end-times religious groups (the Branch Davidians).
These groups tend to see the world as Manichean (good vs evil) and zero-sum (any win for the other side is necessary a loss for their side; i.e. there can be no mutual gains or victories or compromise), and motivated not by personal gain but by “a higher cause”.
The author leaves out groups focused on racism and/or anti-Semitism because they “differ from the above groups in the desired outcomes of their actions…although believing in a coming apocalyptic Race War…[they] do not seek to change the beliefs, ideology, or actions of the rest of society. They seek only to change those of white or ‘Aryan’ members of society. … A racist cannot change a black man to white, nor change a Jew into a Gentile”, though of course there’s overlap between the beliefs of these groups and the ones analyzed here.
I was struck by how these movements reflect some of the movements of the present: conspiracies around “internationalists” (“globalists” being the preferred term today), panic around “federal tyranny” and gun restrictions, paranoia around secret world governments trying to bring in the antichrist (QAnon-like), false flags (belief that the Oklahoma City Bombing was “the equivalent of the Reichstag fire that brought Hitler to power. The government is often seen as either having prior knowledge of the bombing…or direct involvement”), and so on. And of course many if not all of the same environmental and animal welfare concerns remain. Though I can’t remember seeing any major millenarian cults with apocalyptic predictions lately. And the way these groups are organized probably have changed a lot, but it reading this it feels like those changes are of a degree than of a kind (e.g. how quickly and far-reaching something like QAnon can be with social media). One major difference may be the increase in violence motivated not by a higher cause but by feeling personally slighted (male lone-wolf shooters)…though they are connected in a way, and maybe this is the extreme end of the “small group” organizational form (with a group size of one).
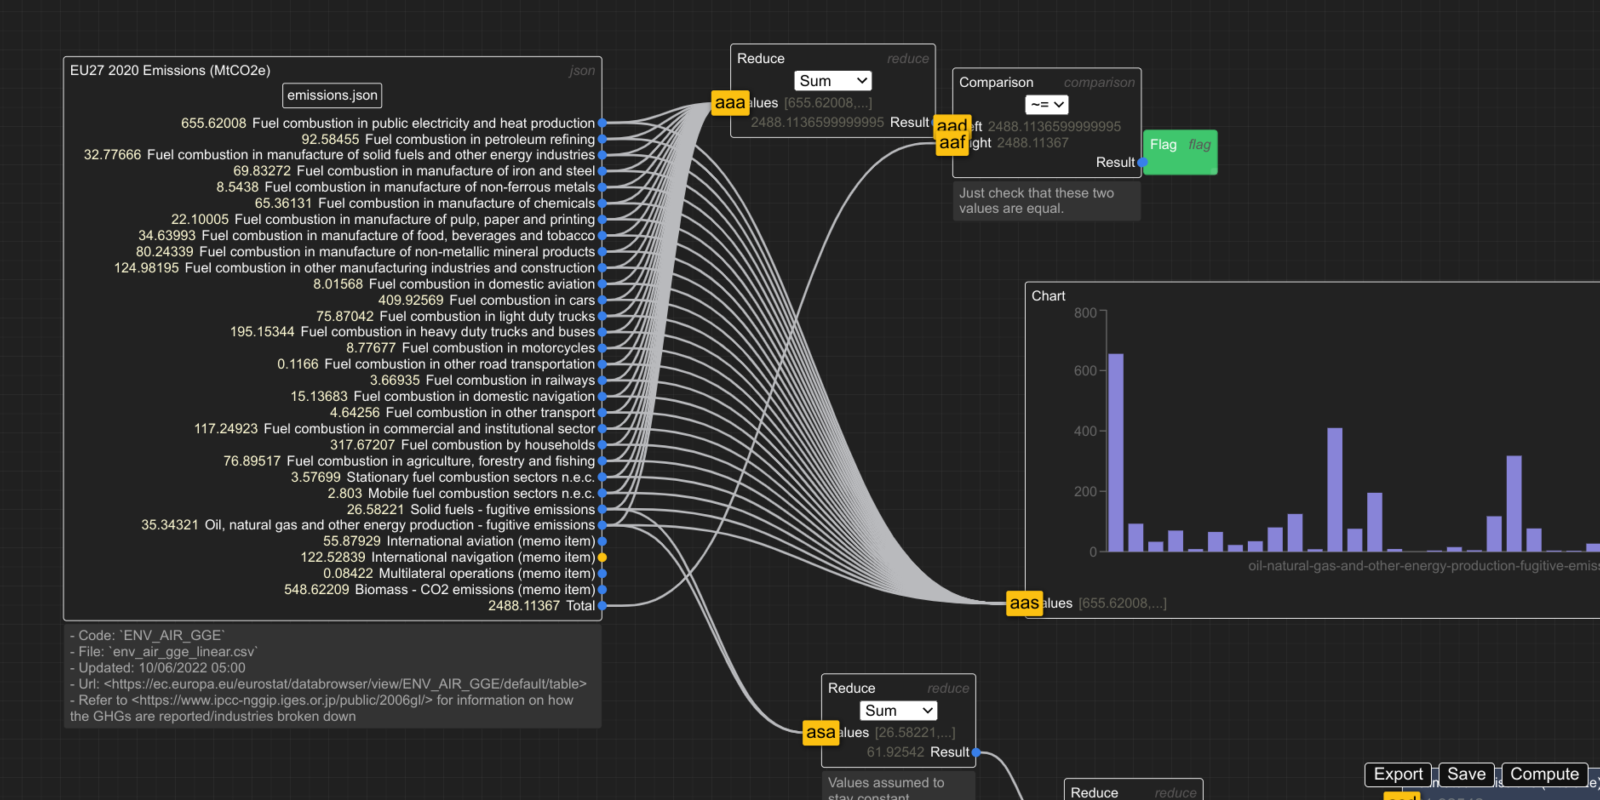
Graphical/node-based programming prototype
I sketched out a node-based programming tool (not the first time I’ve tried this…), in part to implement a feature I always felt was lacking in other visual programming tools. This feature is inspired by the various Firefox Vim addons (can’t remember exactly where I first encountered the feature, it was either Pentadactyl, Vimperator, or Vimium).
Quick-connect ports
In the screenshot above I have a port selected (“International navigation (memo item)”, highlighted in yellow). When a port is selected, candidate input ports are assigned a sequence of keystrokes to immediately connect the two ports. The keys are limited to asdf so you don’t have to move your hand from the home row to specify the target. Saves a lot of time of dragging your mouse and trying to target the correct port.
Radioactive whetstones
I was looking to pick up a new whetstone and found a couple reviewers notice that they were radioactive??
It sounds like it’s not something to worry about (and normal):
I’ve had to fix a few more issues with the character generation system, but also added some improvements.
One of the main problems was with the poly reduction (the Decimate modifier), which can make some interactions between clothing and the character body unpredictable. Basically when clothes is close to the body and you have the character in different animations/poses, sometimes the underlying body can clip through the clothes. If the clothes conform to the body’s geometry this is less of an issue because you won’t, for example, have pointy geometry that can poke through more rounded geometry.
The way MakeClothes handles this is with its delete groups, where you basically flag specific vertices to be deleted when wearing a particular clothing item. The underlying vertices are redundant because they’re covered by the clothes, and no vertices there means no clipping.
The Decimate modifier complicates this in two ways:
It may modify the body and clothing geometry in different ways, such that two surfaces that conformed are now shaped differently, so now the surface underneath may poke out through the surface above (consider that a smooth rounded surface has a higher poly count than a pointy pyramid-like surface; decimate converts these rounded surfaces into pointier ones.
It may modify the geometry such that delete groups end up deleting too much of the mesh.
So far these haven’t caused major problems; I’ve been able to solve them by adjusting delete groups or by slightly scaling up clothing/hair so there’s margin for pointy surfaces to stay concealed.
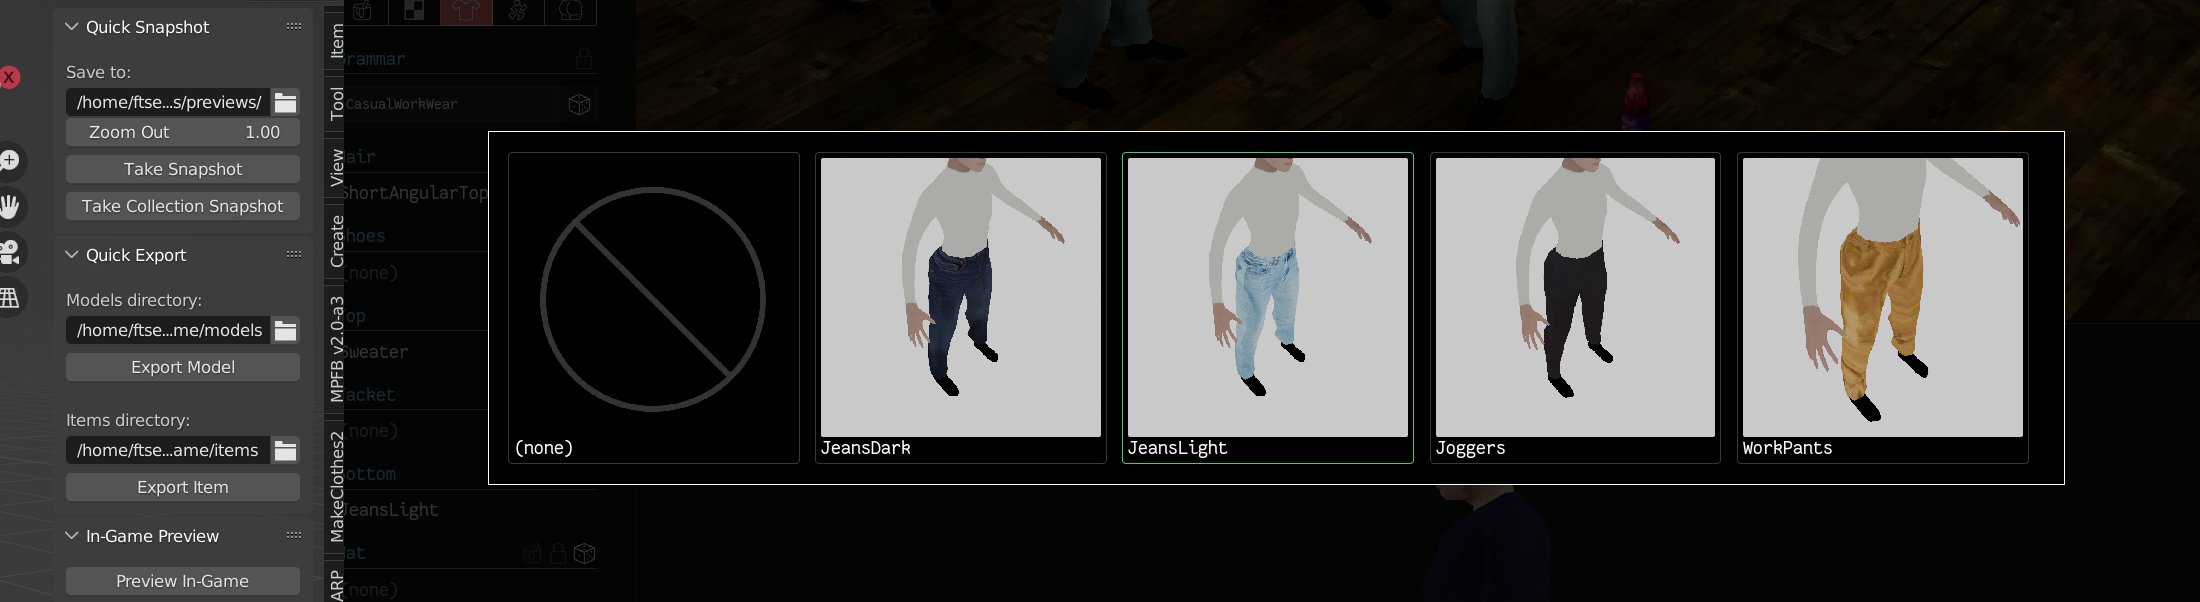
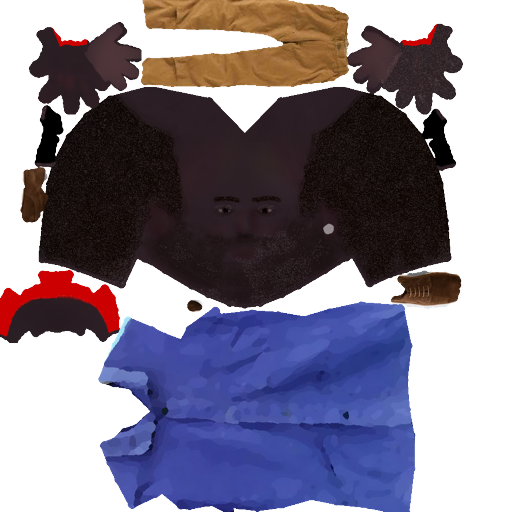
Aside from this I made a few minor quality-of-life improvements. I added a “Quick Preview” option which only converts the first frame of each character animation, cutting down character generation time by 30 seconds or so (really useful when tweaking things). I also added a way to generate clothing previews from within Blender and see them from within the character generator:
Clothes preview generation and picker
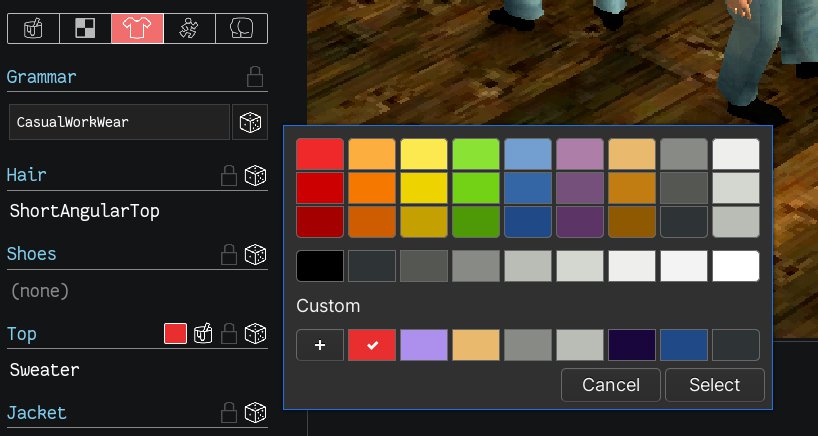
I also added a way to colorize clothing. Solid-colored clothes are made using a base forest green texture, (#1e3b2f), generated using the texture painting algorithm I described a few posts back:
Base solid color texture
In the UI you can pick a color and then that forest green is replaced in that texture:
Picking the color of clothes
This lets me squeeze a bit more mileage out of clothes meshes without needing to make different textures for every solid color I might want to use. The system is flexible enough that I can create more complicated textures that also use this system to re-colorize them, so long as they’re based around that same forest green.
And I finally figured out why my webpack builds were taking so long. They took anywhere from 5-10min for the initial build, now it’s just a few seconds1.
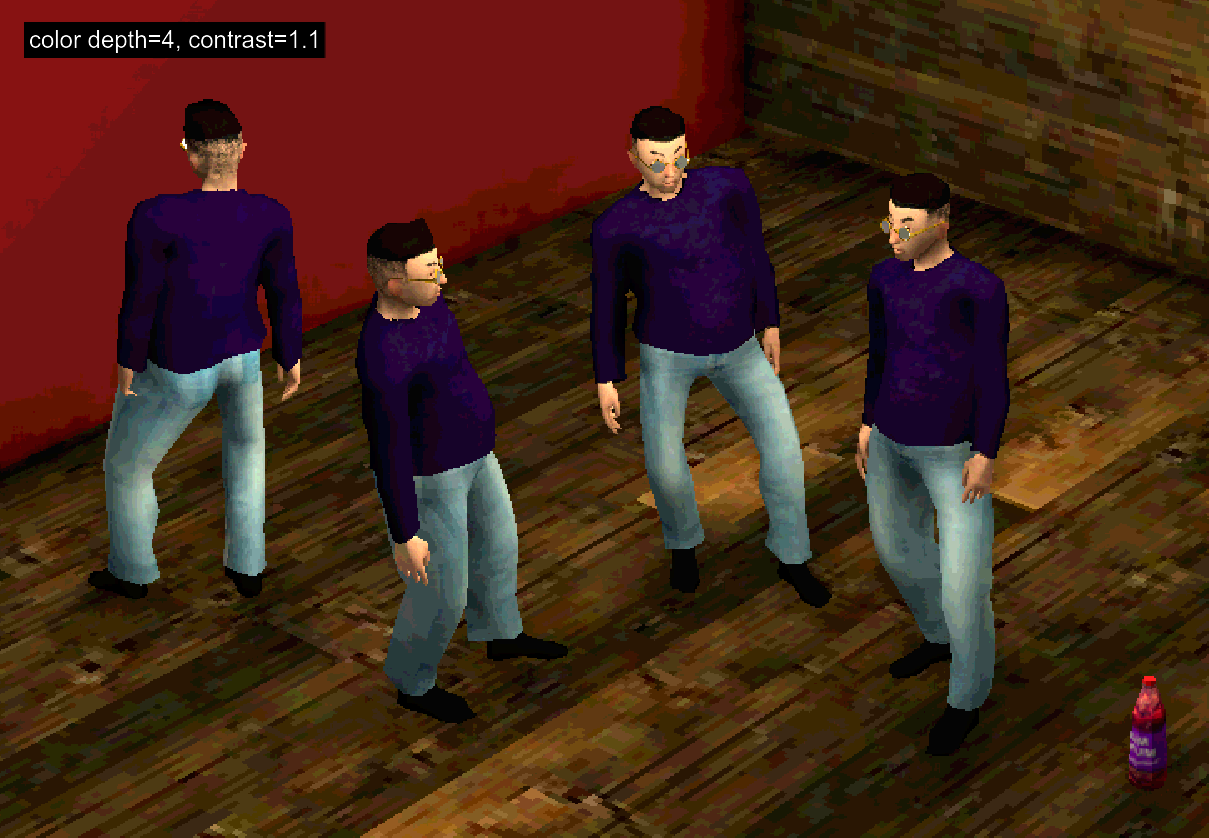
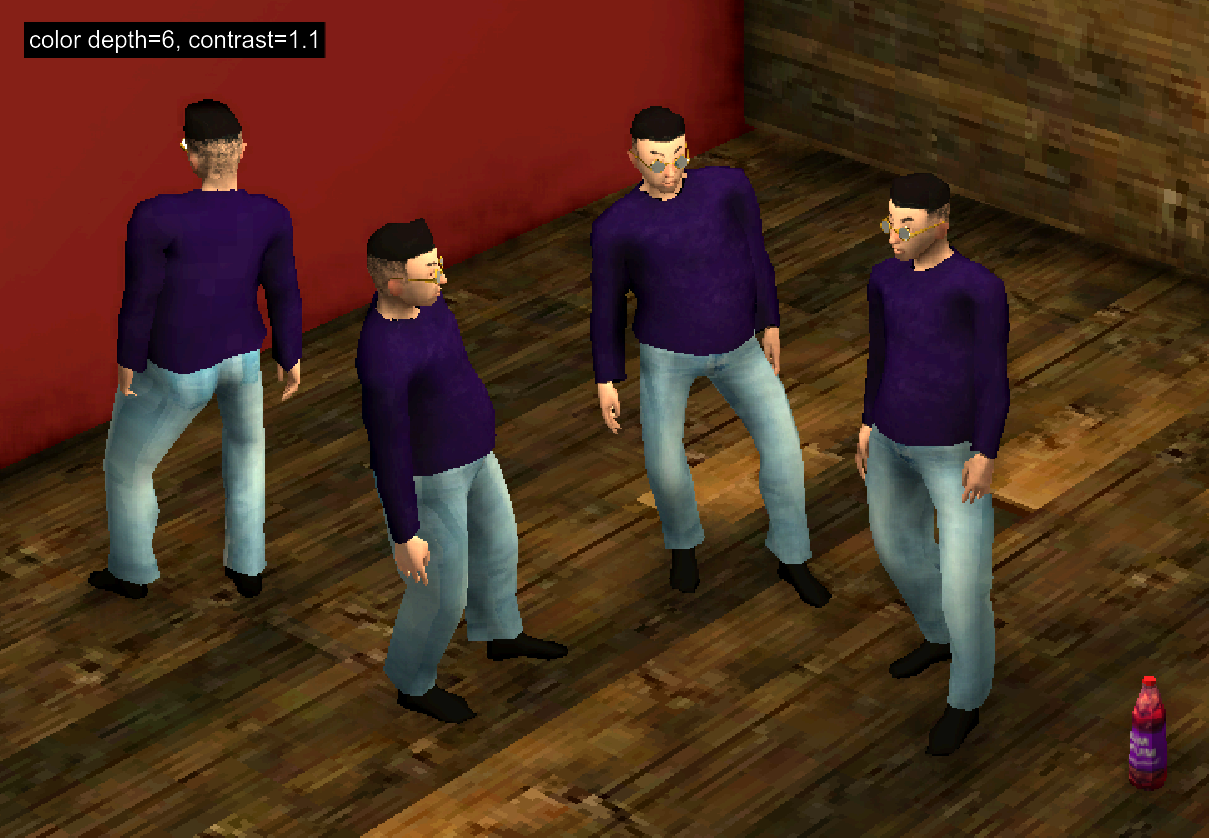
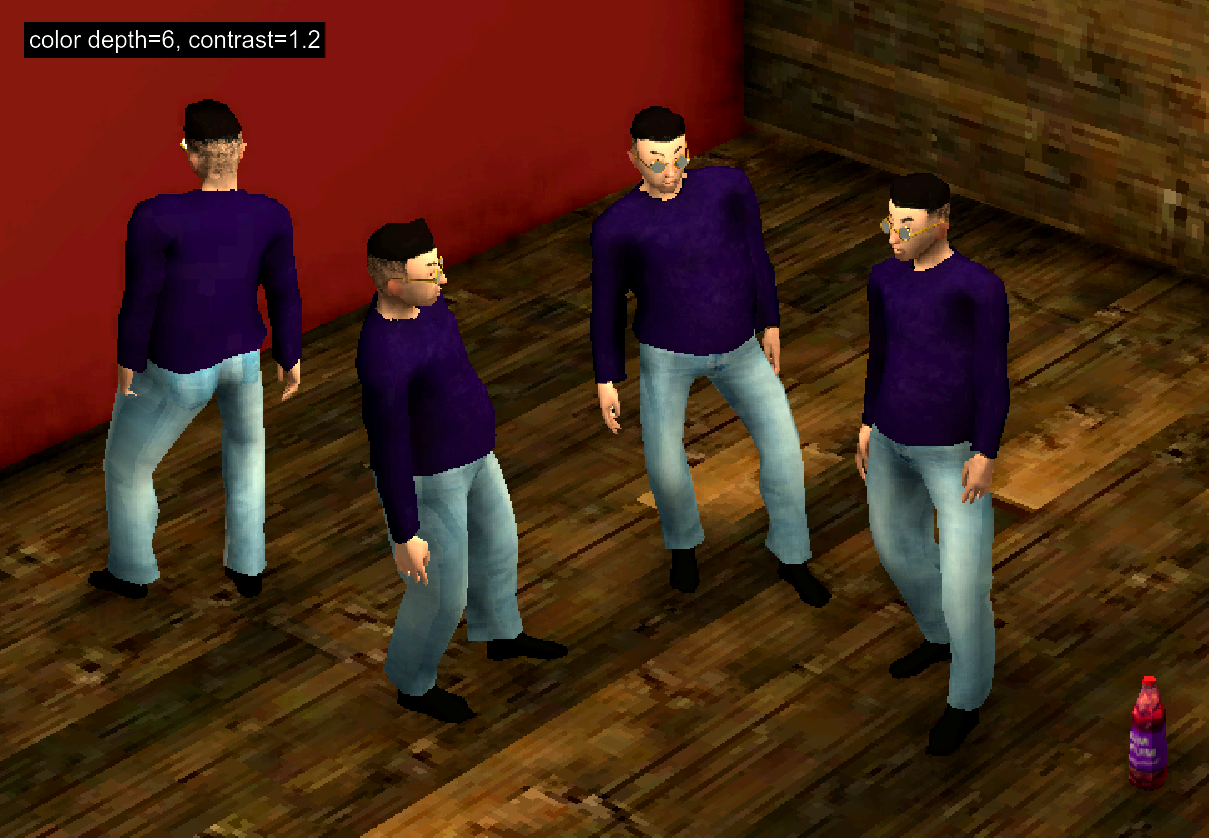
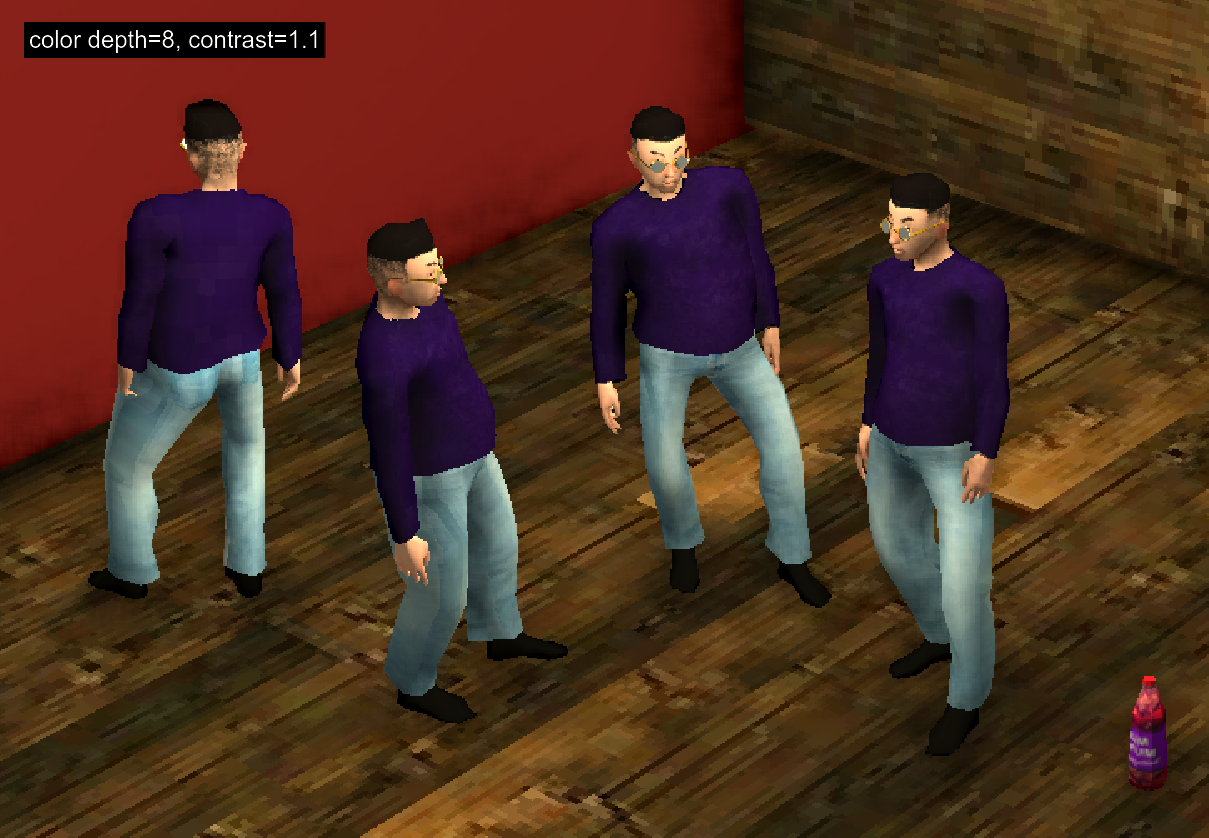
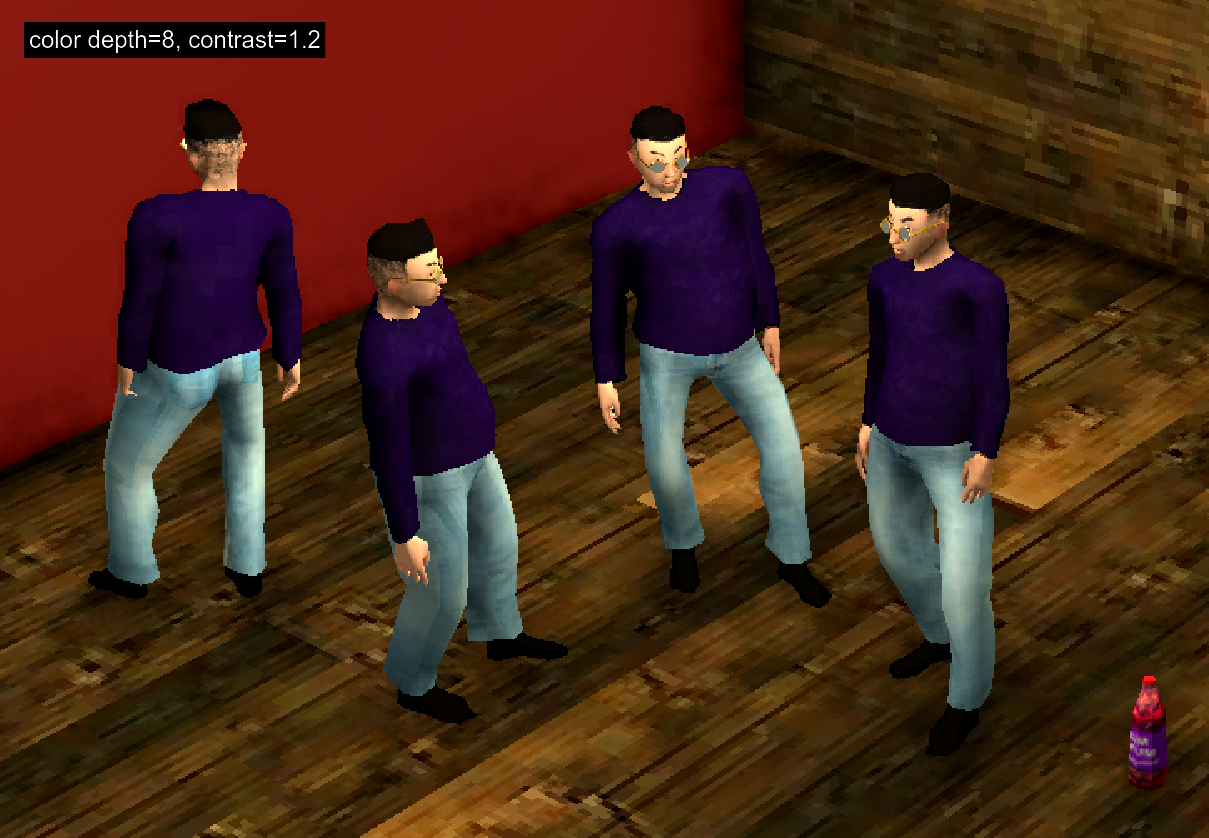
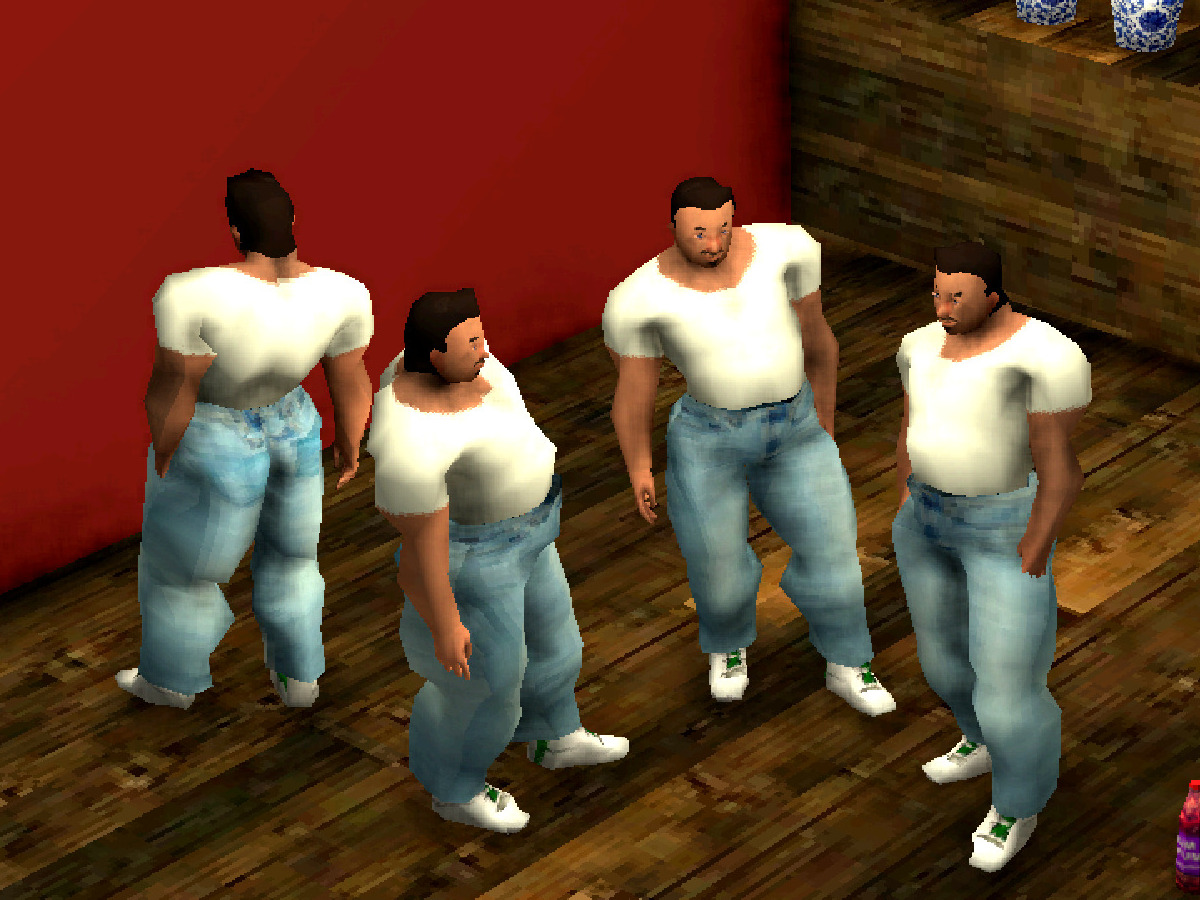
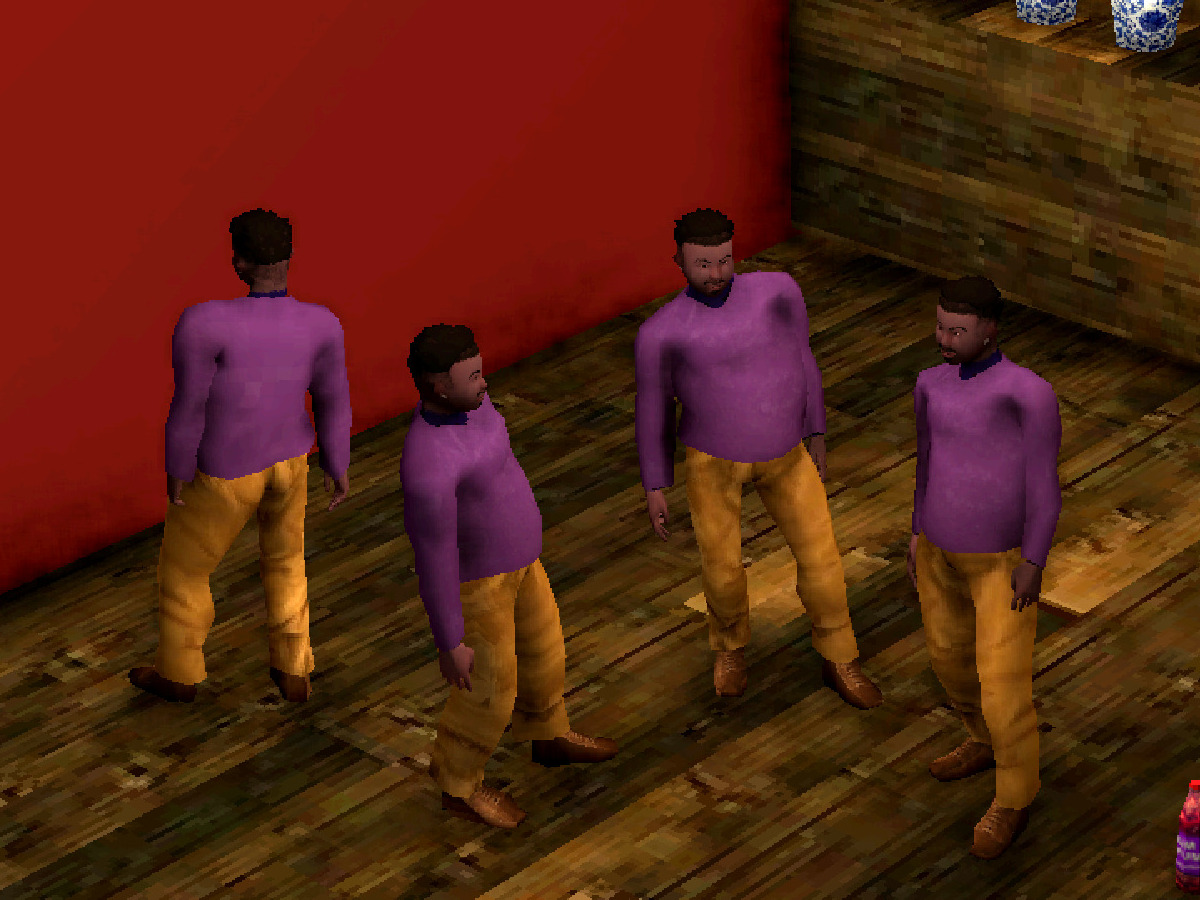
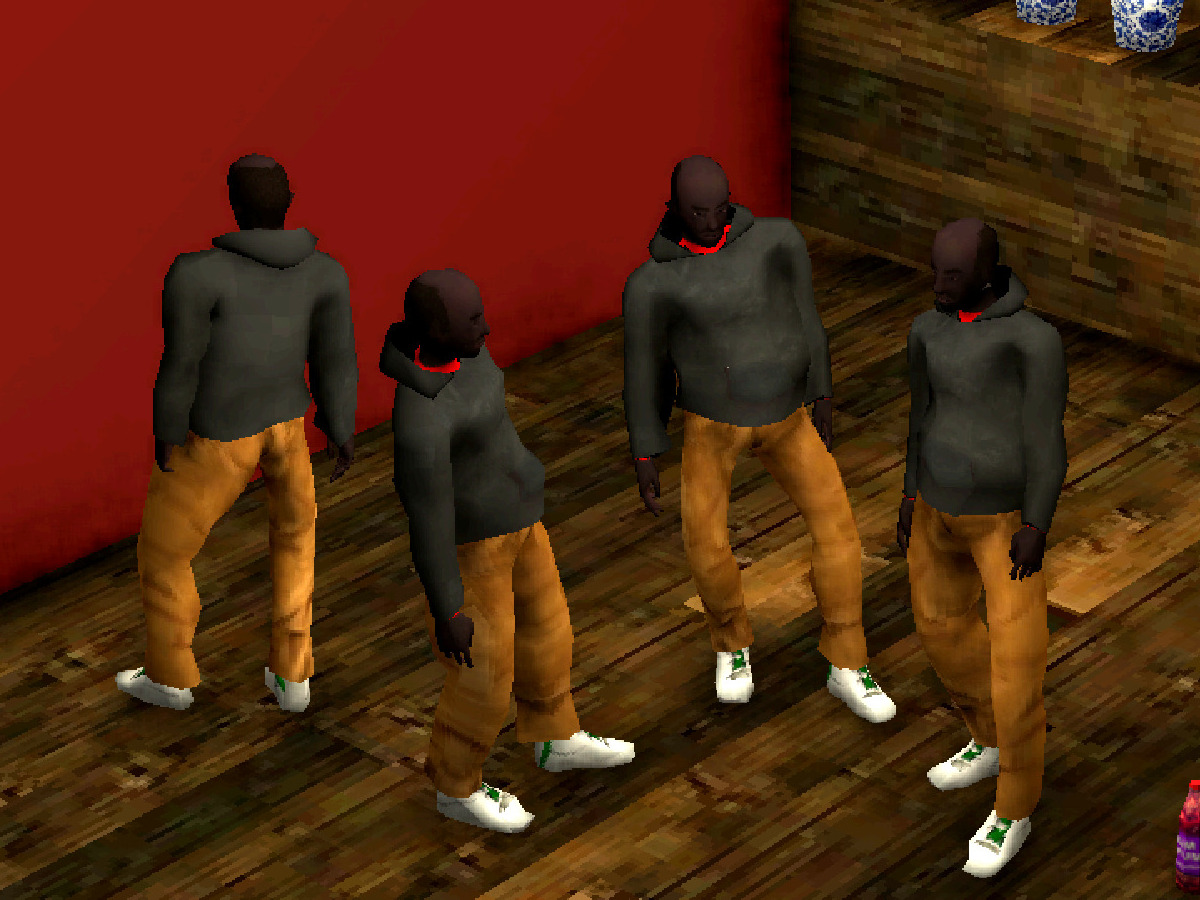
Screen shader tweaking
I’m trying to settle on screen shader settings for the game. There is already some downsampling happening here (well, the max resolution is set to 720p, so pixel cruchiness is more visible when rendering to higher resolutions than that), and I also had the color depth reduced to 4 for awhile. It’s a nice visual effect but might get fatiguing, so I played around with some other settings.
Common settings across these renders: resolution=1, saturation=1.1, dithering=false, brightness=1.
(I did do some comparisons with dithering=true but this didn’t make much of a difference except introducing some artifacts at lower resolutions.)
I think I’ll probably stick to depth=6 (since it still introduces some interesting banding on the wall, but not too aggressive like it is with a color depth of 4) and contrast=1.2 for now. It may change as more environments and characters are created.
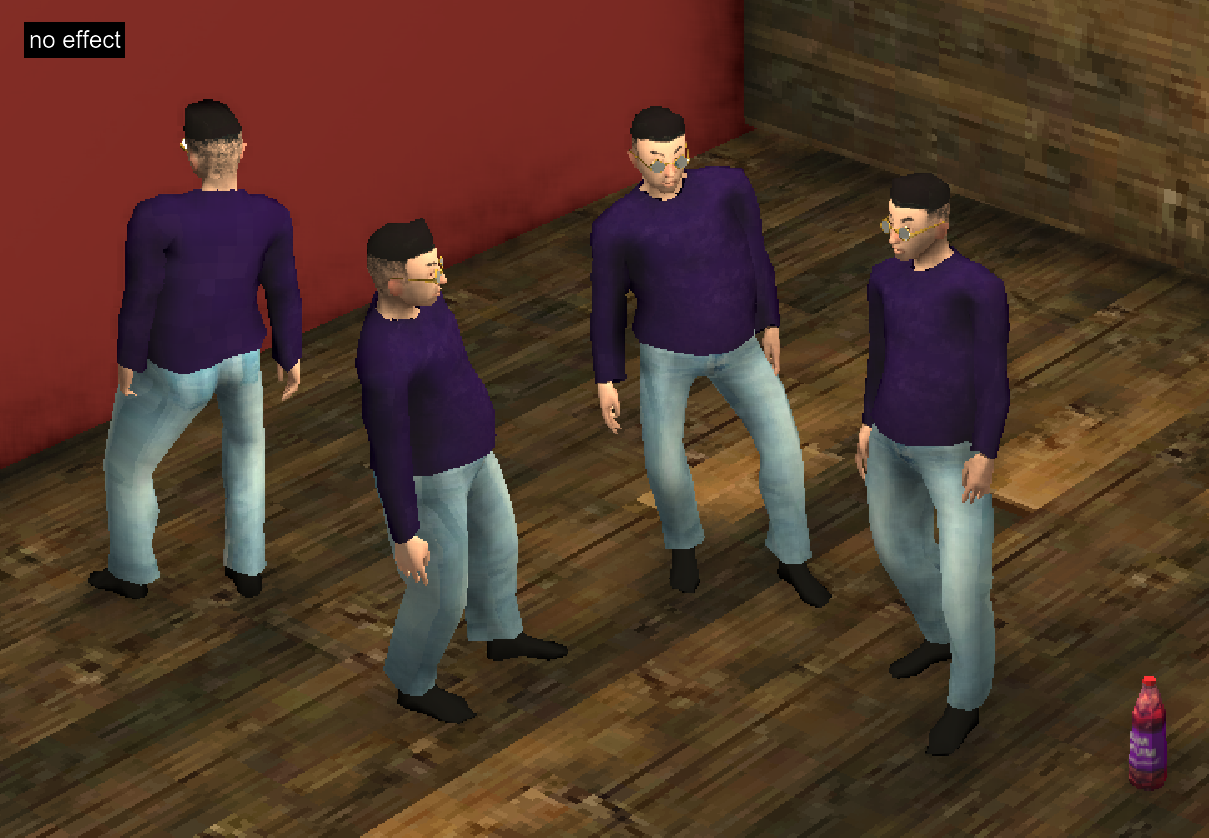
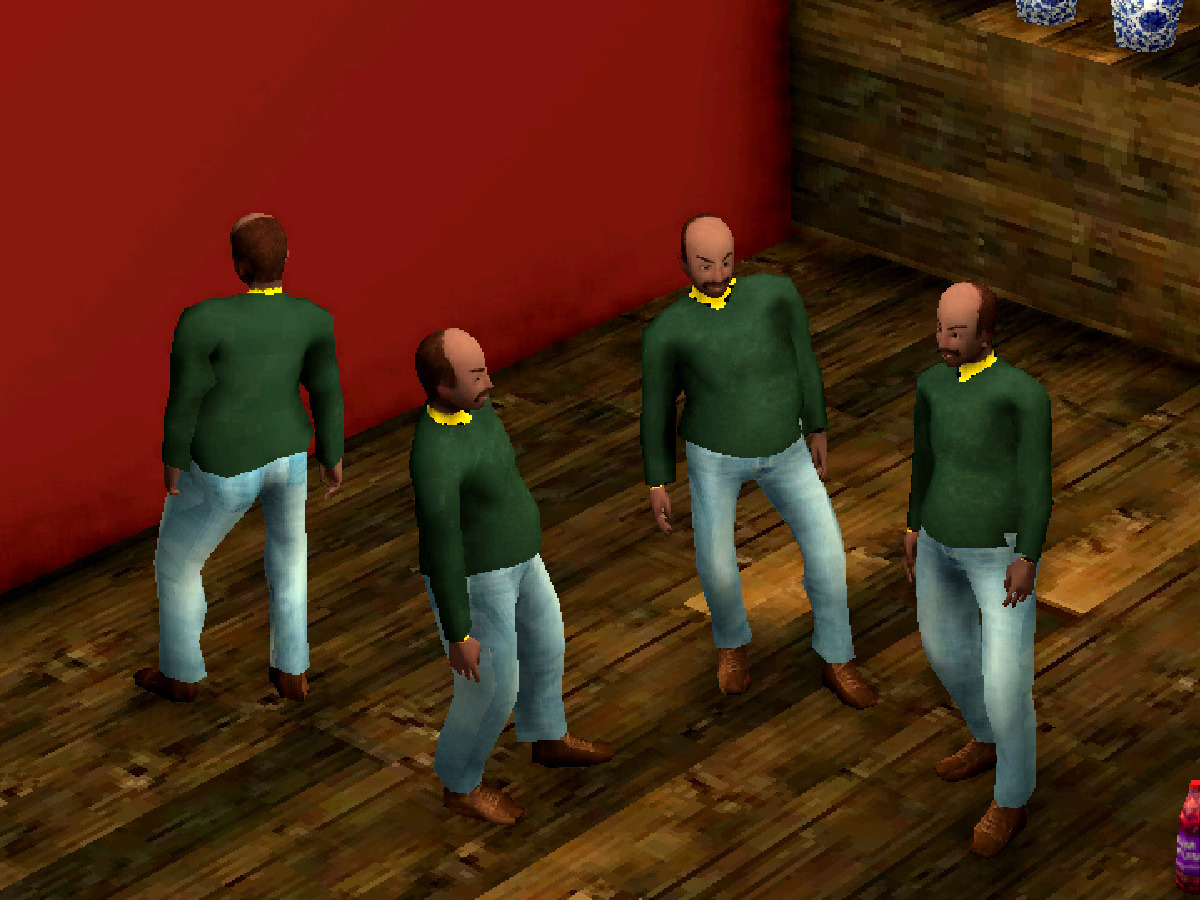
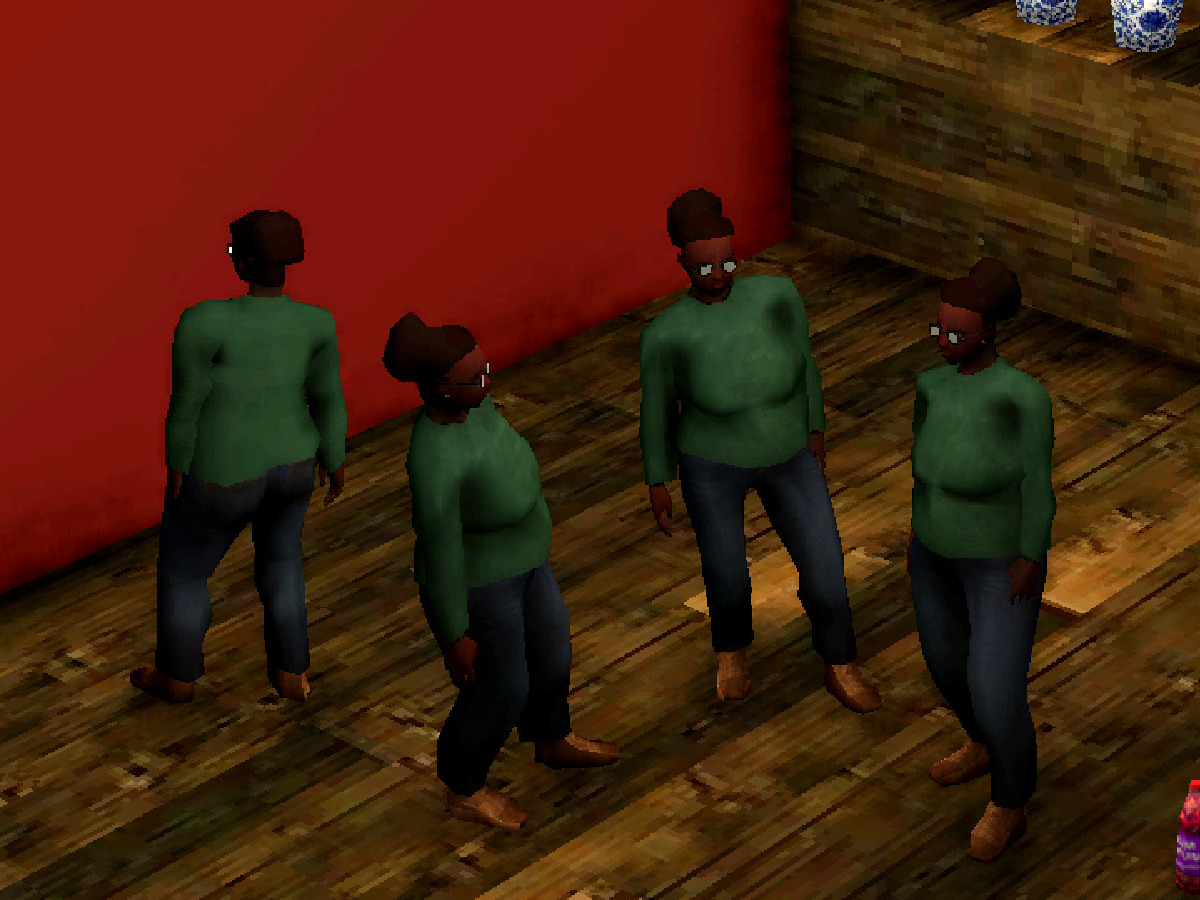
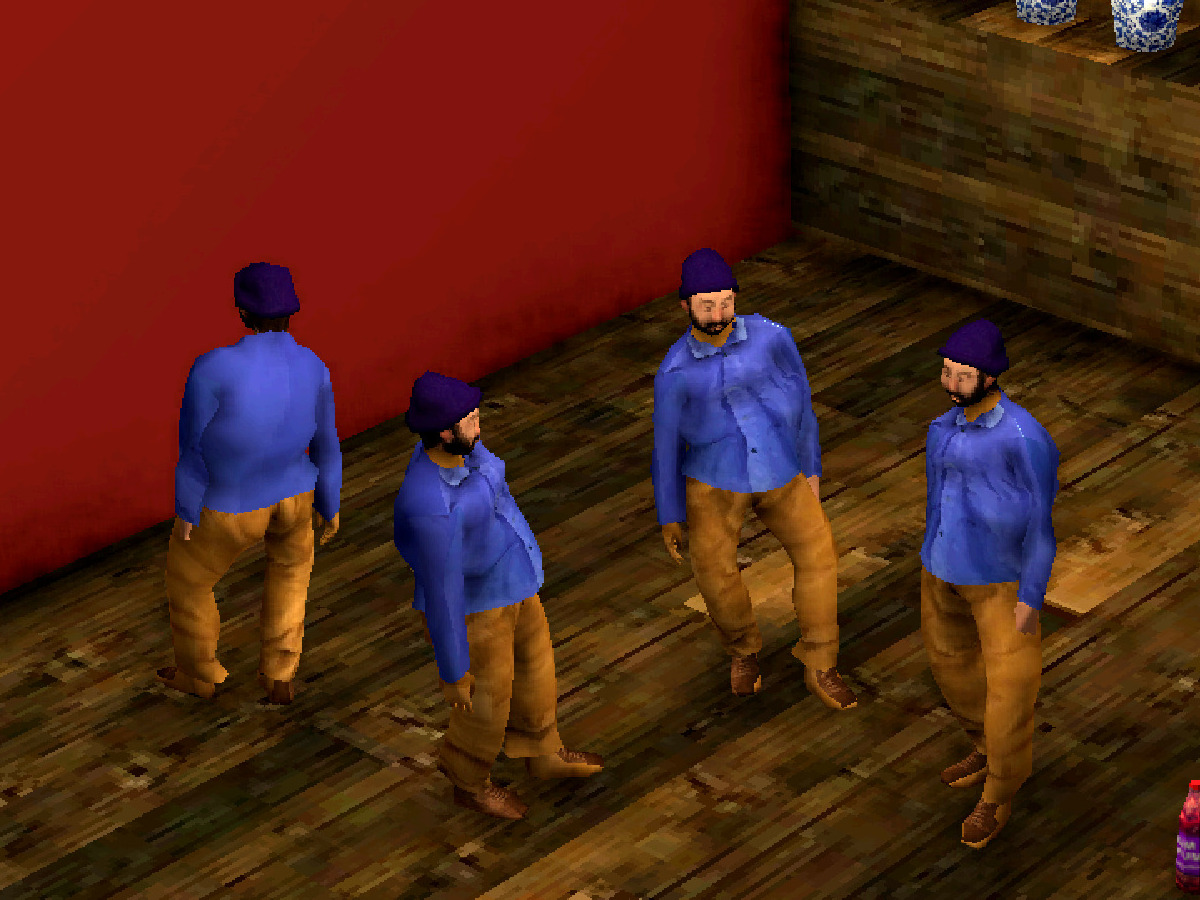
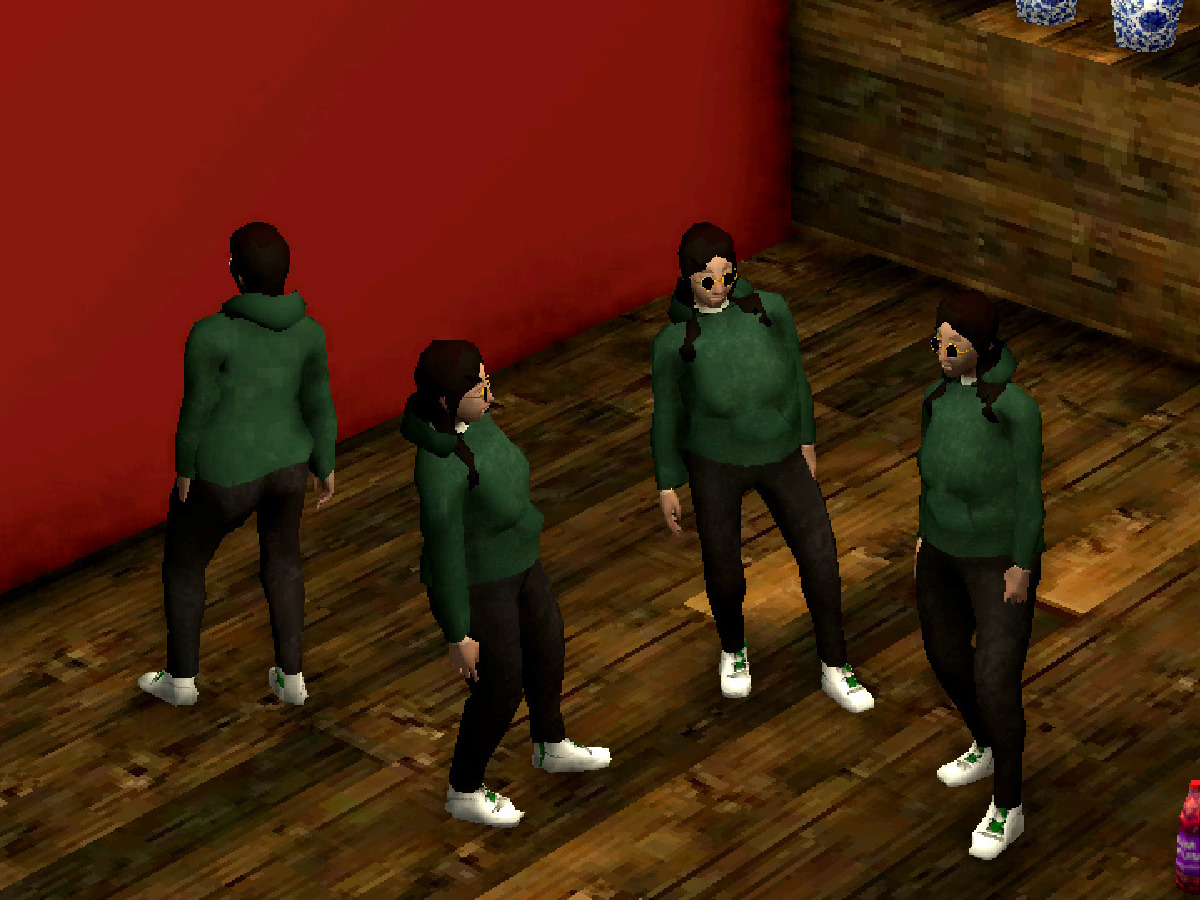
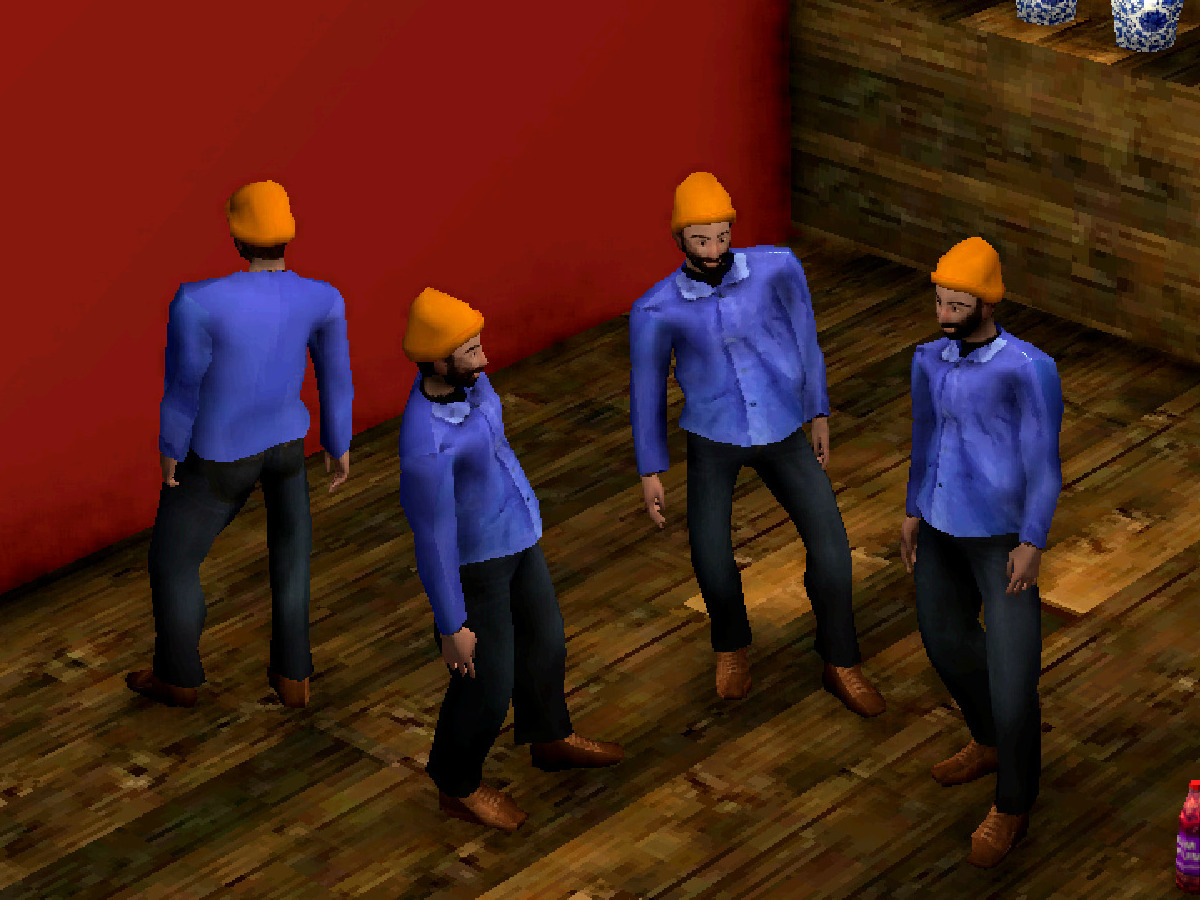
Test characters
I started making more use out of the character generation system to see if anything else needs improving. Part of this trial run required creating more clothing and hairstyles to try out. These characters are all randomly generated (except for the clothing/hair, which are added afterwards):
Next steps
I’ll likely leave the character generation system here for now, though I’ll need to make a lot more clothes and hairstyles eventually. The priority now is to figure out the story and game mechanics since those influence everything else moving forward.
1
The main change was that the typescript-loader is very slow unless it’s set to transpileOnly: true, I don’t fully understand why.
At the end of the last post I mentioned some optimization considerations for Fugue’s character models. I managed to reduce the poly count of the human model a bit, but my quick-and-dirty approach (using Blender’s Decimate) messed up the mesh’s structure too much and caused some issues, so I’ll have to try a more manual method [Update: see the end of this post].
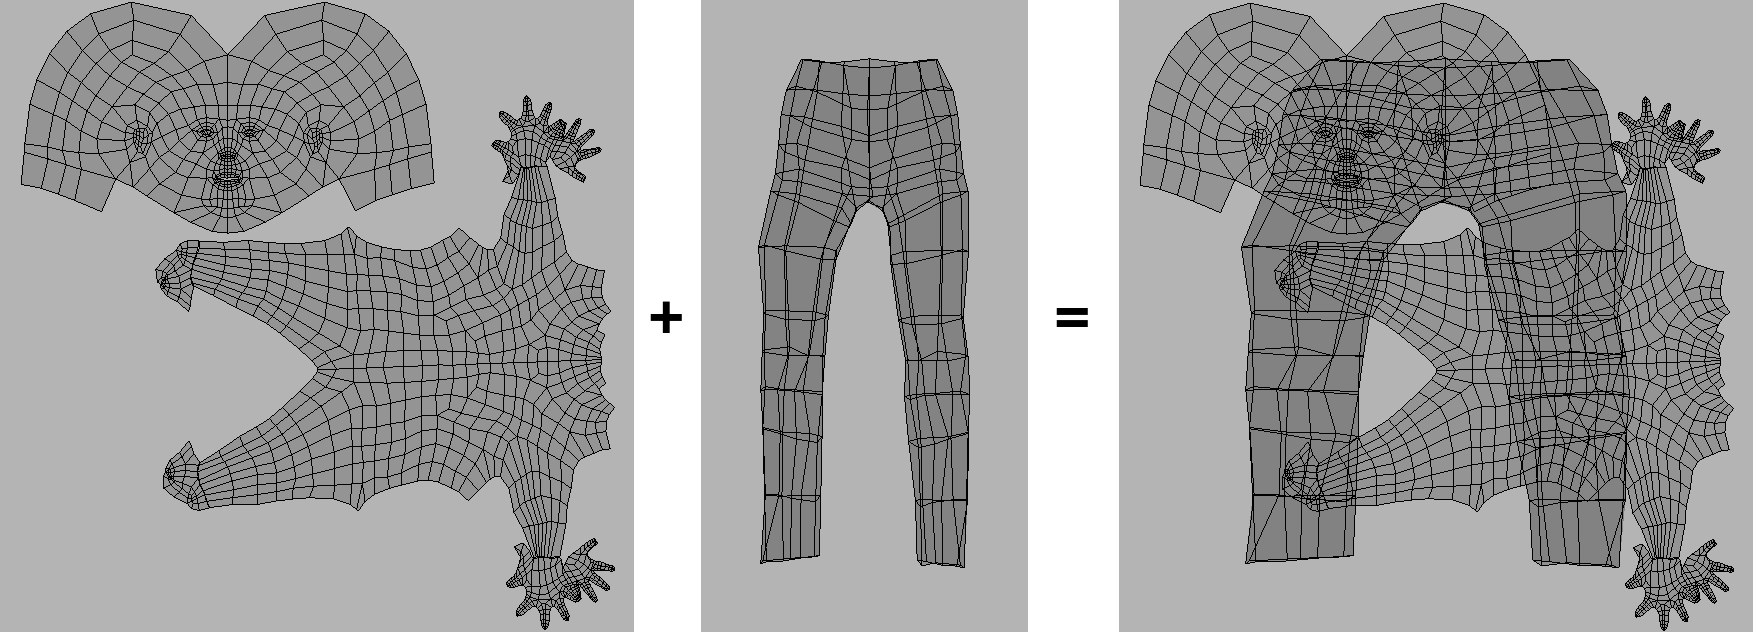
The other bit of optimization I started working on was reducing draw calls. A fully dressed character model has several different materials: one for the human (the skin texture) and then one for each item of clothing. I couldn’t find any clear information about how Godot handles draw calls and materials but generally more materials means more draw calls. So if I can merge the skin and clothes materials I should be able to reduce draw calls to as low as one per character.
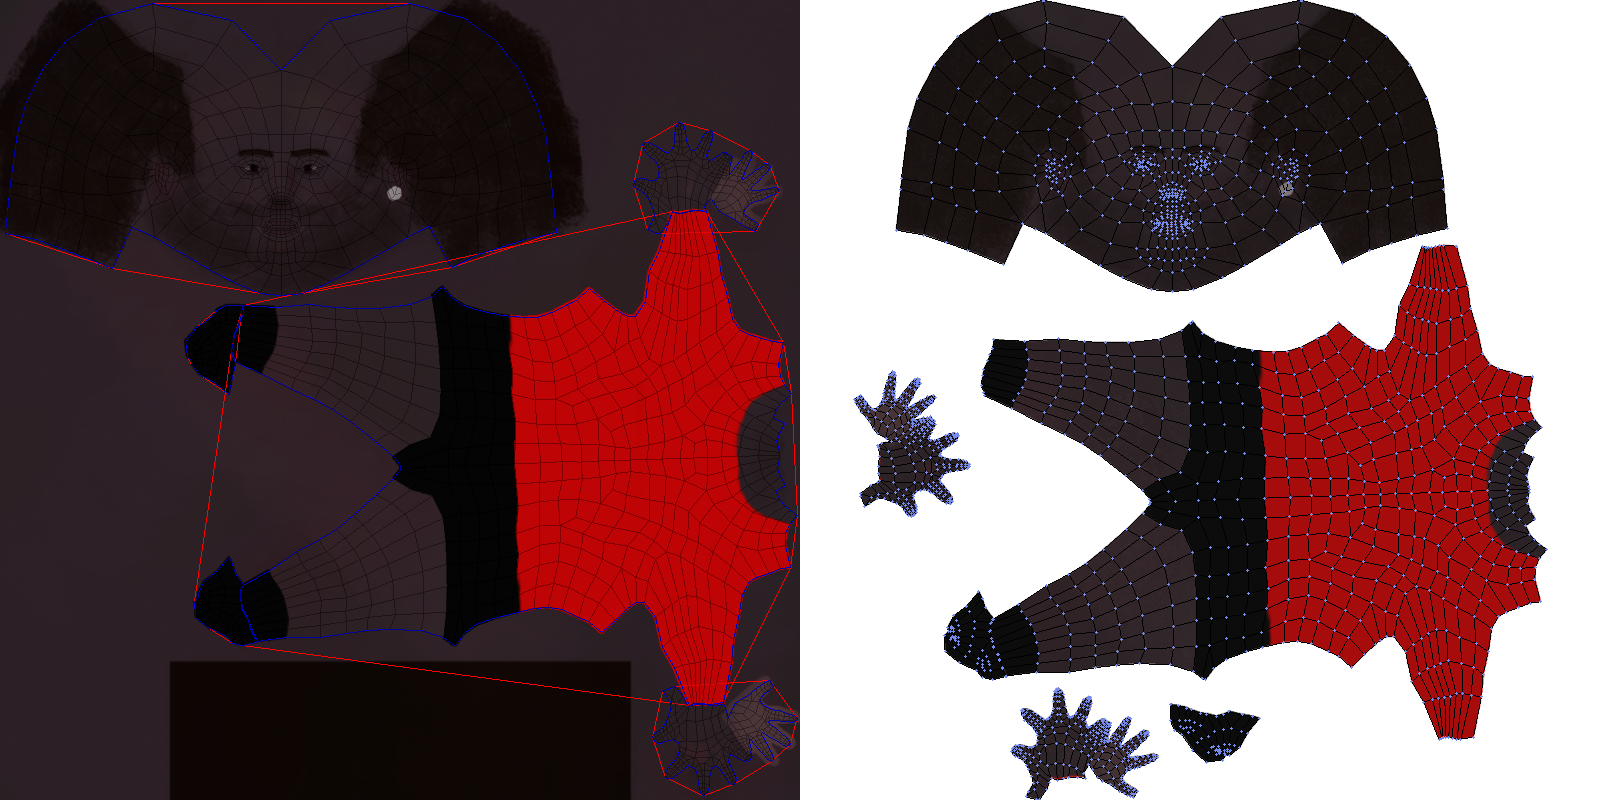
I thought there’d be a Blender addon that does this but I surprisingly couldn’t find any. There are texture atlas baking addons which isn’t quite what I’m looking for–they assume that your UV maps neatly laid out, without overlaps, and they’re usually for baking environmental influence (e.g. lighting/shadows) into the texture (I just need to cut and rearrange the original texture data). Merging materials in the way I have in mind is tricky because each mesh has its own UV map and when you merge the meshes these UV maps all overlap:
Merging objects and the resulting UV layout issue
(You can also see that there are some scaling issues, where the pants UV layout is now stretched–the original pants texture has a non-square aspect ratio.)
To solve this you need to scale/move the UV maps so they each have their own space, which then requires you to also move the underlying parts of their original textures to where their UV map regions were moved to so that the correct image data is still mapped to the correct faces.
In theory this isn’t too difficult–there are some tricky parts like placing the UV map regions (a concave bin packing problem) but everything else is straightforward if you have the UV map geometry. But actually implementing this was really rough–probably my most frustrating development experience in recent memory. I’m not even finished yet, so crossing my fingers that nothing else comes up. This is one of those problems that required many different approaches, and it’s possible that I’ll need to pull ideas from old abandoned ideas if I run into new obstacles…so I’ll try to document my thinking and attempts here.
The biggest struggle was with Blender itself. Blender is an amazing tool and its scripting capabilites are awesome, but they feel like an afterthought, especially for background mode/headless scripting. It has so many puzzling design decisions, many useful functions don’t have a Python API, and an inconsistent dependency on the UI. There are functions that behave differently depending on what the active window/area is or if you’re in EDIT mode vs OBJECT mode, and if you aren’t running the UI (i.e. running Blender in background mode) some of these functions don’t work at all. So of course the entire script I developed within the UI environment didn’t end up working when I switched to the background mode 🙃.
There are also some strange instabilities and limitations of headless Blender, like I can’t export UV layouts because “the GPU can’t be used in background mode”, but I’m able to render 3d scenes without any problem. I’m sure there’s a good reason. Similarly, for some reason loading JPGs and converting them to RGBA with Pillow segfaults from within the Blender environment but works just fine using Blender’s Python when not running Blender. Fortunately these problems always had a hacky workaround.
There also just isn’t a lot of information about scripting for headless Blender so it was difficult to find answers or discussion when I did run into problems.
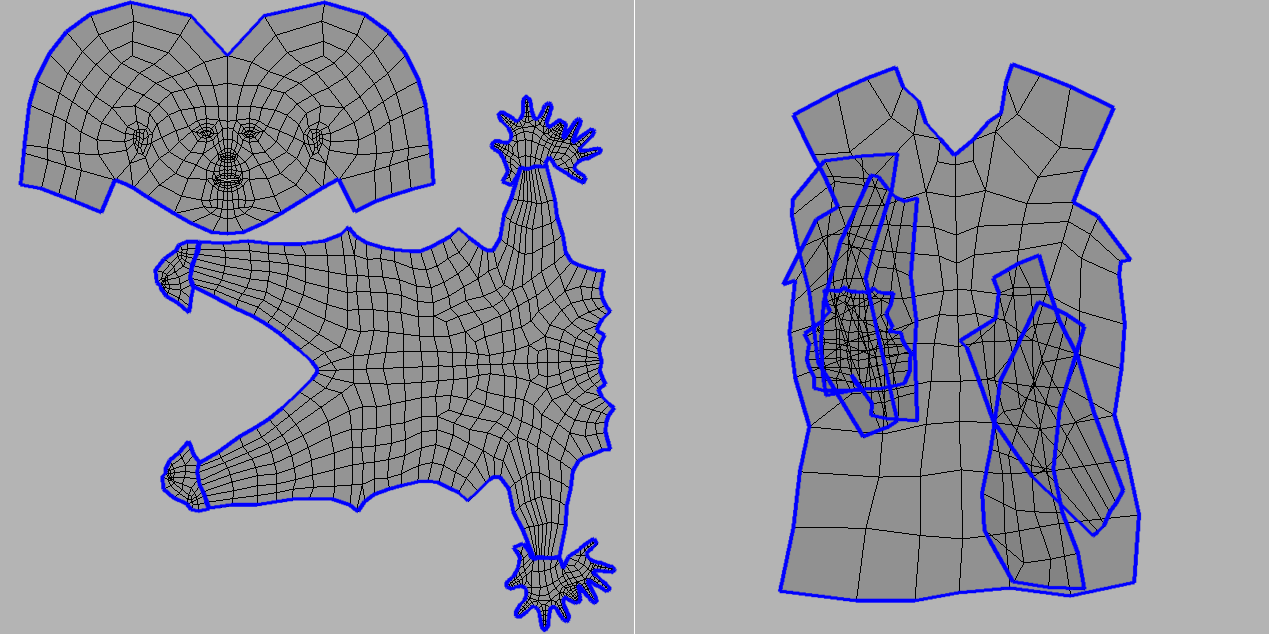
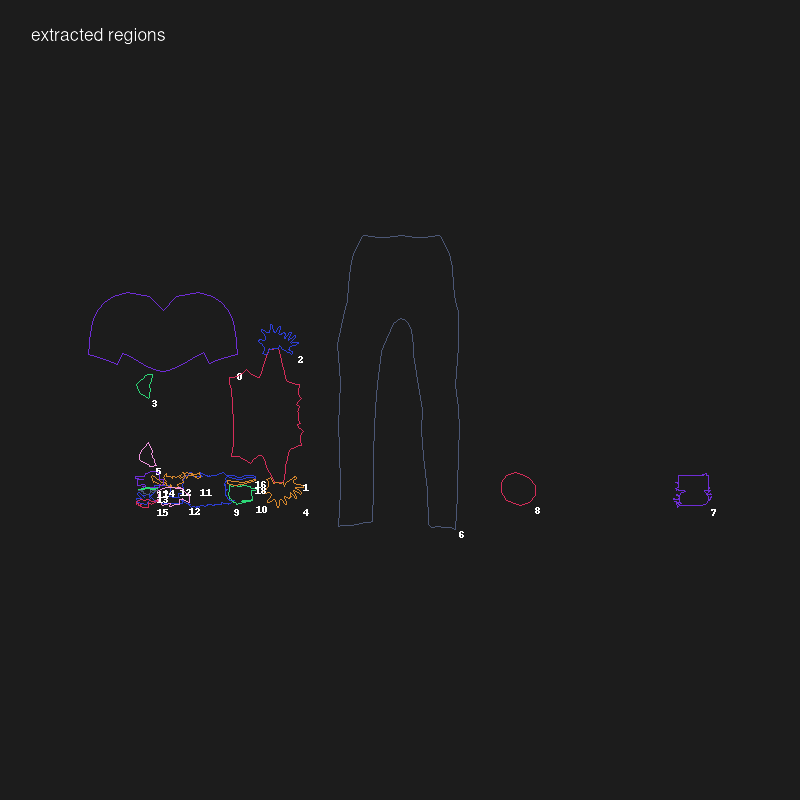
The other difficult part was getting the UV map data I needed–in particular the geometry of each individual UV map region. What I’m calling a “UV map region” here isn’t quite the same as a “UV island”. Islands are sets of connected UVs and they can overlap. In the maps below the islands are outlined in blue:
In my case I care about contiguous regions of UV map, whether or not they are connected. So the UV map on the right with all the overlapping islands would be considered a single UV map region, and each island in the UV map on the left is also its own UV map region.
To identify these regions I needed two bits of information:
The polygon boundaries of each island
A mapping of UVs to the island they belong to
Surprisingly there is no built-in Python function to access UVs by island. There is a way to hack it though:
# Make sure the correct object is selected# and that you're in edit modeobj=bpy.data.objects['your-object-name']bpy.context.view_layer.objects.active=objbpy.ops.object.mode_set(mode='EDIT')bm=bmesh.from_edit_mesh(bpy.context.active_object.data)uv_layers=bm.loops.layers.uv.verify()# Select all UVs# then generate seams from UV islandsbpy.ops.uv.select_all(action='SELECT')bpy.ops.uv.seams_from_islands()# Collect the island boundary edges hereedges=[]forfinbm.faces:forlinf.loops:ifl.edge.seamorl.edge.is_boundary:a=l[uv_layers].uvb=l.link_loop_next[uv_layers].uv# Blender's texture coordinates are flipped# than most image processing;# i.e. top-left is (0, 1) rather than (0, 0).# So we reflect everything over y=0.5 (i.e. flip vertically)# to compensate.edges.append(((a.x,1-a.y),(b.x,1-b.y)))
This method relies on Blender’s built in “Seams from Islands” function, which marks the border edges of UV islands as a “seam”. Then we can iterate all edges of the mesh to find those that are marked as a seam.
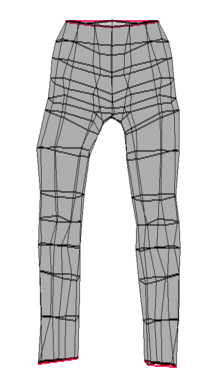
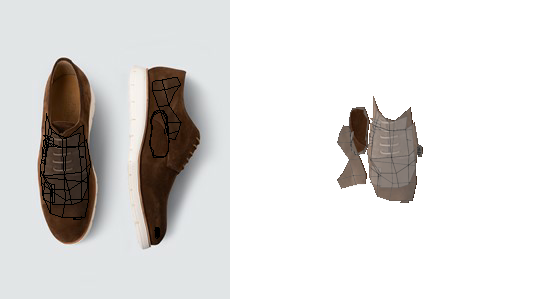
This actually worked fine until I tried it on a UV map where the seams produced by this function didn’t actually match the island’s borders:
Seams/islands extracted from the pants
Here the islands, outlined in red, are just the openings of the pants. The rest of the island border isn’t selected.
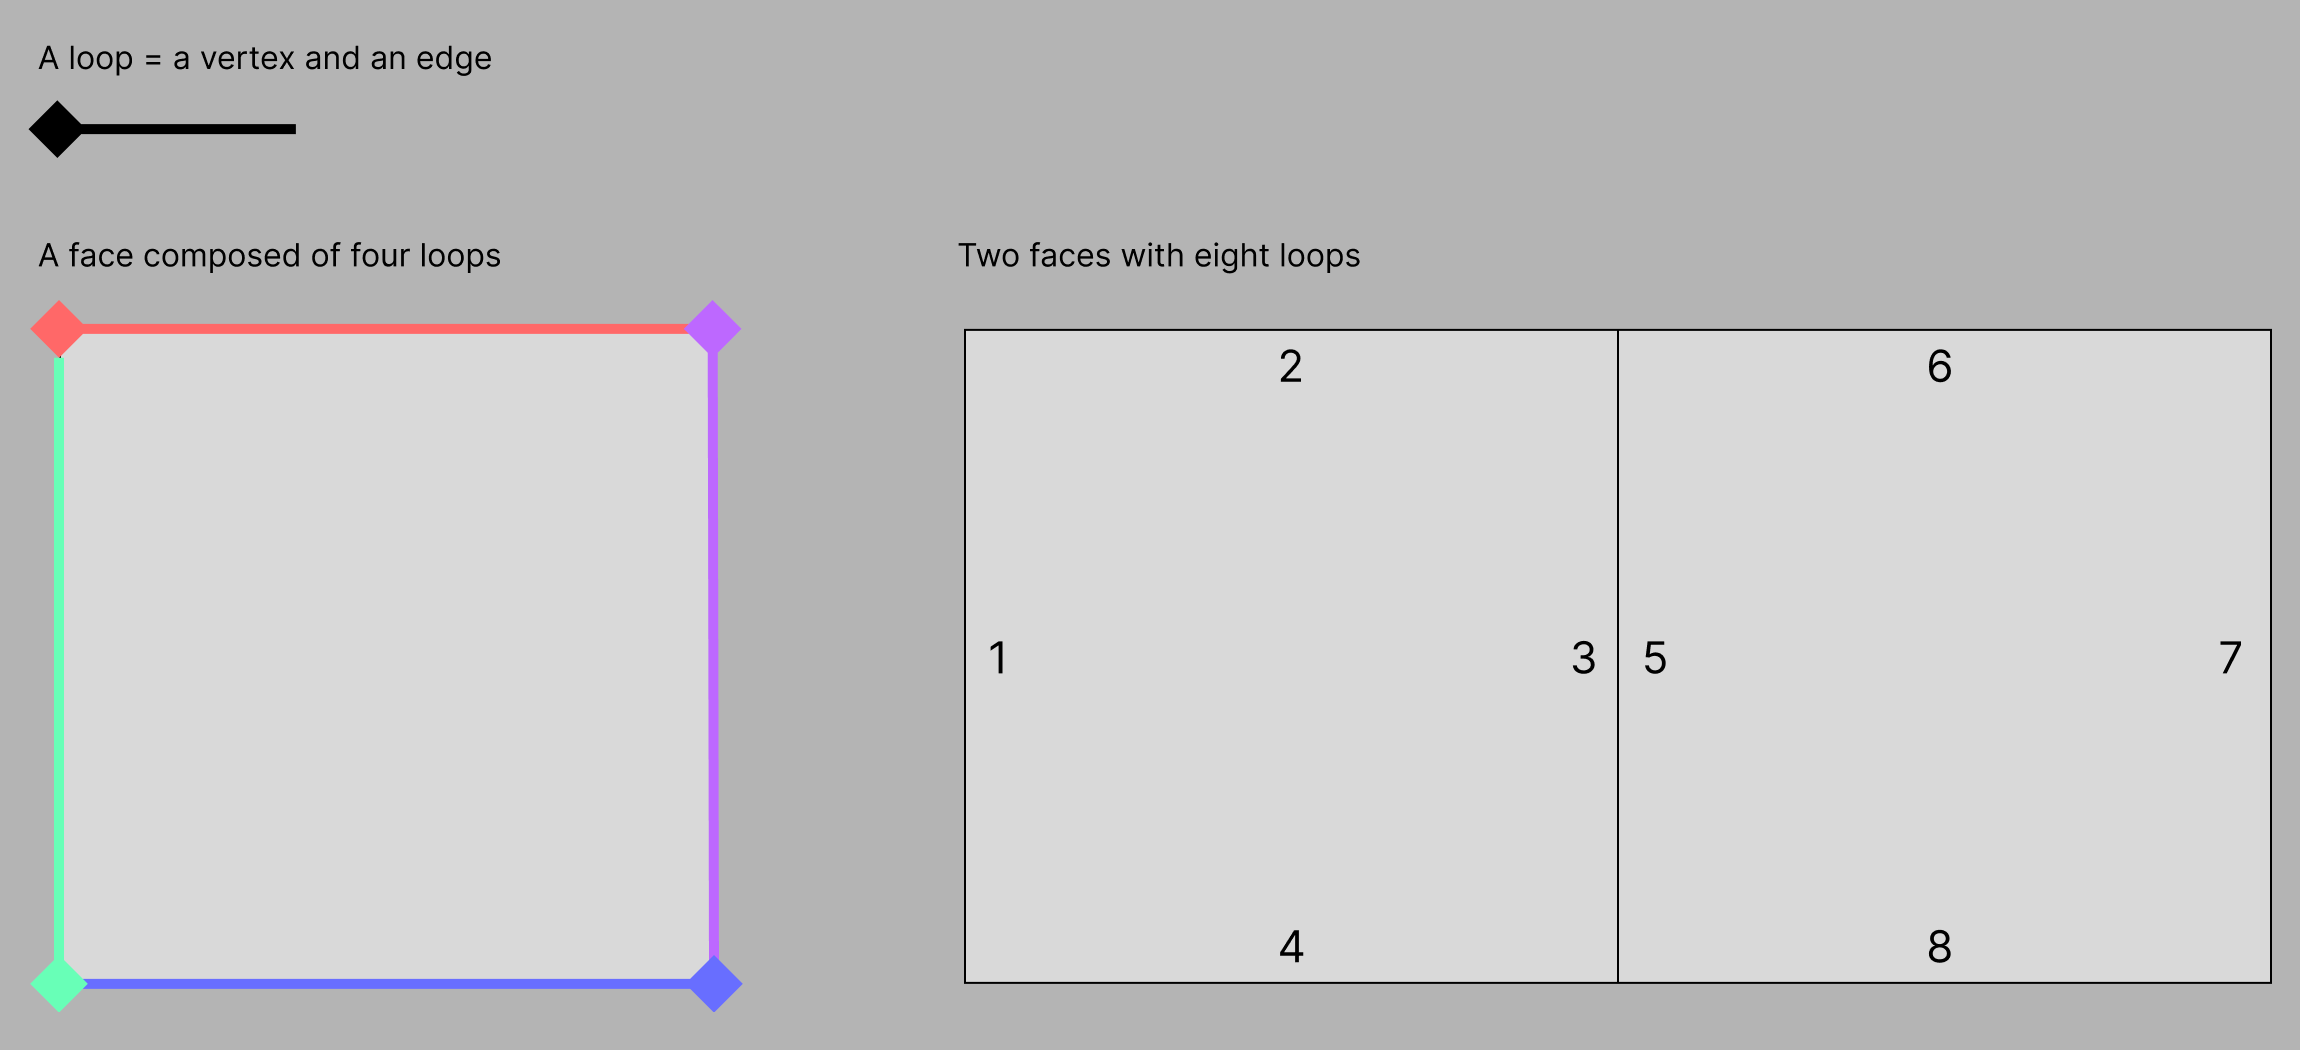
I didn’t really understand why until I read more on how mesh geometry works in Blender. Meshes are composed of faces, and each face is composed of “loops”. A loop is a vertex and an edge (which connects to another vertex), though I use “edge” and “loop” interchangeably here. Each face has its own loops, even if those edges are shared with other faces. In the example below there are two faces joined by an edge. That edge is actually two edges, one for each face.
Blender loops
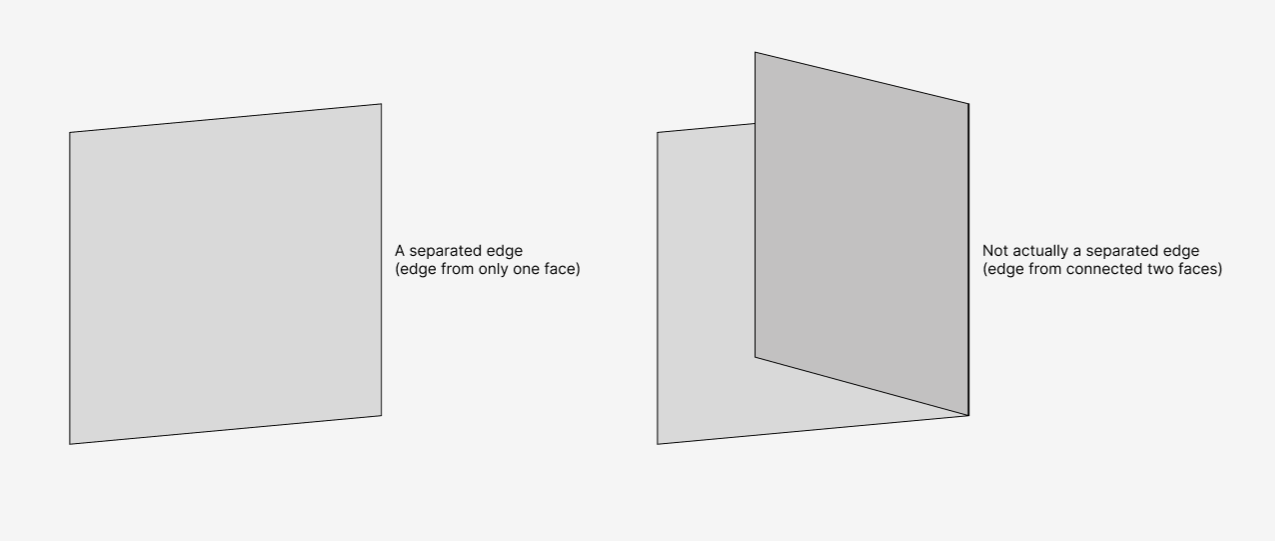
From looking at Blender’s source code (at uv_seams_from_islands_exec) I believe the way “Seams from Islands” works is that the UVs for each shared edges/loops are compared; if the UVs aren’t in the same locations then we know that those edges are separate in the UV map, and thus we have the border edge of an island. In the pants example above the parts that aren’t selected aren’t actually separated edges. It’s hard to tell from the image, but they are edges of joined faces that are folded over:
Seam edge vs non-seam edge
This can also be illustrated by using a graph-based approach for detecting seams:
importnetworkxasnx# Same prep as abovebm=bmesh.from_edit_mesh(bpy.context.active_object.data)uv_layers=bm.loops.layers.uv.verify()# Collect all edges hereedges=[]forfinbm.faces:forlinf.loops:a=l[uv_layers].uvb=l.link_loop_next[uv_layers].uvedges.append(((a.x,1-a.y),(b.x,1-b.y)))# UVs don't have any ids;# we need to know when two UVs are actually the same UV.# We do this by seeing if two UVs are within some small range;# if so we consider them to be the same UV.eps=1e-6uv_idx=[]deffind_closest(uv:tuple[float,float]):x,y=uvfori,(x_,y_)inenumerate(uv_idx):x_diff=abs(x-x_)y_diff=abs(y-y_)ifx_diff<epsandy_diff<eps:returnielse:uv_idx.append(uv)returnlen(uv_idx)-1# Reconstruct the UV map geometry# as a graph.g=nx.Graph()fora,binedges:a_id=find_closest(a)b_id=find_closest(b)# Count how many edges connect# these two UVsifg.has_edge(a_id,b_id):edge=g.edges[a_id,b_id]edge['count']+=1else:g.add_edge(a_id,b_id,count=1)# UVs that are connected by only one edge# are island bordersborders=[]fora_id,b_id,dataing.edges(data=True):ifdata['count']==1:borders.append((a_id,b_id))
This approach also works on the fact that island borders are separated edges. The general idea is this:
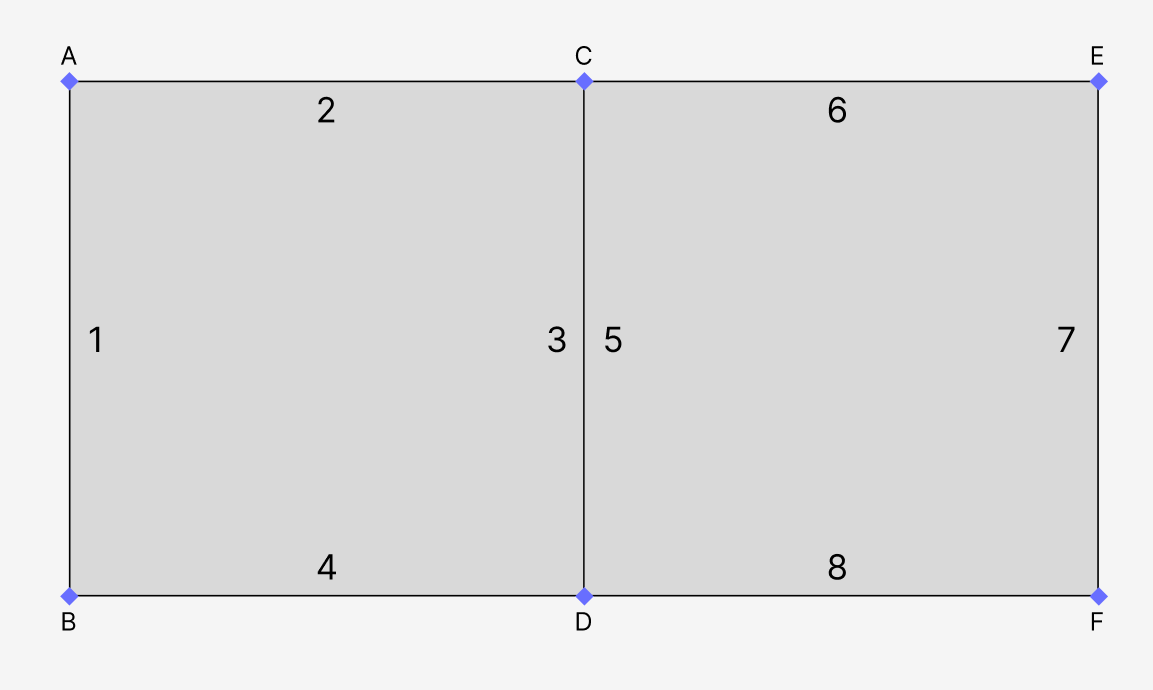
The connection between UVs C and D is not a border because two edges connect them–edge 3 and 5, belong to the left and right faces respectively. The other connections on the other hand have only one edge, and thus they form the island border.
This nice thing about this approach is it’s easy to identify which UVs belong to which islands. With the “Seams from Islands” approach I had a very crude method: just checking which UVs fall within which island polygons. This unfortunately doesn’t work with overlapping islands because the UVs could be assigned to any of the overlapping islands. With this graph-based approach islands are just the connected components of the graph:
However because this is basically the same idea as “Seams from Islands” it suffers from the same issues. The pants UV map would fail in the same way.
The approach I’m using now is less elegant (using graph structures just feels neat) but should work better (I hope):
fromcollectionsimportdefaultdictfromshapely.opsimportunary_unionfromshapely.geometryimportPolygonfromshapely.validationimportmake_valid# Same setup as abovebm=bmesh.from_edit_mesh(bpy.context.active_object.data)uv_layers=bm.loops.layers.uv.verify()# Here we collect all edges,# but grouped into their parent facesfaces=[]forfinbm.faces:face=[]forlinf.loops:a=l[uv_layers].uvb=l.link_loop_next[uv_layers].uvifnotface:face.append((a.x,1-a.y))face.append((b.x,1-b.y))faces.append(Polygon(face))# Group faces into their parent islandsisland_faces=defaultdict(list)forfaceinfaces:# Since the UVs are all connected,# we can use any UV from the face to identify its parent islanduv=face.exterior.coords[0]# `find_closest` has same definition as above# and we still use the graph-based approach# for mapping UVs to islandsuv_id=find_closest(uv)island_id=uv_ids_to_islands[uv_id]# Fix face geometry as neededifnotface.is_valid:face=make_valid(face)island_faces[island_id].append(face)# Then merge the faces of each island to get# the island borders/silhouetteisland_shapes=[]forisland_id,valid_facesinisland_faces.items():merged=unary_union(valid_faces)island_shapes.append(merged)
Here I extract the geometry of every face of the mesh, rather than working with just the edges. I still use the graph-based approach to map faces to islands. Then each island’s faces are merged using shapely and the island’s borders are the exterior of this merged shape.
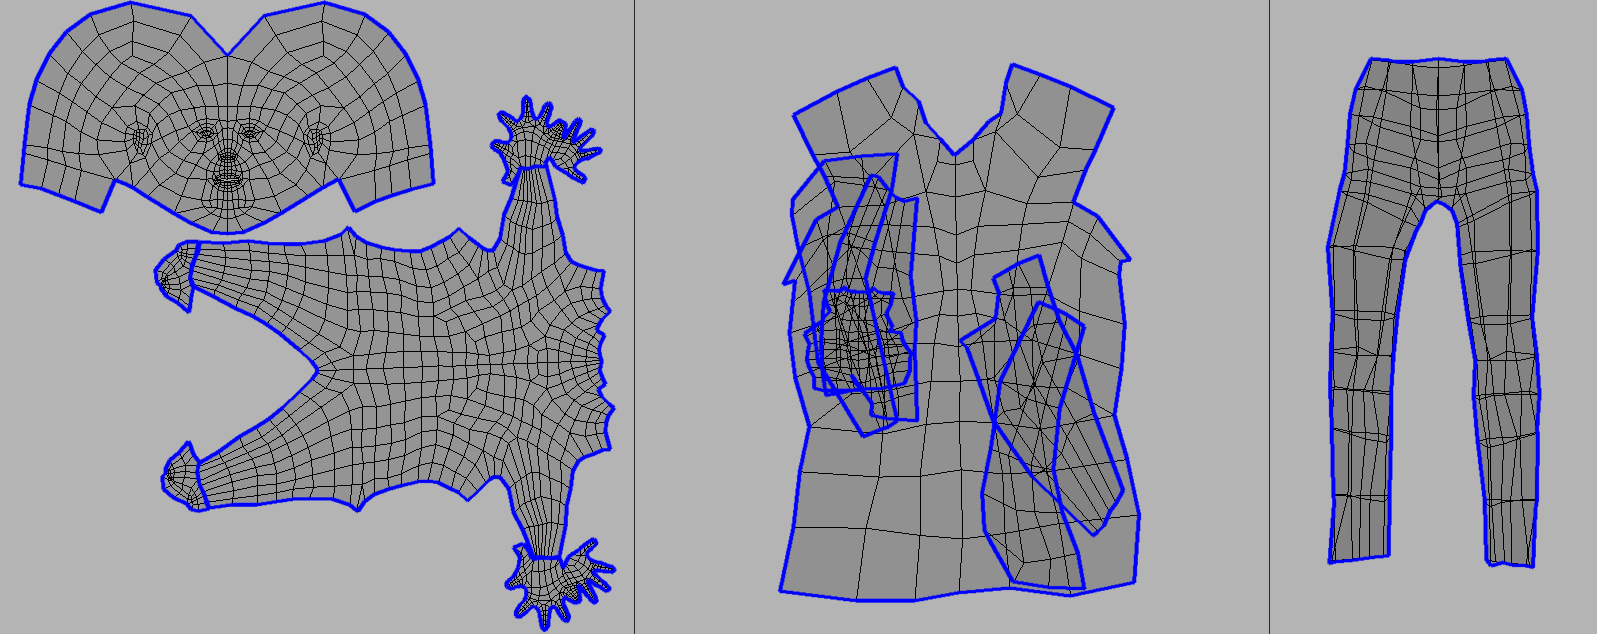
Here are the results of this approach, with the extracted borders in blue:
With the island borders extracted the subsequent steps are a bit easier, which is mainly identifying overlapping islands and merging them into one shape (what I was calling “UV map regions”) and cutting out the matching texture regions.
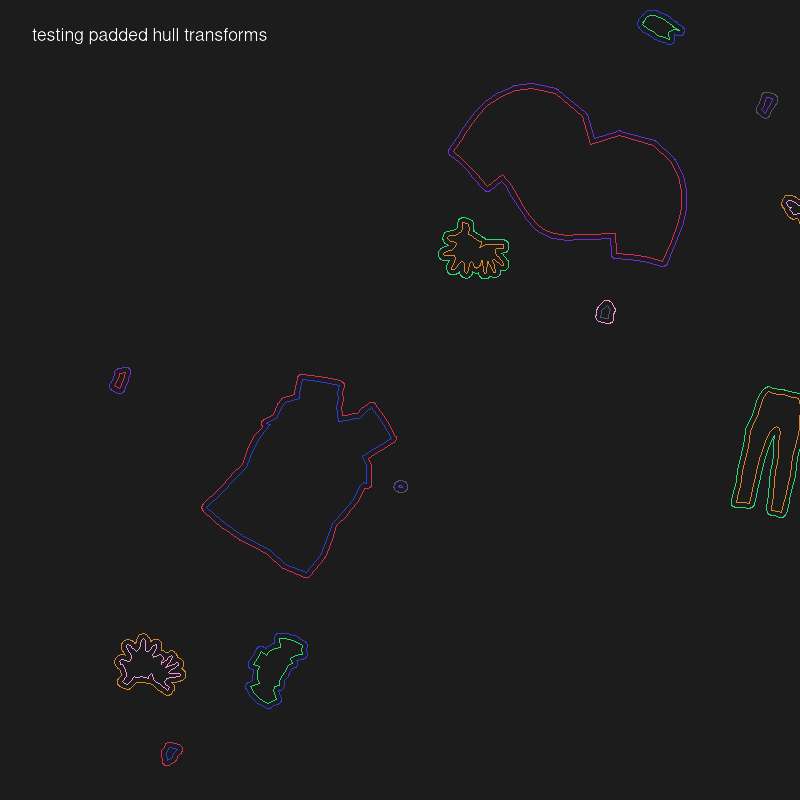
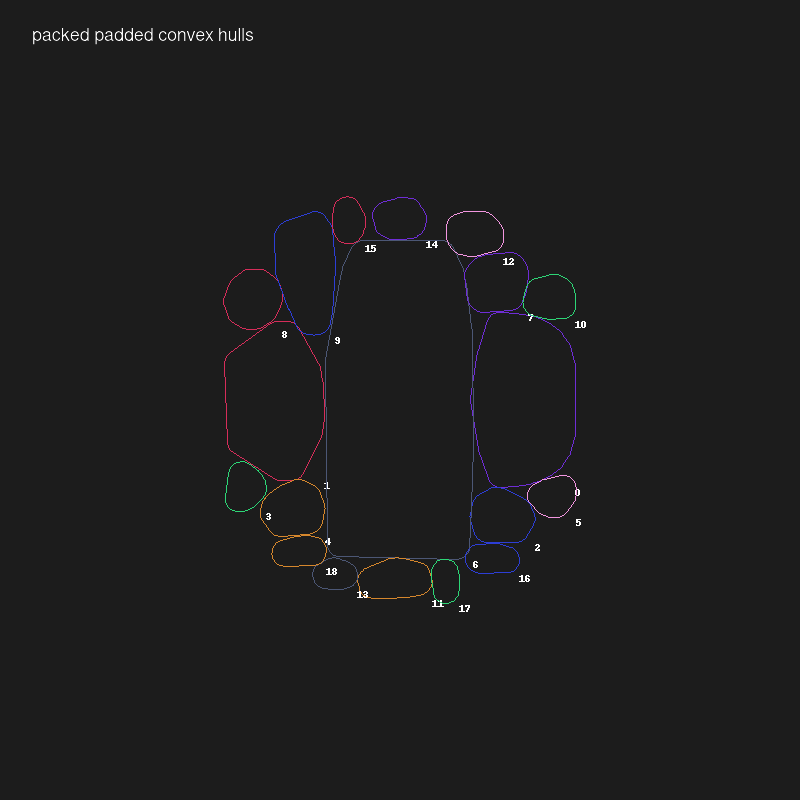
The other important piece is packing these UV map regions. I’m using nest2d, which is a Python interface to libnest2d, for bin packing. There were a couple challenges here too. I’m actually using a fork because the original version bizarrely leaves out a Python API to access the important packing information (translations and rotations of the packed polygons). I also had to expand the Python interface to support some additional libnest2d parameters to avoid packing overlaps. A final adjustment: libnest2d doesn’t support concave shapes so instead of directly using the UV map region polygons I use their convex hulls instead. So the resulting packs won’t be the most space-efficient, but that’s ok.
Here are a couple example results from the script:
An example result. Original UV map and texture on the left, with the detected islands (blue) and convex hulls (red).
Another example result. Original UV map and texture on the left.
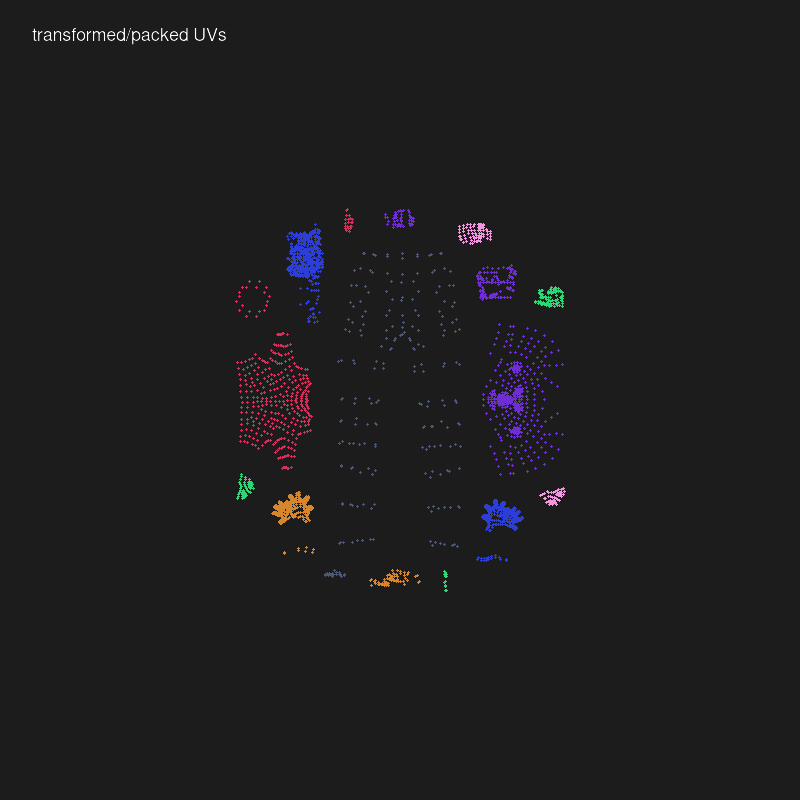
The other component of this system is what handles the actual merging of the Blender objects and materials (merge.py in the code). This was more straightforward: grab the textures for each object’s material (assuming one main material), bin pack them into a single image, and update the UV maps accordingly. Then the packing system described here is applied to the merged object/texture to remove unnecessary image data and the final output is trimmed and/or scaled to be a square texture with dimensions that are powers of 2 (e.g. 512x512, 1024x1024, etc).
The resulting texture for the character I’m working with here:
Resulting texture
There is some weird artifacting going on; notice the noisy speckled texture on parts of the face and one of the hands. I’m not really sure why that’s occurring, but it’s not especially noticeable, so I won’t worry about it for now.
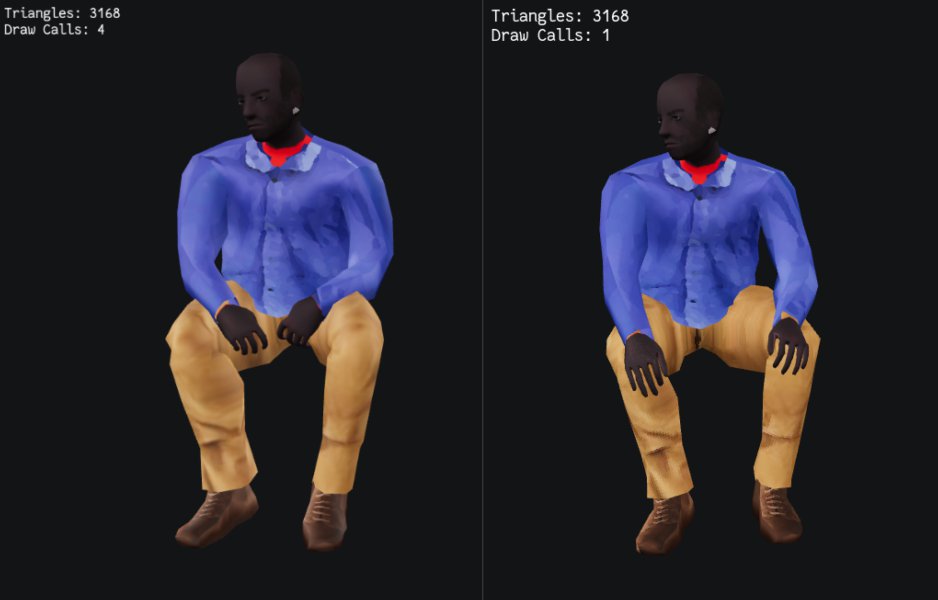
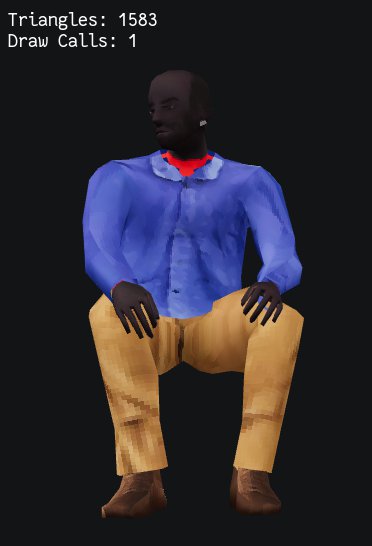
Here we see the draw calls for this character reduced from 4 to 1:
Draw call reduction
Of course after all of this effort there had to be more problems🙃. The first was a lot of white/blank texture areas showing up in the character. I had thought that this might be an issue–basically extracted textures have no bleed, so if the UV maps aren’t exactly precise then they might cut into empty parts of the texture. The solution to this was to add a padding parameter that provides a few pixels of buffer around each texture clipping.
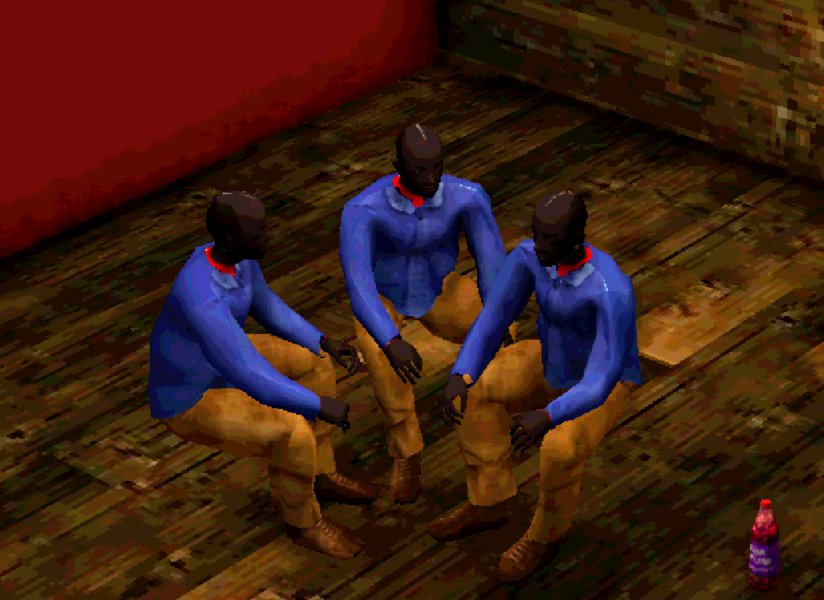
Yet even after that there was still one other problem. Though the Blender renders and in-browser GLTF preview look fine there is a weird seam that shows up in Godot:
Texture issue in Godot. Note the white seam at the top of his head.
Fortunately this wasn’t too difficult to solve. It was unlikely to be an issue with the exported GLTF itself because the in-browser GLTF preview didn’t have this issue. So it had to be something with Godot. For completeness I’ll go into the details.
When you import an asset into Godot it may process it in some way. For textures this can mean manipulating the images in ways to improve game performance. One such manipulation is the generation of “mipmaps”, which are scaled down versions of the texture to run when the object is at a smaller scale. The problem is that these mipmaps mean that the scaled down textures might not quite line up with the object’s UV maps, which causes texturing bleeding (thus the white line in the render above).
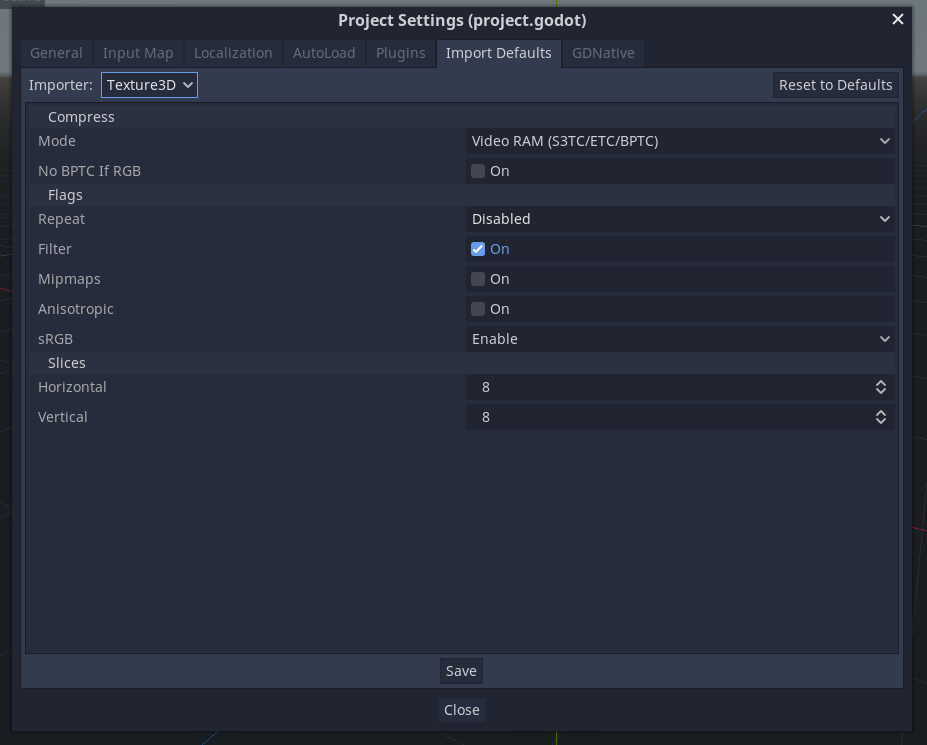
The actual modifications to the imported texture are controlled by default import settings you can define for your project:
# Ensure that mipmaps and filter are disabled
# for each material texture.
# This is because mipmaps can cause issues with bleed,
# i.e. blank parts of the texture bleed through to the UV map.
# For flag values see: <https://docs.godotengine.org/en/stable/classes/class_texture.html#enum-texture-flags>
for child in Util.find_children_of_type(instance, MeshInstance):
    for i in range(child.mesh.get_surface_count()):
        var mat = child.mesh.surface_get_material(i)
        mat.albedo_texture.flags = 0
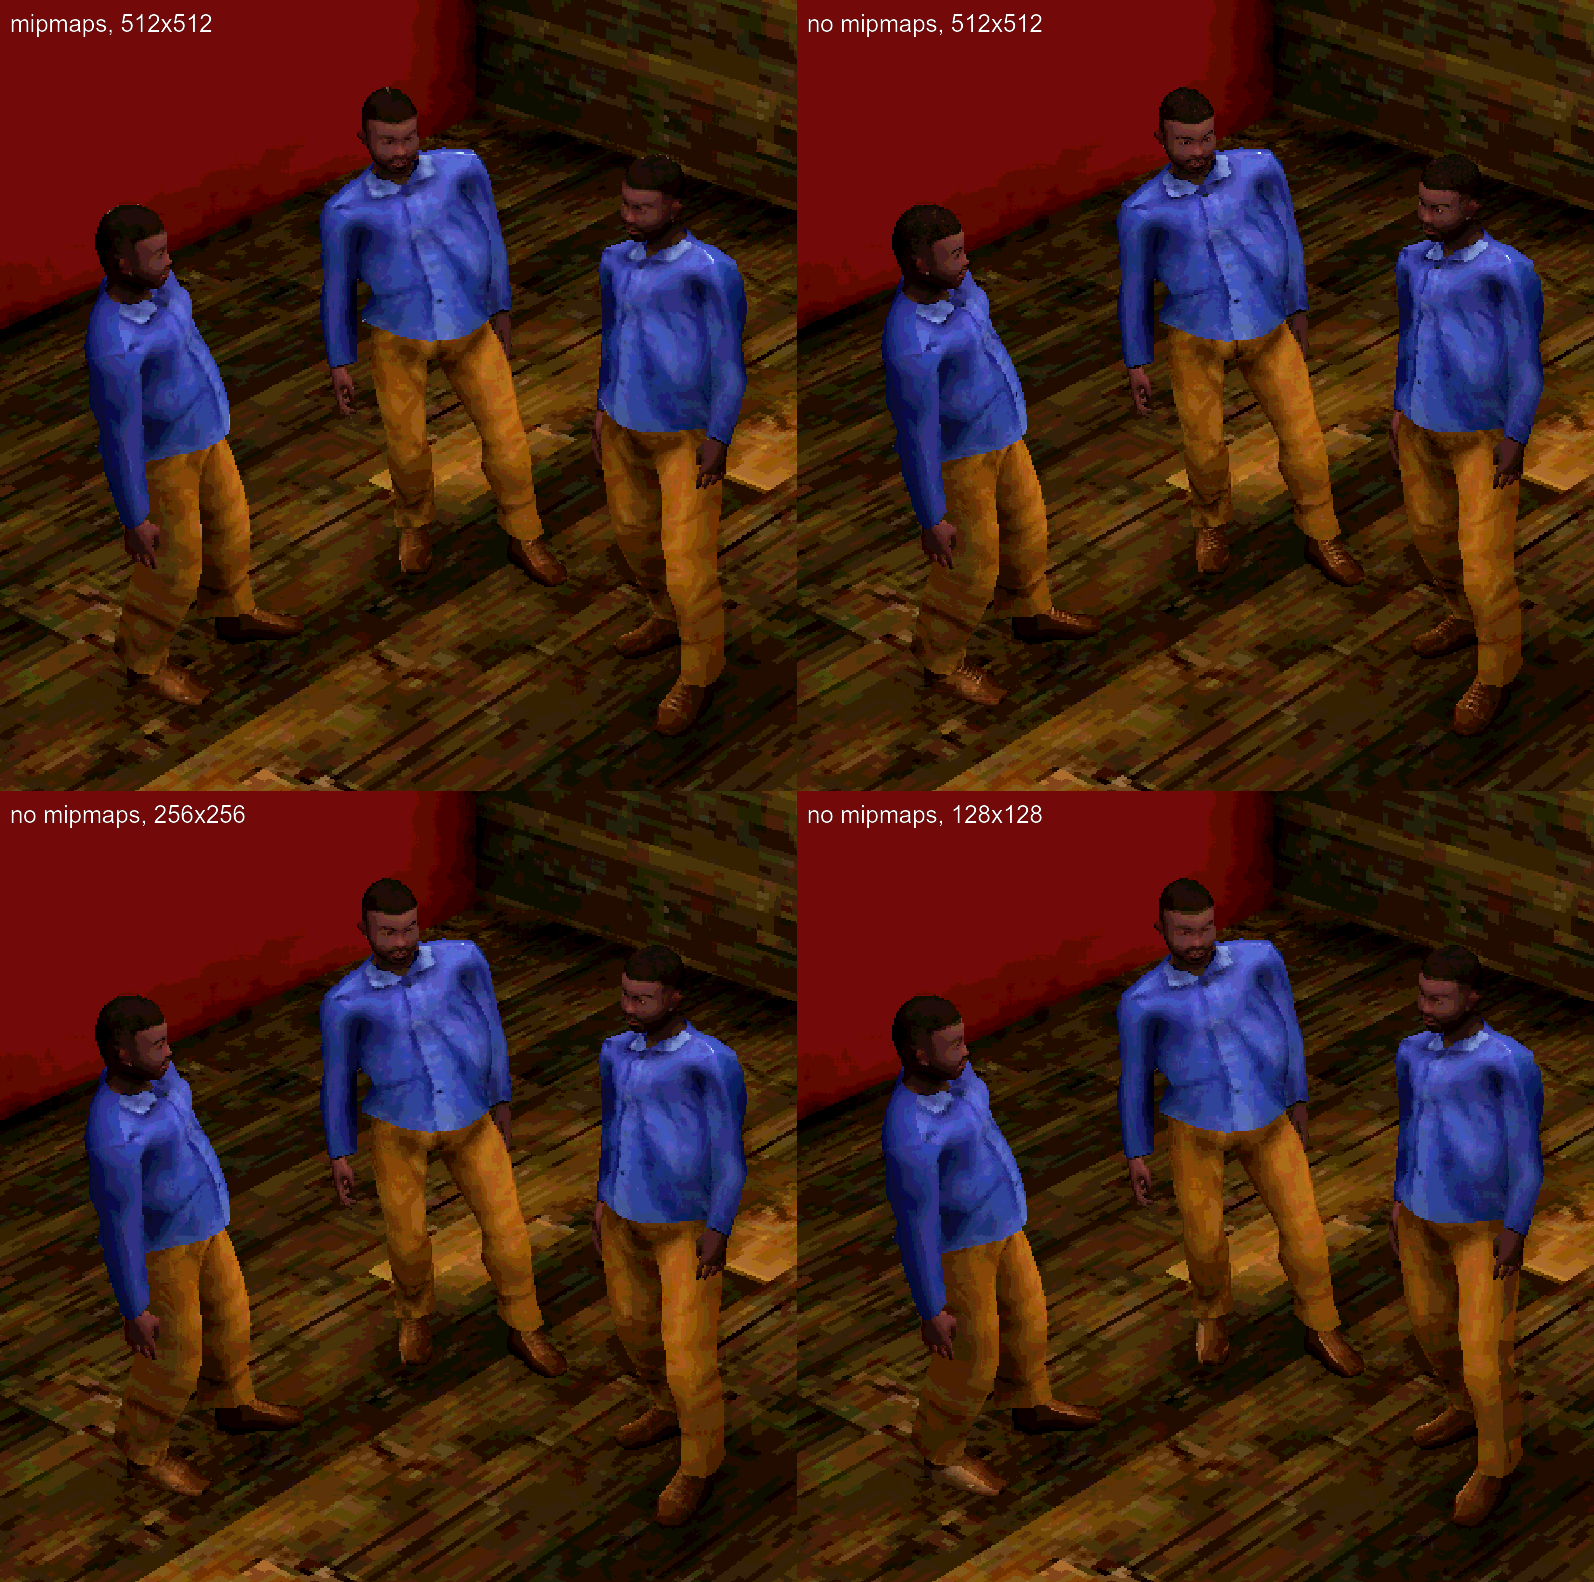
This works, but then I lose the advantage of mipmaps. There is a clear visual difference between enabling/disabling mipmaps. When turned off the original resolution texture is displayed which can mean showing more detail (I suggest clicking the image to see the full resolution version):
Mipmaps on/off compared, with different original texture sizes
Maybe it’s because I’m used to it now, but the mipmaps version looks better to me. It’s a bit softer and the eyes look better (though I think that’s because I maybe have too bright of a white for the eyeballs). I figured if the lower-res mipmaps version looks better I should just use a lower-res texture to begin with. So I tried downscaling the original 512x512 texture to 256x256 and 128x128 and they both look good. The 128x128 one looks the closest to the mipsmap version, but isn’t exactly the same (Godot may use a different downscaling algorithm; I used Pixeluvo to resize and they don’t say what algorithm they use). Most importantly this manually downscaled version doesn’t have the seam/bleed problem that Godot’s version does. One further issue here is that the 128x128 version does lose some detail–the earrings are much, much harder to see there, so that might be an argument for the 256x256 texture.
This is all a good example of the unexpected and massive diversions that happen with a project like this. I spent so much time and energy on this that could have been spent on more interesting parts of the game. And it’s totally possible that this all just premature optimization. I haven’t developed a game like this so I don’t have any intuition about what I should be focused on for performance. But I really want to avoid the scenario where I’ve generated all this content for the game and then I have to go back and redo everything because of some bad performance decision I made early on (like ignoring draw calls, poly counts, texture sizes, etc).
I don’t think this level of detail is interesting to anyone except me lol. I mostly chronicled this so I have some documentation to refer to when in 3 months I’ve completely forgotten everything and find another edge case that requires me to re-think the whole system (I hope that doesn’t happen, but you never know), but also because maybe there’s some really simple industry standard approach that I completely missed (though I tried to look for one!).
In the end this was one of those things where you’re dealing with two challenges at once: figuring out the high-level algorithm to solve the abstract problem you’re dealing with and figuring out how to implement it in unfamiliar and at times un-/underdocumented or baffingly-designed APIs/libraries. Never a pleasant experience, but I hope it’s worth it!
Update @ 12/9/22 14:30: Right after publishing this I realized that I don’t need to simplify the base human geometry, but only the final geometry that will be exported. Simplifying the base human geometry was hard because of the reasons I mentioned in the last post: meeting the constraints of MakeClothes (quads or tris, minimizing poles) and because simplifying the geometry gives MakeHumans fewer vertices to manipulate the human form with, leading to wonky results. What I’m doing now is throwing a Decimate modifier on as the very last step before exporting the model. This not only simplifies the base human but also any clothes that are attached. At this stage MakeHuman has already done its work, so the constraints of quads/tris and poles no longer apply.
For now I’m using Decimate with a ratio of 0.5, cutting about half of the polys:
Reduced the poly count for this character from ~3k to ~1.5k.
Update @ 12/9/22 22:02: So there was another padding-related bug that was causing textures to overlap after packing them. Basically it came down to the fact that there are three different space systems that are used during the packing process: the UV space (where x and y are both in [0, 1]), the texture space (measured in pixels), and the packing space (which is just a scaled up version of the UV space so that coordinates can be integers). The padding is specified as pixels but I wasn’t properly converting them to the packing space, so I just had to implement the correct conversion.
Here are some images from the debugging process (I thought they looked nice):