I've had to fix a few more issues with the character generation system, but also added some improvements.
One of the main problems was with the poly reduction (the Decimate modifier), which can make some interactions between clothing and the character body unpredictable. Basically when clothes is close to the body and you have the character in different animations/poses, sometimes the underlying body can clip through the clothes. If the clothes conform to the body's geometry this is less of an issue because you won't, for example, have pointy geometry that can poke through more rounded geometry.
The way MakeClothes handles this is with its delete groups, where you basically flag specific vertices to be deleted when wearing a particular clothing item. The underlying vertices are redundant because they're covered by the clothes, and no vertices there means no clipping.
The Decimate modifier complicates this in two ways:
It may modify the body and clothing geometry in different ways, such that two surfaces that conformed are now shaped differently, so now the surface underneath may poke out through the surface above (consider that a smooth rounded surface has a higher poly count than a pointy pyramid-like surface; decimate converts these rounded surfaces into pointier ones.
It may modify the geometry such that delete groups end up deleting too much of the mesh.
So far these haven't caused major problems; I've been able to solve them by adjusting delete groups or by slightly scaling up clothing/hair so there's margin for pointy surfaces to stay concealed.
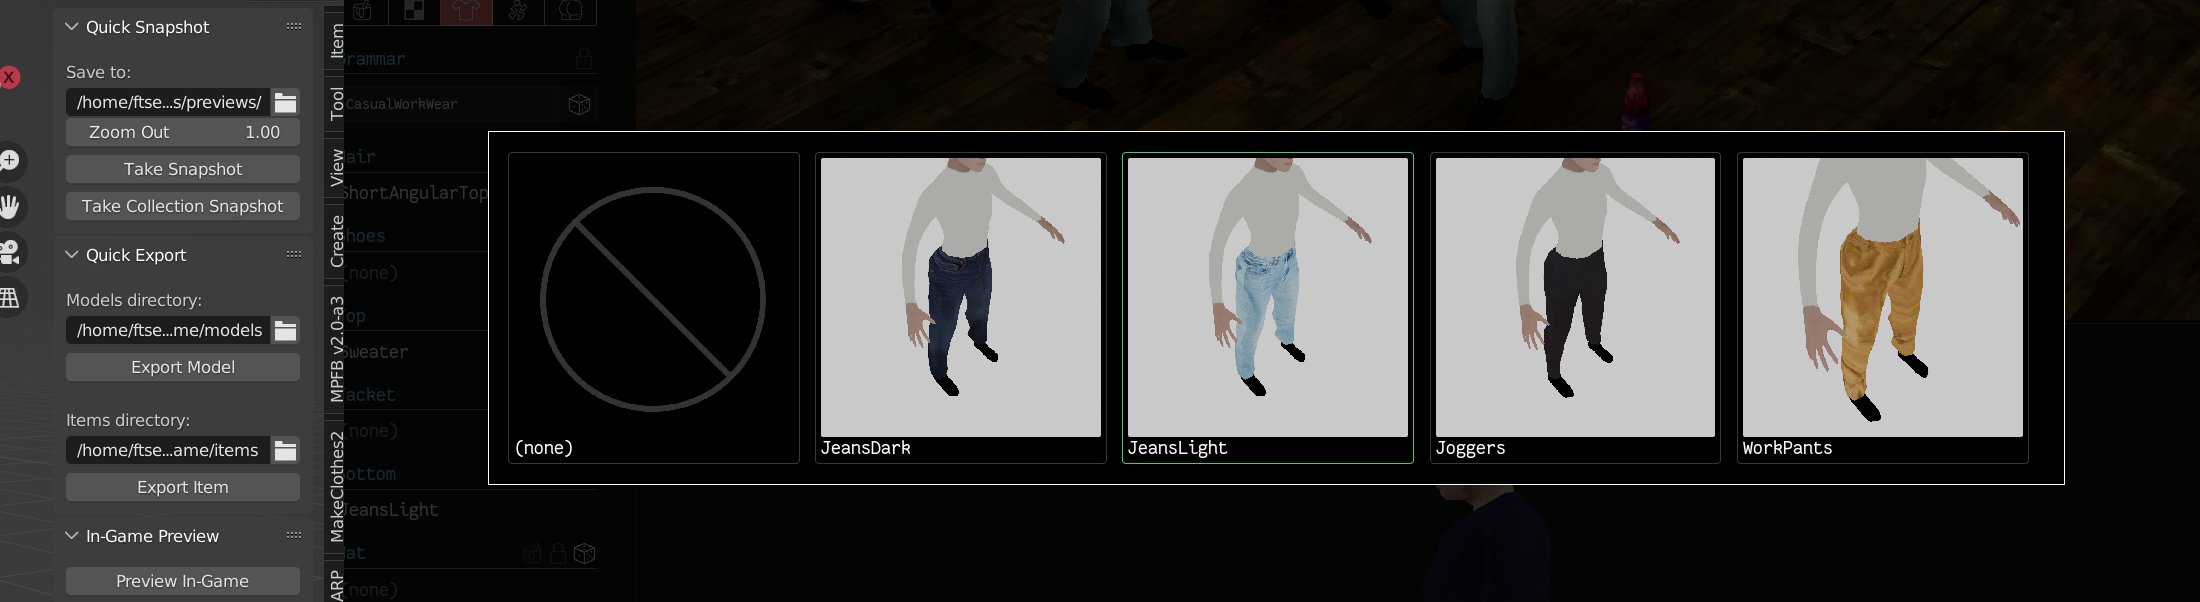
Aside from this I made a few minor quality-of-life improvements. I added a "Quick Preview" option which only converts the first frame of each character animation, cutting down character generation time by 30 seconds or so (really useful when tweaking things). I also added a way to generate clothing previews from within Blender and see them from within the character generator:
Clothes preview generation and picker
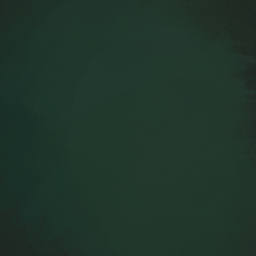
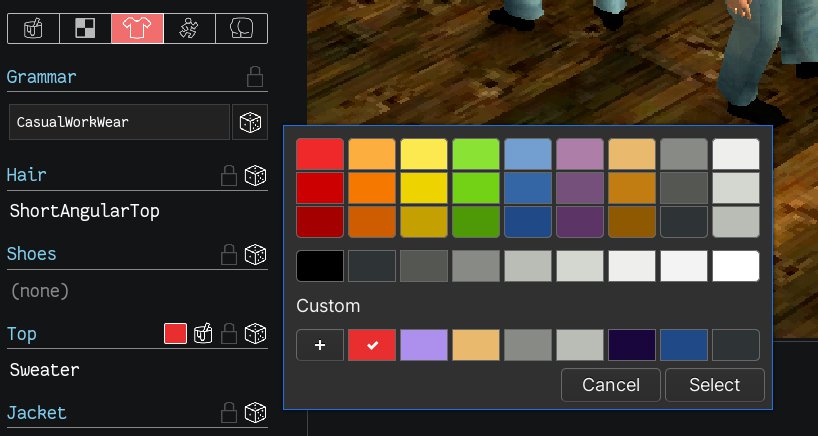
I also added a way to colorize clothing. Solid-colored clothes are made using a base forest green texture, (#1e3b2f), generated using the texture painting algorithm I described a few posts back:
Base solid color texture
In the UI you can pick a color and then that forest green is replaced in that texture:
Picking the color of clothes
This lets me squeeze a bit more mileage out of clothes meshes without needing to make different textures for every solid color I might want to use. The system is flexible enough that I can create more complicated textures that also use this system to re-colorize them, so long as they're based around that same forest green.
And I finally figured out why my webpack builds were taking so long. They took anywhere from 5-10min for the initial build, now it's just a few seconds1.
Screen shader tweaking
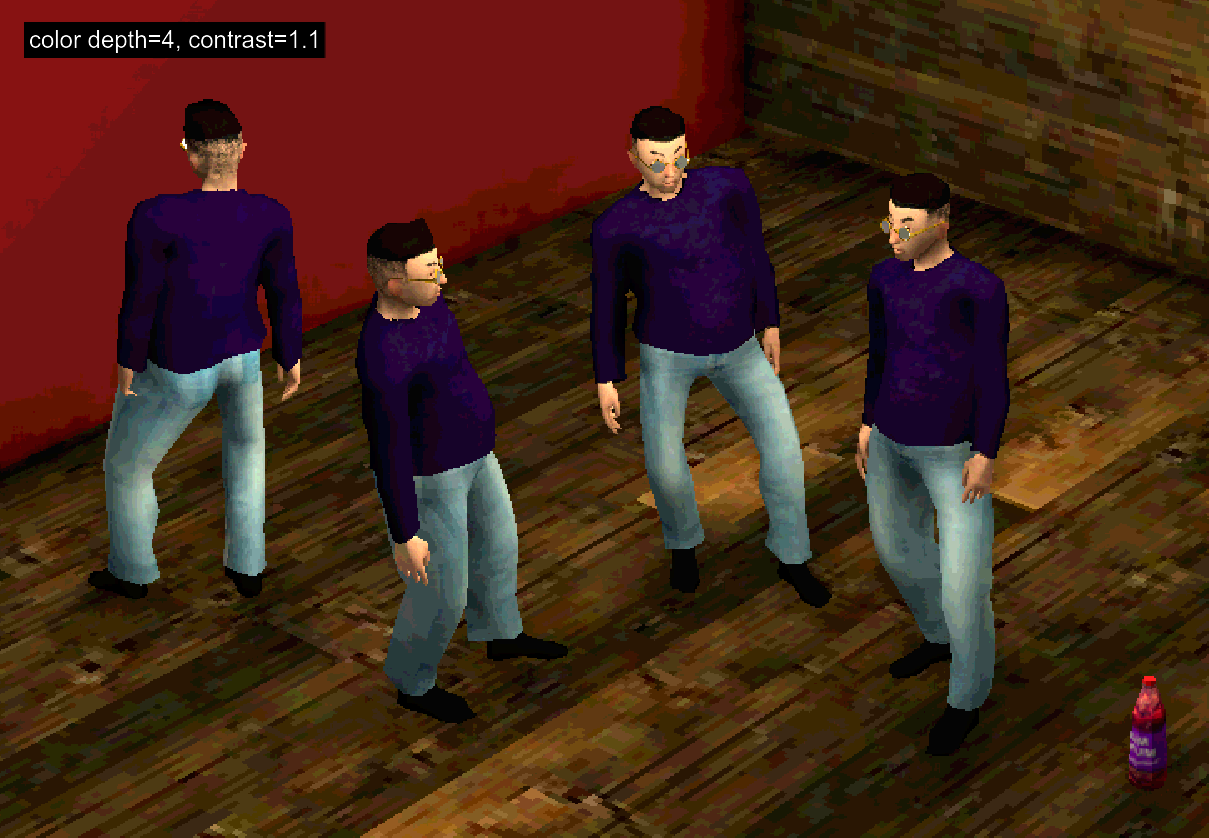
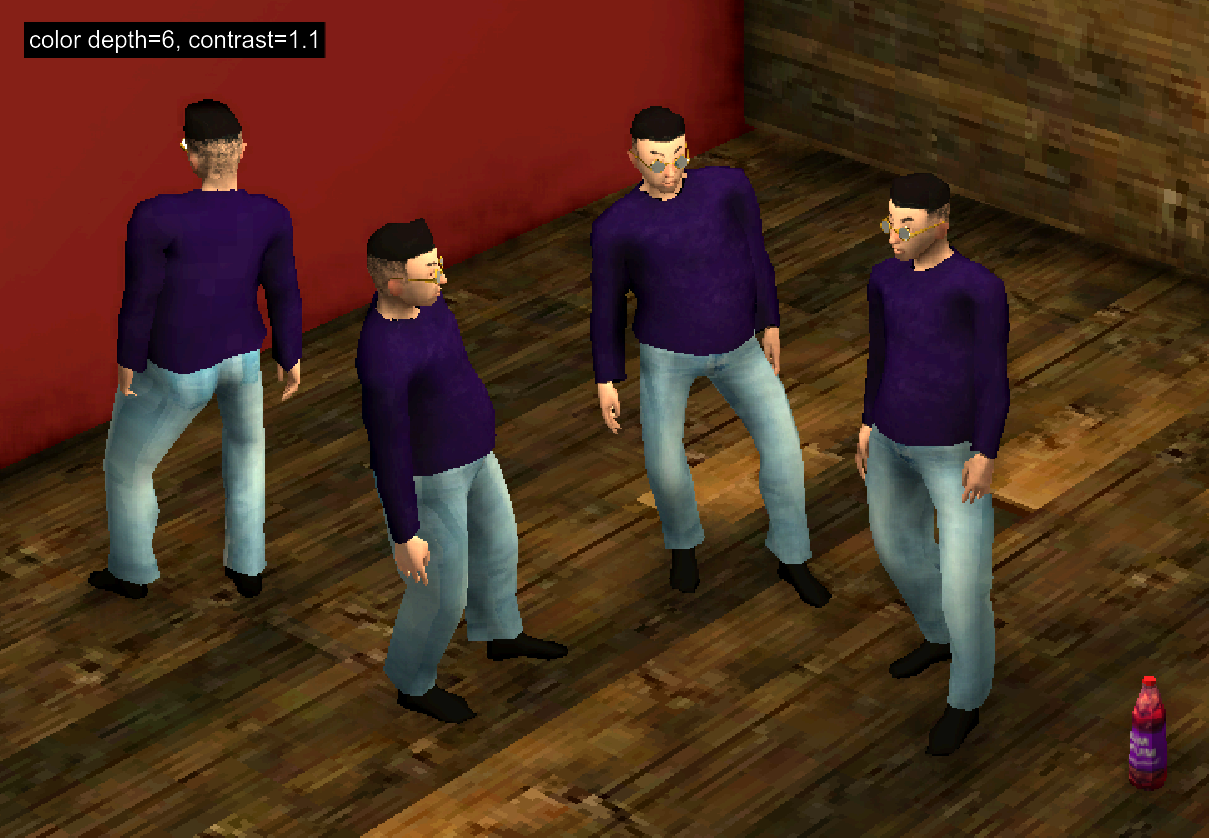
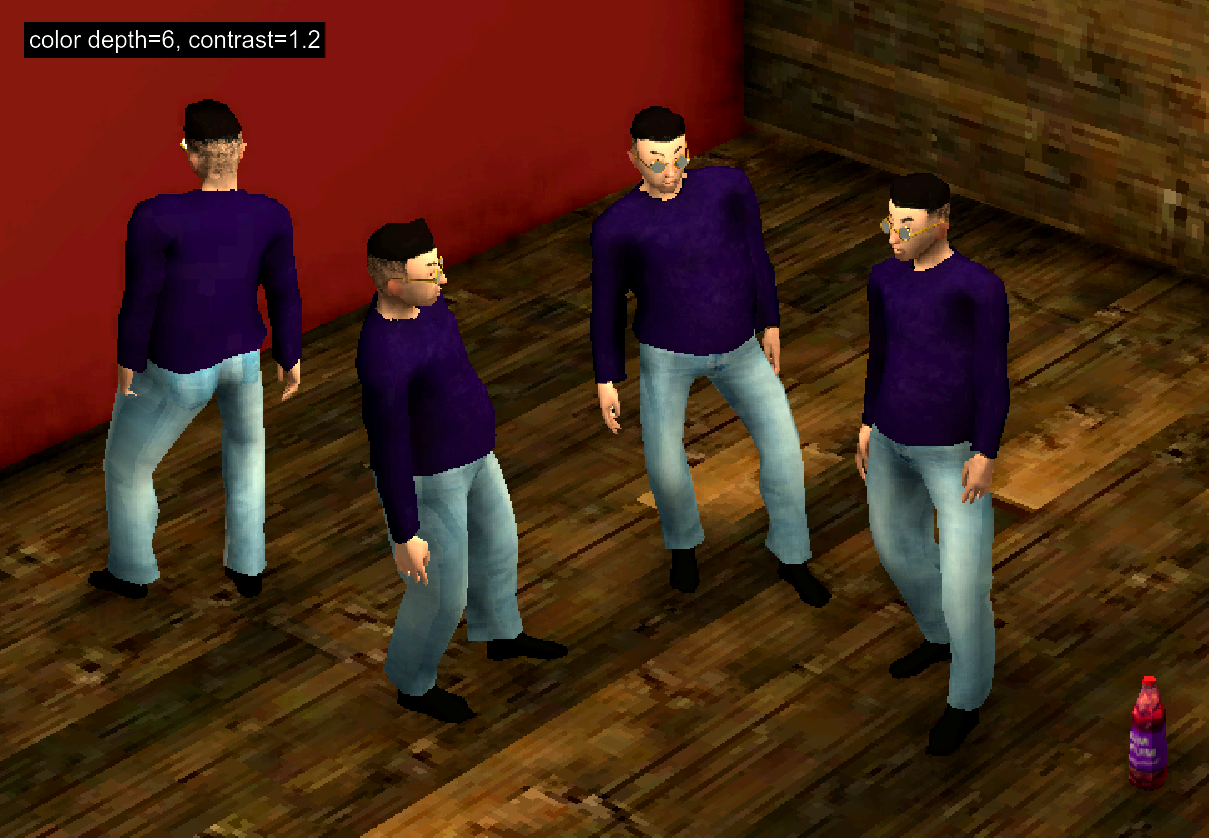
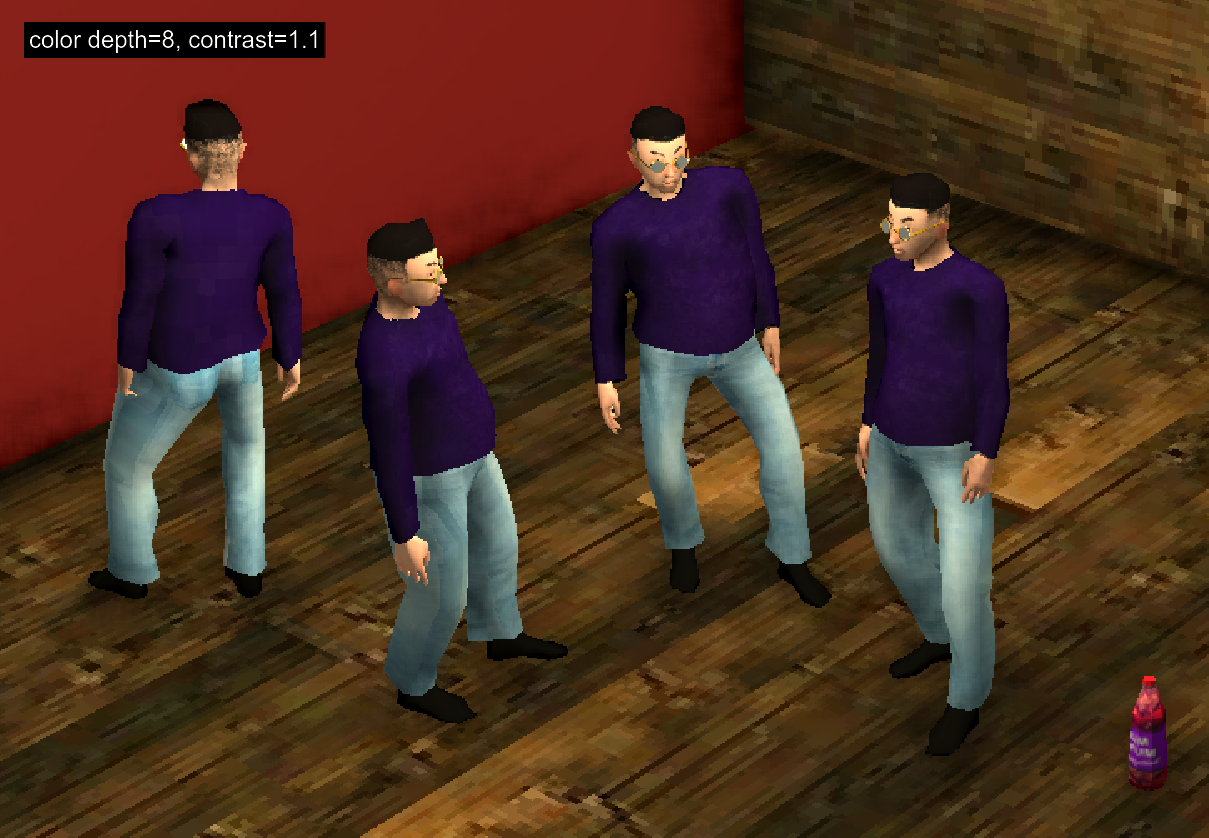
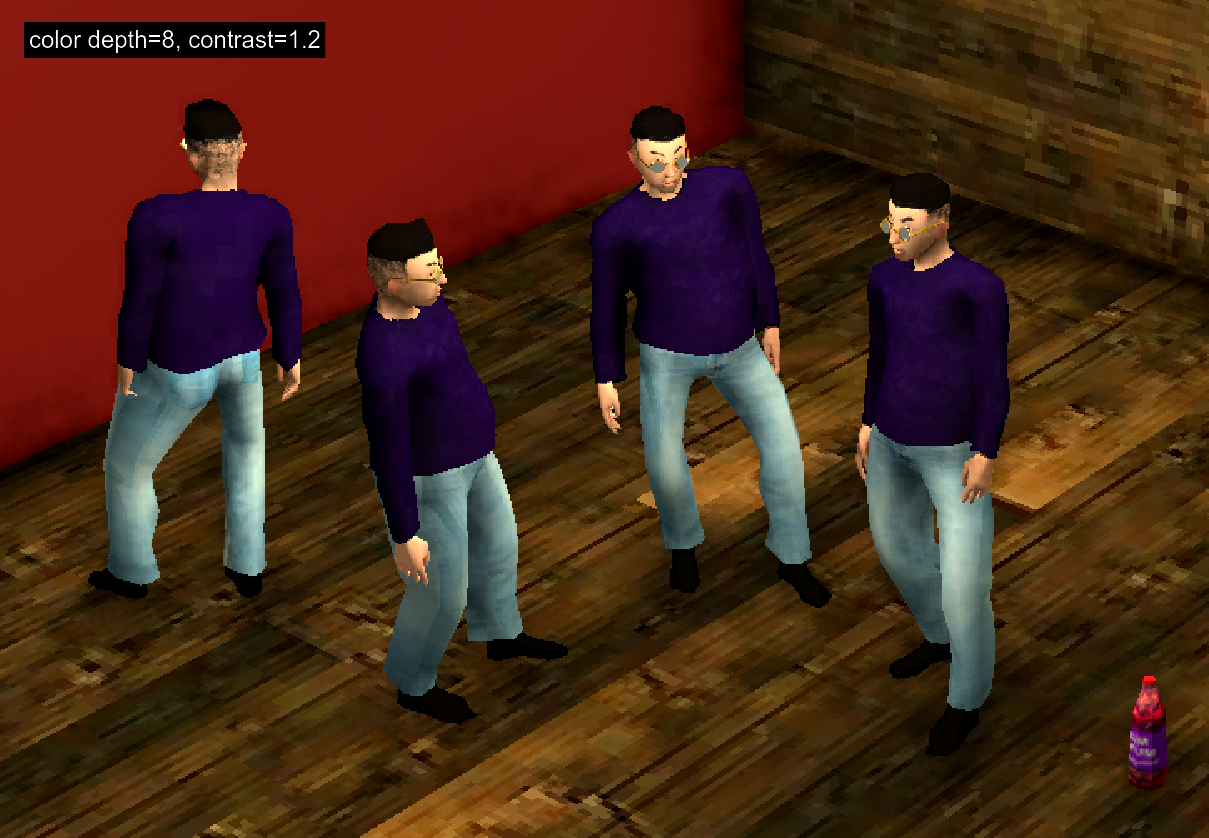
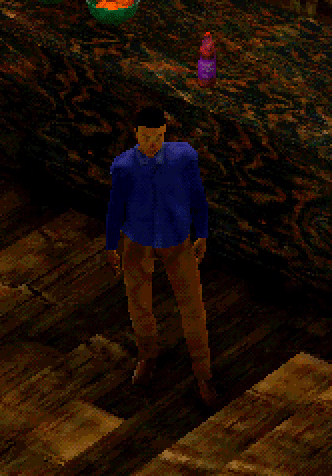
I'm trying to settle on screen shader settings for the game. There is already some downsampling happening here (well, the max resolution is set to 720p, so pixel cruchiness is more visible when rendering to higher resolutions than that), and I also had the color depth reduced to 4 for awhile. It's a nice visual effect but might get fatiguing, so I played around with some other settings.
Common settings across these renders: resolution=1, saturation=1.1, dithering=false, brightness=1.
(I did do some comparisons with dithering=true but this didn't make much of a difference except introducing some artifacts at lower resolutions.)
I think I'll probably stick to depth=6 (since it still introduces some interesting banding on the wall, but not too aggressive like it is with a color depth of 4) and contrast=1.2 for now. It may change as more environments and characters are created.
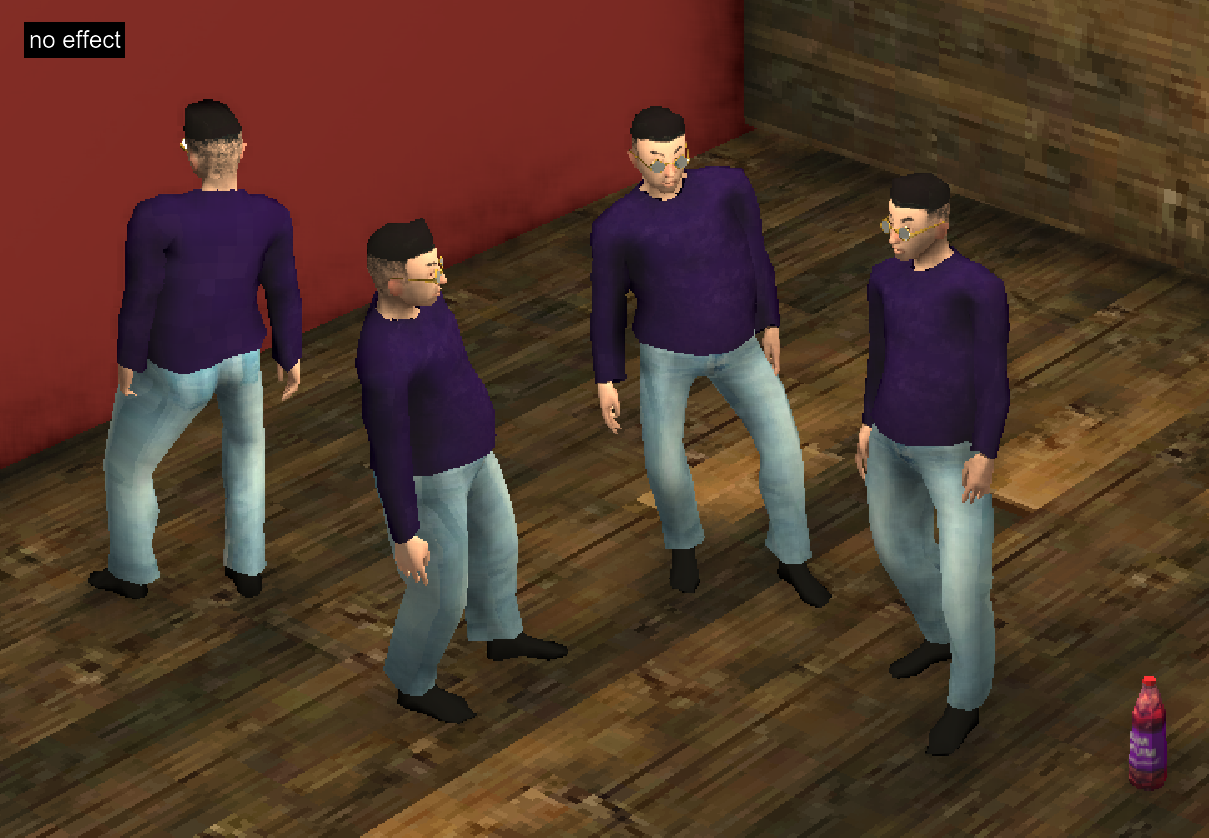
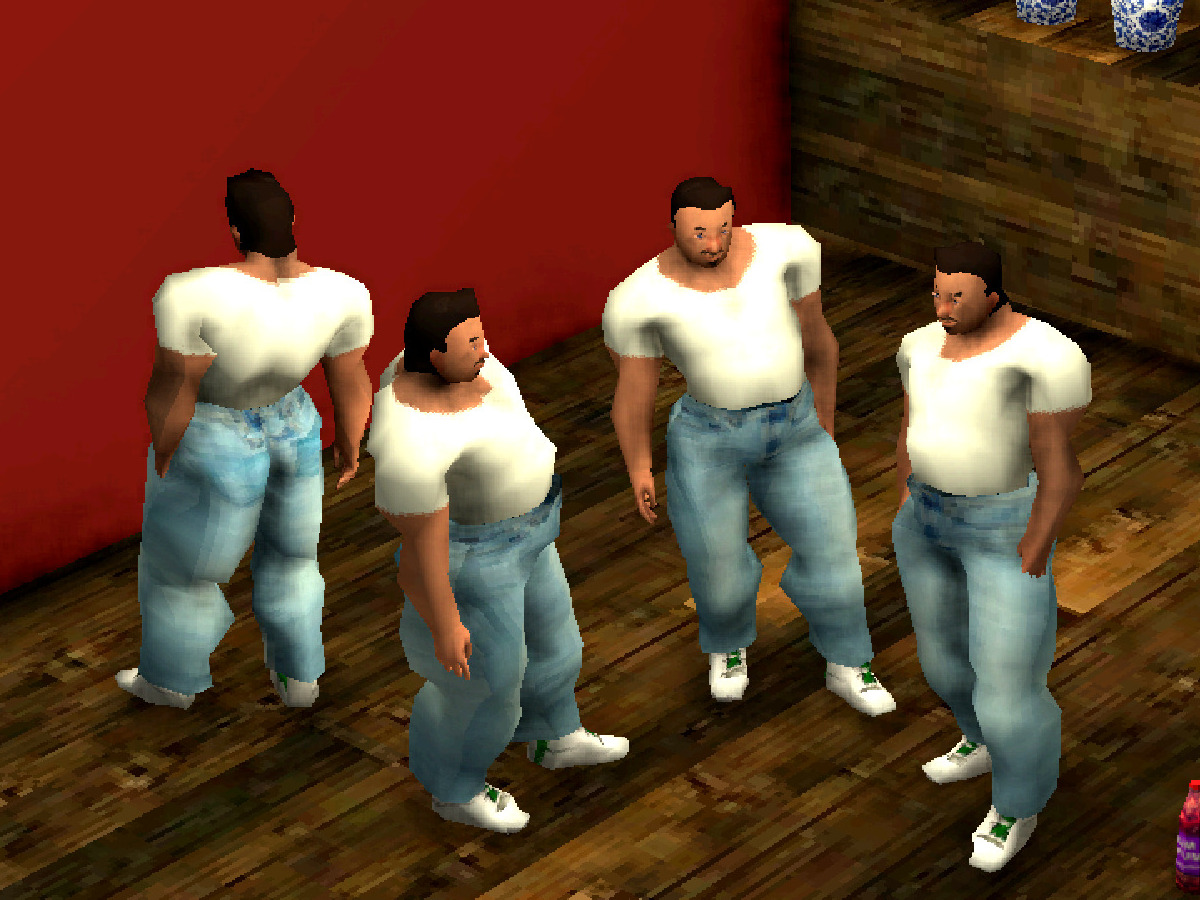
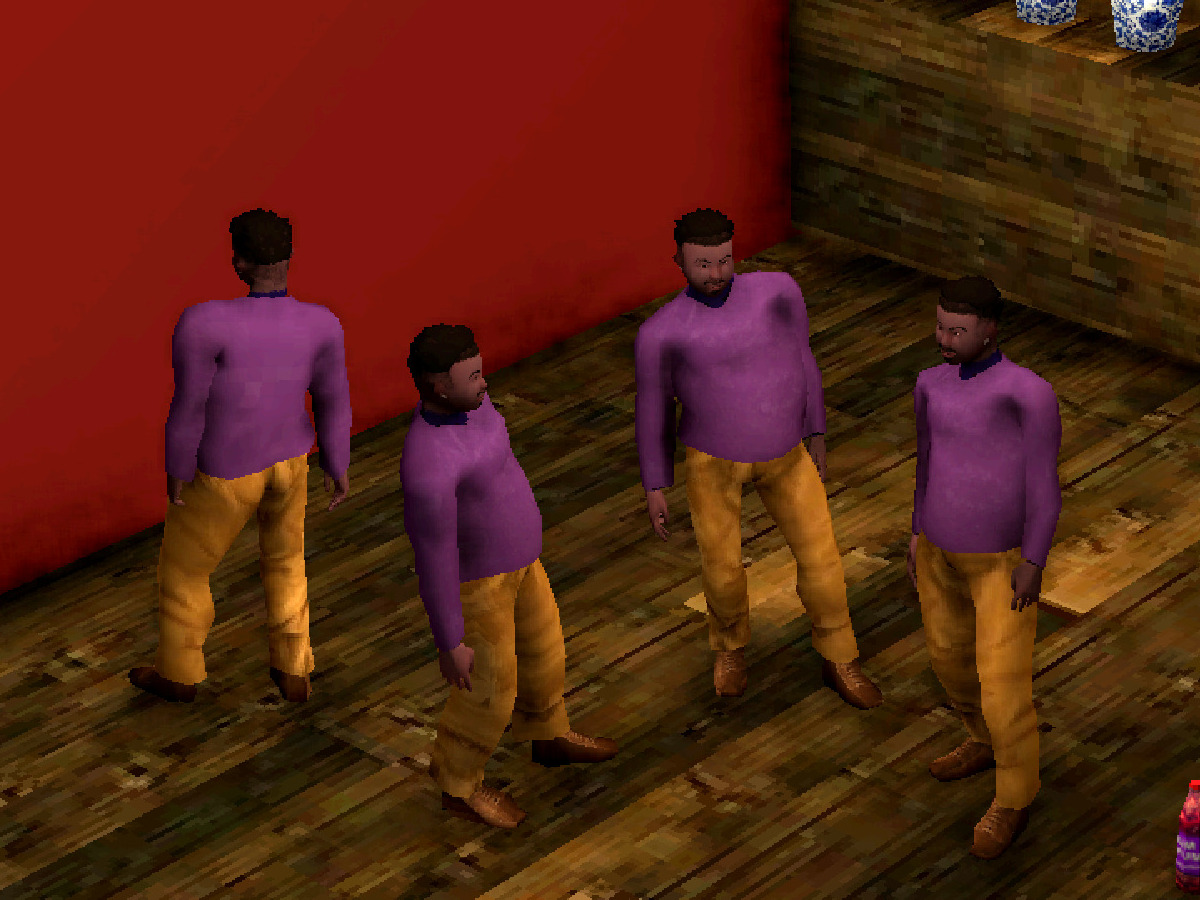
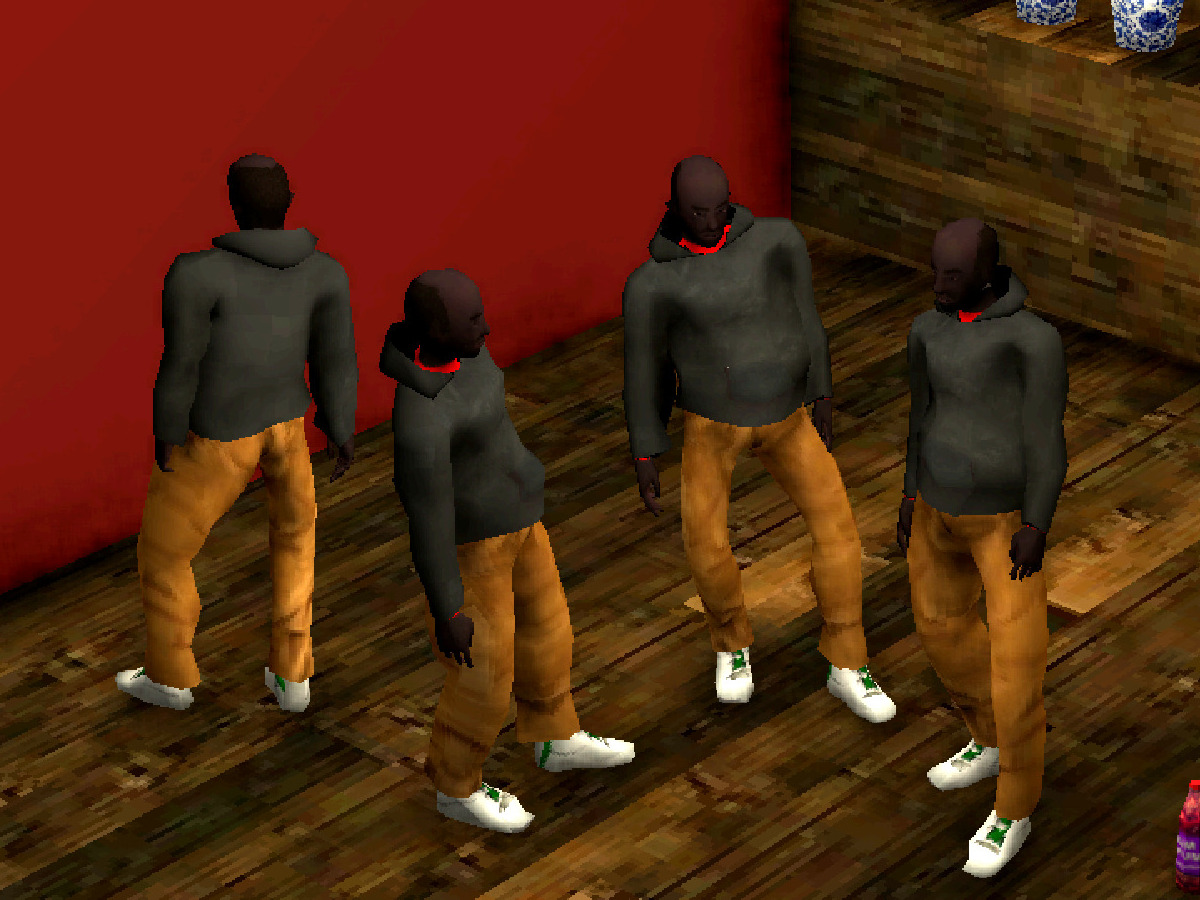
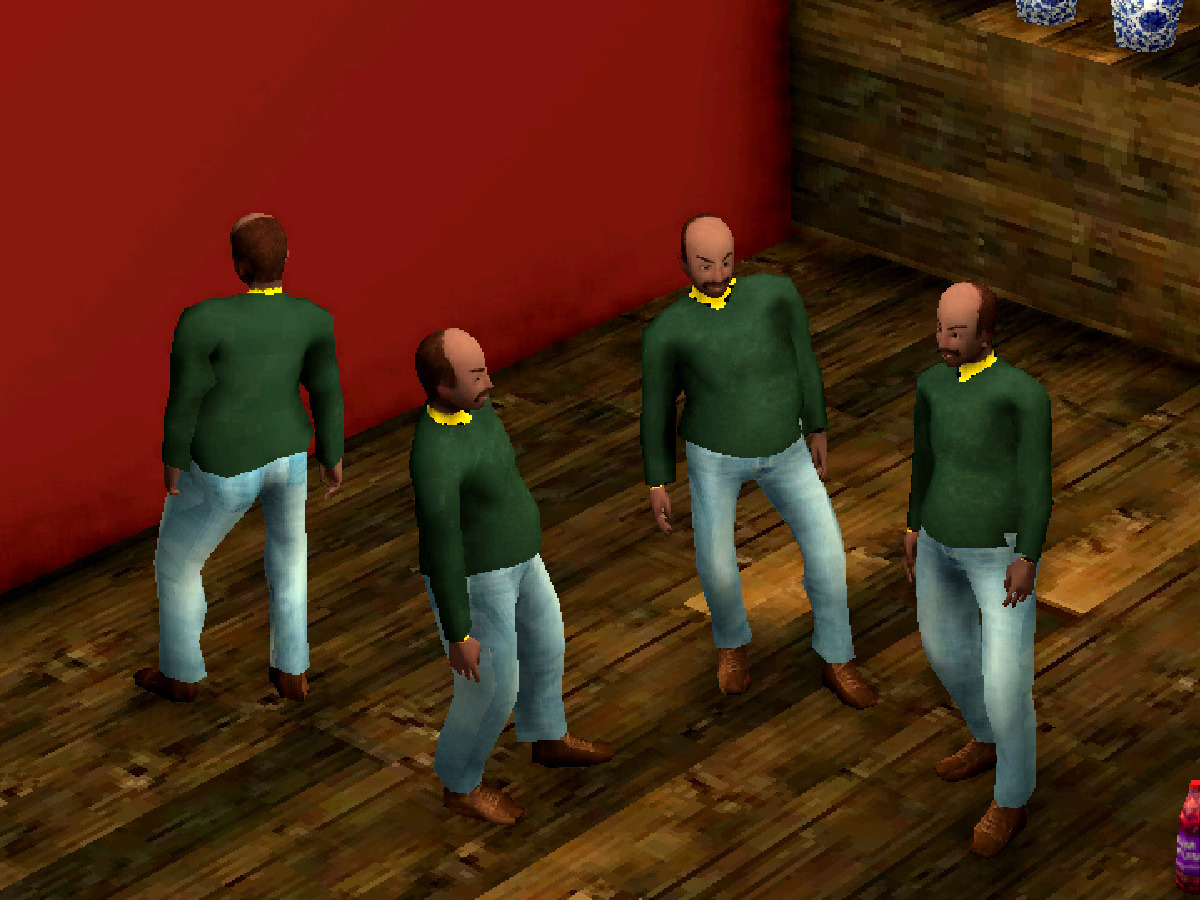
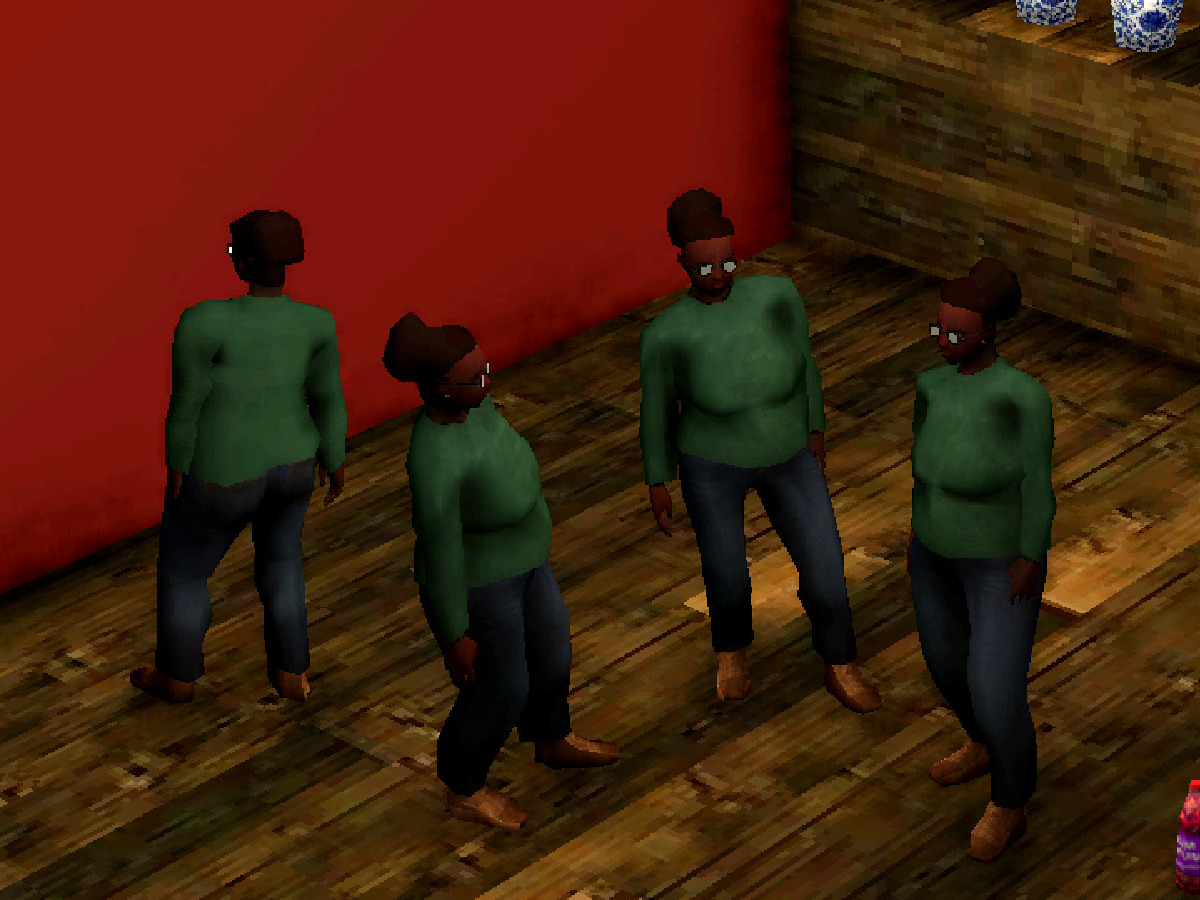
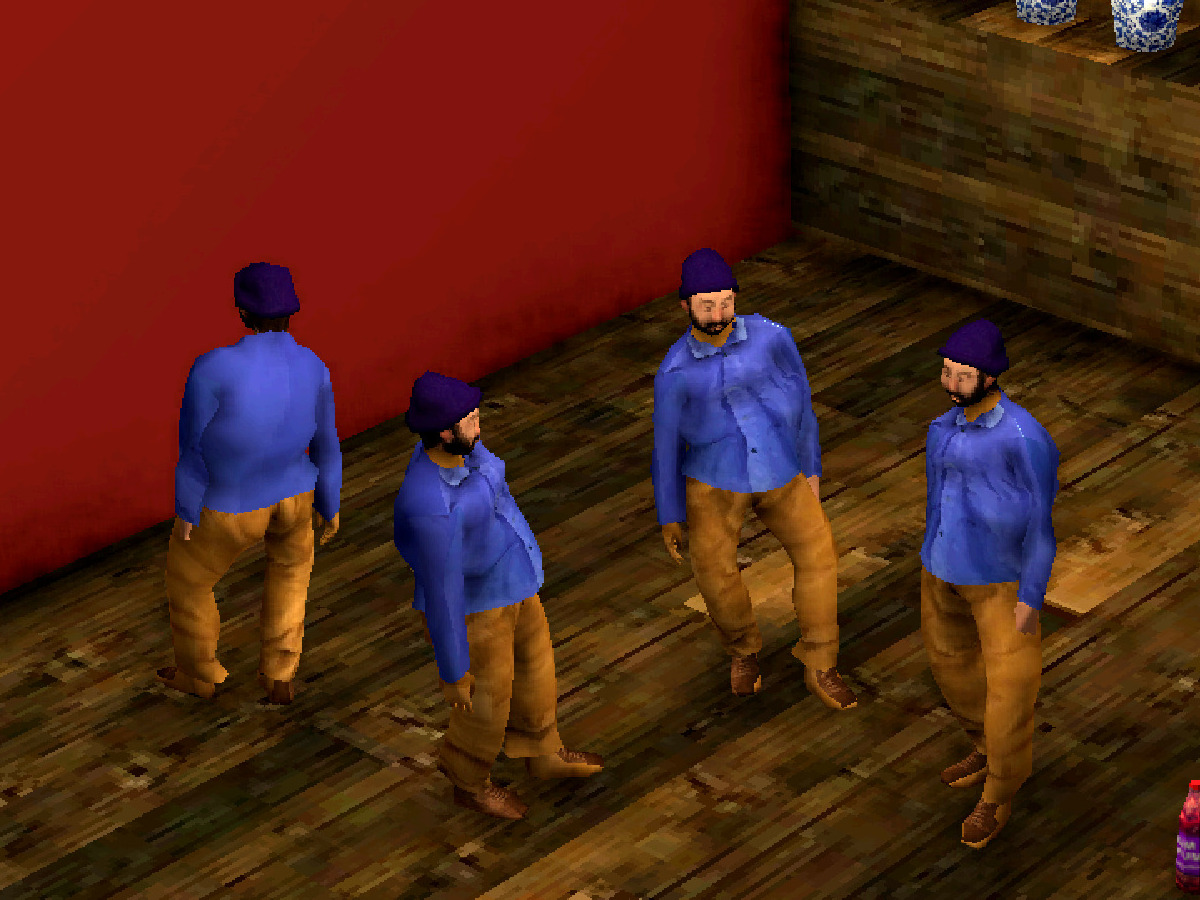
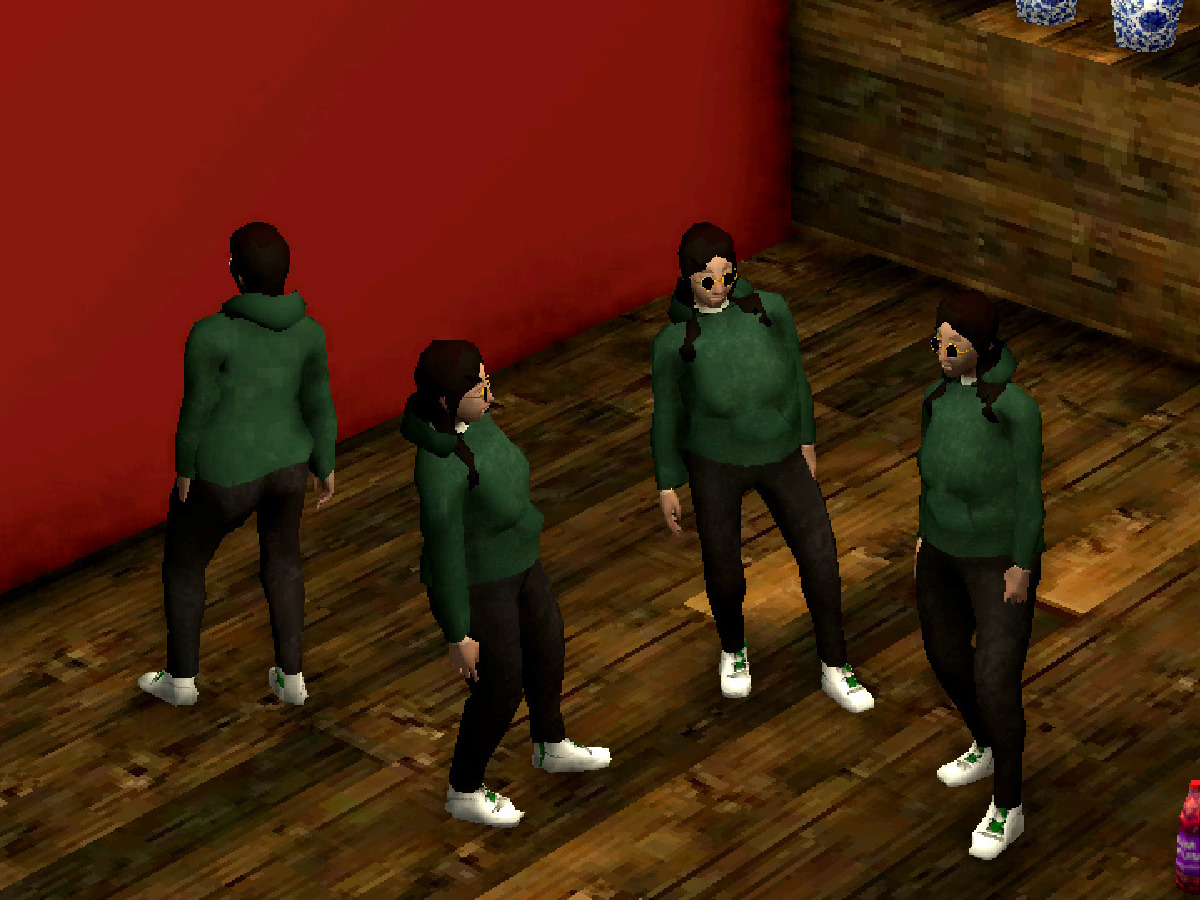
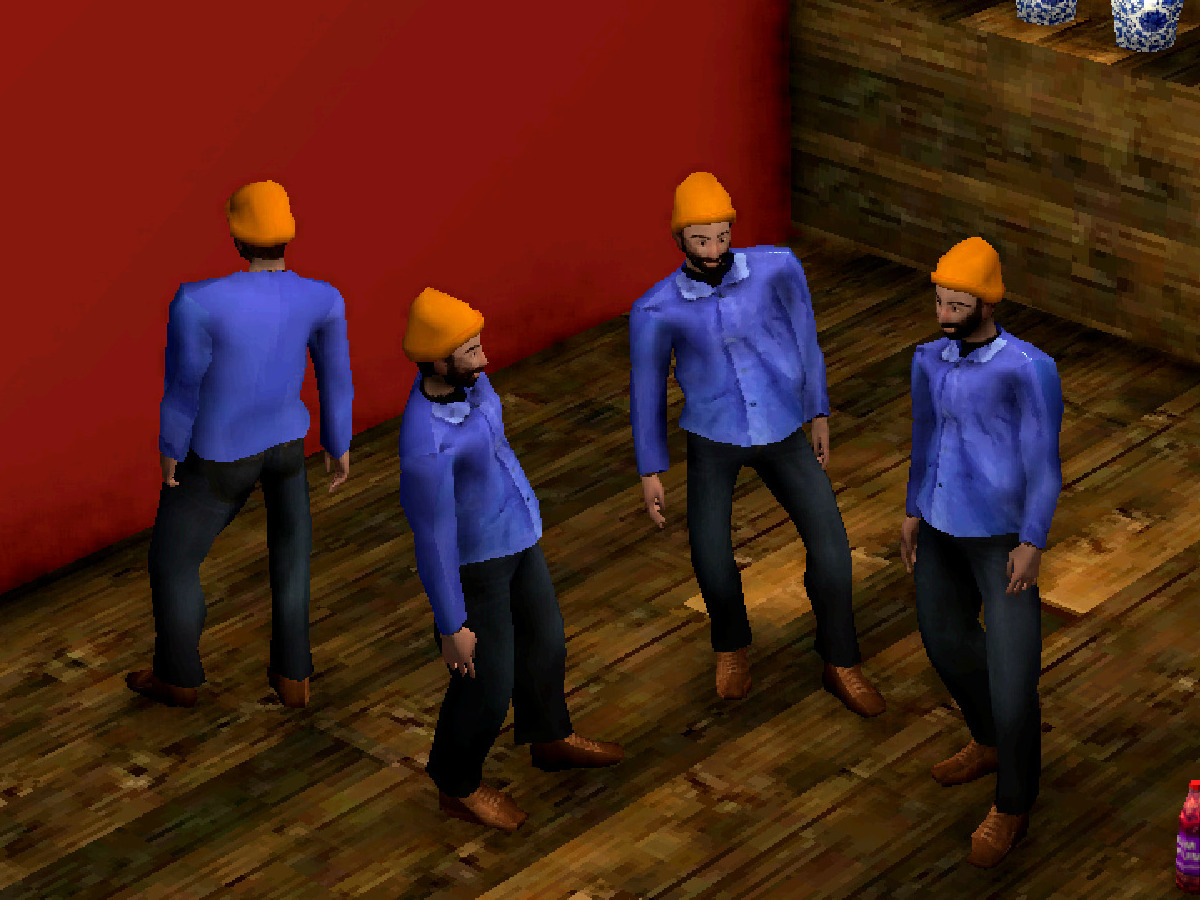
Test characters
I started making more use out of the character generation system to see if anything else needs improving. Part of this trial run required creating more clothing and hairstyles to try out. These characters are all randomly generated (except for the clothing/hair, which are added afterwards):
Next steps
I'll likely leave the character generation system here for now, though I'll need to make a lot more clothes and hairstyles eventually. The priority now is to figure out the story and game mechanics since those influence everything else moving forward.
The main change was that the typescript-loader is very slow unless it's set to transpileOnly: true, I don't fully understand why. ↩
At the end of the last post I mentioned some optimization considerations for Fugue's character models. I managed to reduce the poly count of the human model a bit, but my quick-and-dirty approach (using Blender's Decimate) messed up the mesh's structure too much and caused some issues, so I'll have to try a more manual method [Update: see the end of this post].
The other bit of optimization I started working on was reducing draw calls. A fully dressed character model has several different materials: one for the human (the skin texture) and then one for each item of clothing. I couldn't find any clear information about how Godot handles draw calls and materials but generally more materials means more draw calls. So if I can merge the skin and clothes materials I should be able to reduce draw calls to as low as one per character.
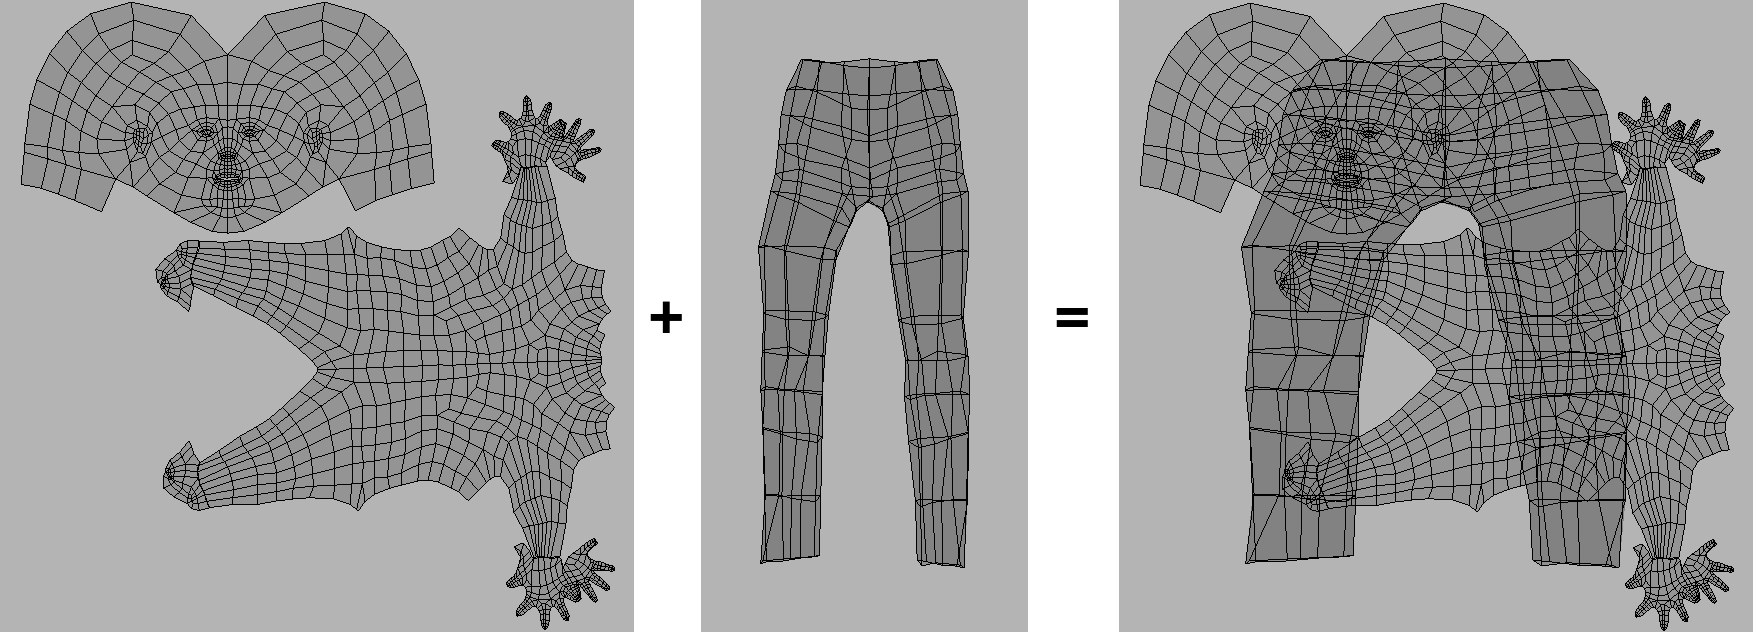
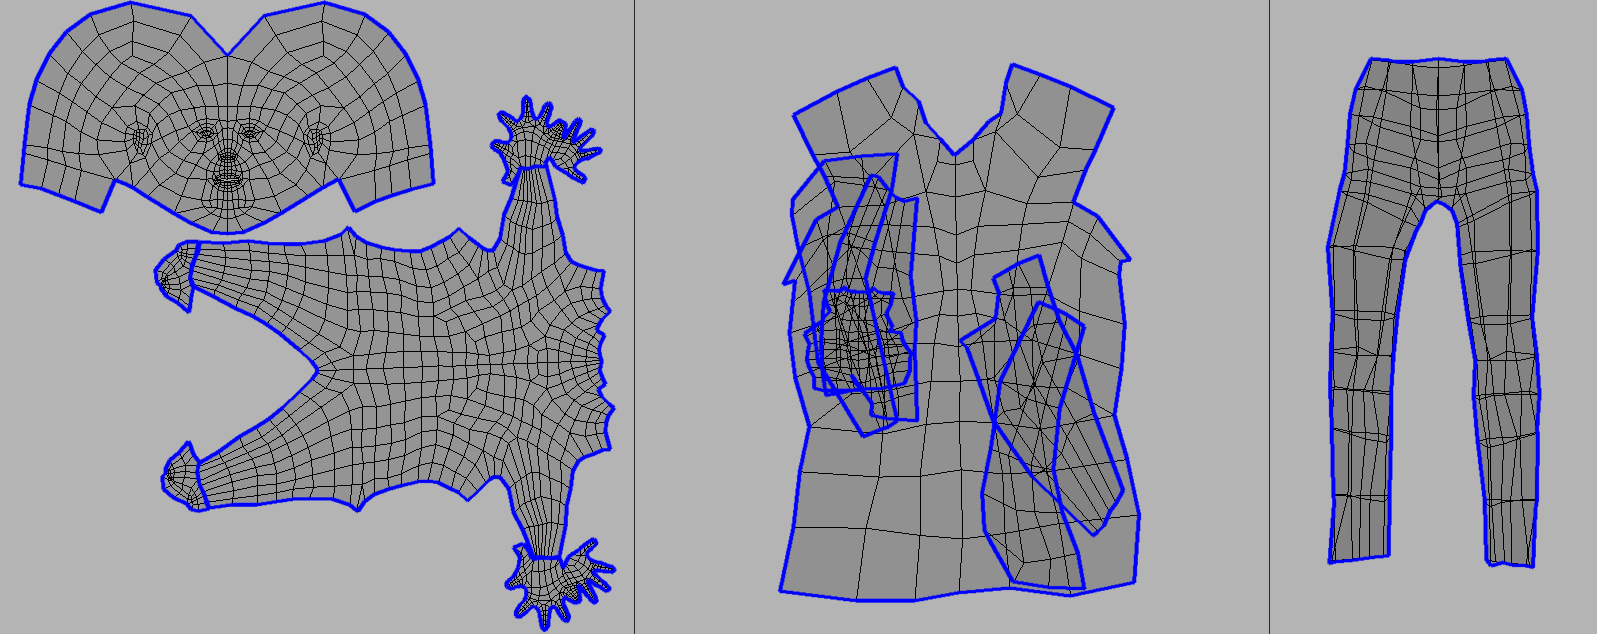
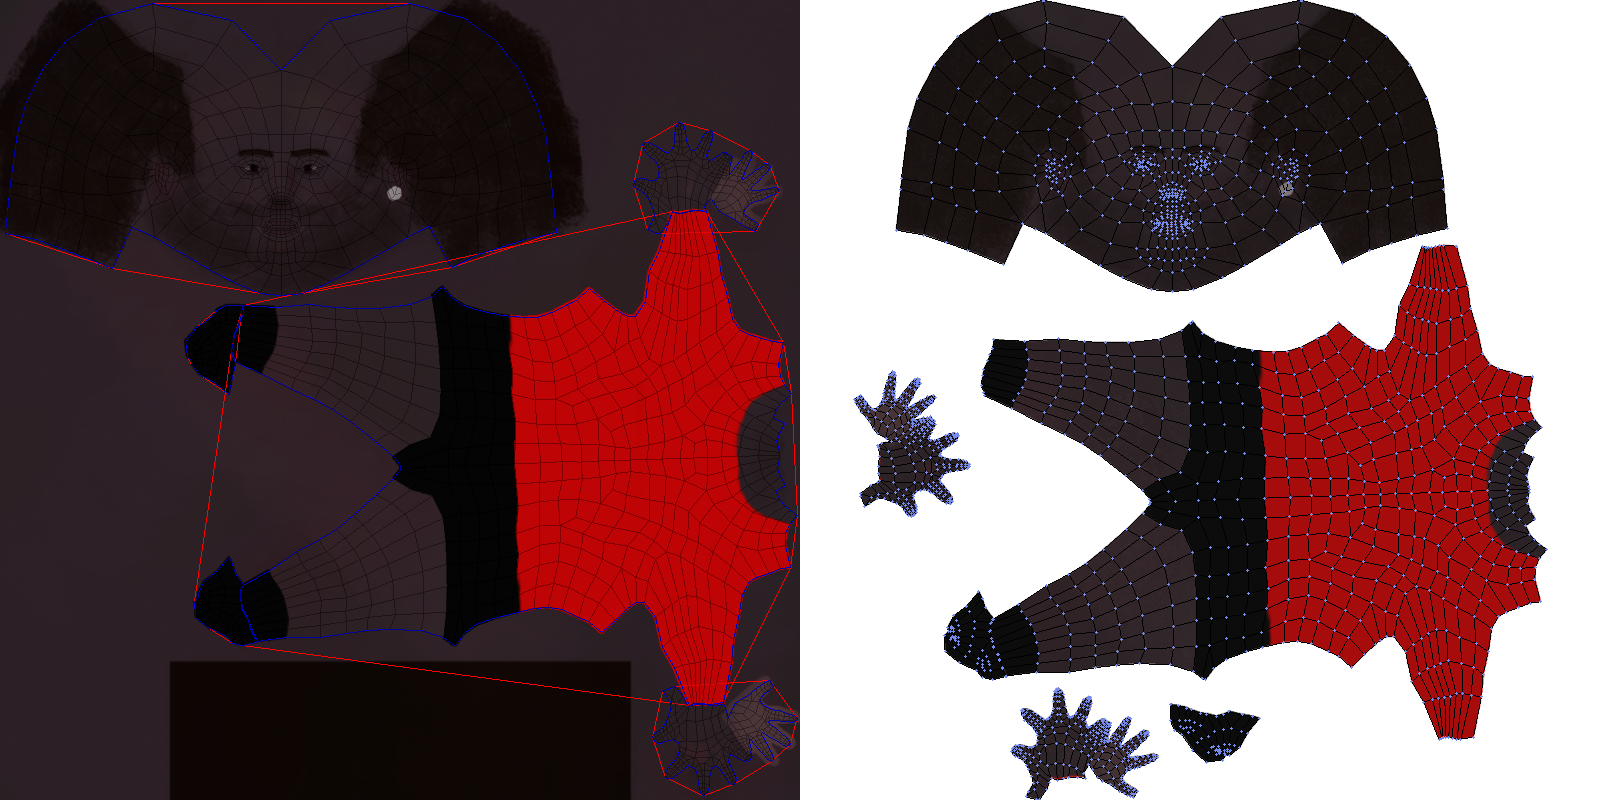
I thought there'd be a Blender addon that does this but I surprisingly couldn't find any. There are texture atlas baking addons which isn't quite what I'm looking for—they assume that your UV maps neatly laid out, without overlaps, and they're usually for baking environmental influence (e.g. lighting/shadows) into the texture (I just need to cut and rearrange the original texture data). Merging materials in the way I have in mind is tricky because each mesh has its own UV map and when you merge the meshes these UV maps all overlap:
Merging objects and the resulting UV layout issue
(You can also see that there are some scaling issues, where the pants UV layout is now stretched—the original pants texture has a non-square aspect ratio.)
To solve this you need to scale/move the UV maps so they each have their own space, which then requires you to also move the underlying parts of their original textures to where their UV map regions were moved to so that the correct image data is still mapped to the correct faces.
In theory this isn't too difficult—there are some tricky parts like placing the UV map regions (a concave bin packing problem) but everything else is straightforward if you have the UV map geometry. But actually implementing this was really rough—probably my most frustrating development experience in recent memory. I'm not even finished yet, so crossing my fingers that nothing else comes up. This is one of those problems that required many different approaches, and it's possible that I'll need to pull ideas from old abandoned ideas if I run into new obstacles...so I'll try to document my thinking and attempts here.
The biggest struggle was with Blender itself. Blender is an amazing tool and its scripting capabilites are awesome, but they feel like an afterthought, especially for background mode/headless scripting. It has so many puzzling design decisions, many useful functions don't have a Python API, and an inconsistent dependency on the UI. There are functions that behave differently depending on what the active window/area is or if you're in EDIT mode vs OBJECT mode, and if you aren't running the UI (i.e. running Blender in background mode) some of these functions don't work at all. So of course the entire script I developed within the UI environment didn't end up working when I switched to the background mode 🙃.
There are also some strange instabilities and limitations of headless Blender, like I can't export UV layouts because "the GPU can't be used in background mode", but I'm able to render 3d scenes without any problem. I'm sure there's a good reason. Similarly, for some reason loading JPGs and converting them to RGBA with Pillow segfaults from within the Blender environment but works just fine using Blender's Python when not running Blender. Fortunately these problems always had a hacky workaround.
There also just isn't a lot of information about scripting for headless Blender so it was difficult to find answers or discussion when I did run into problems.
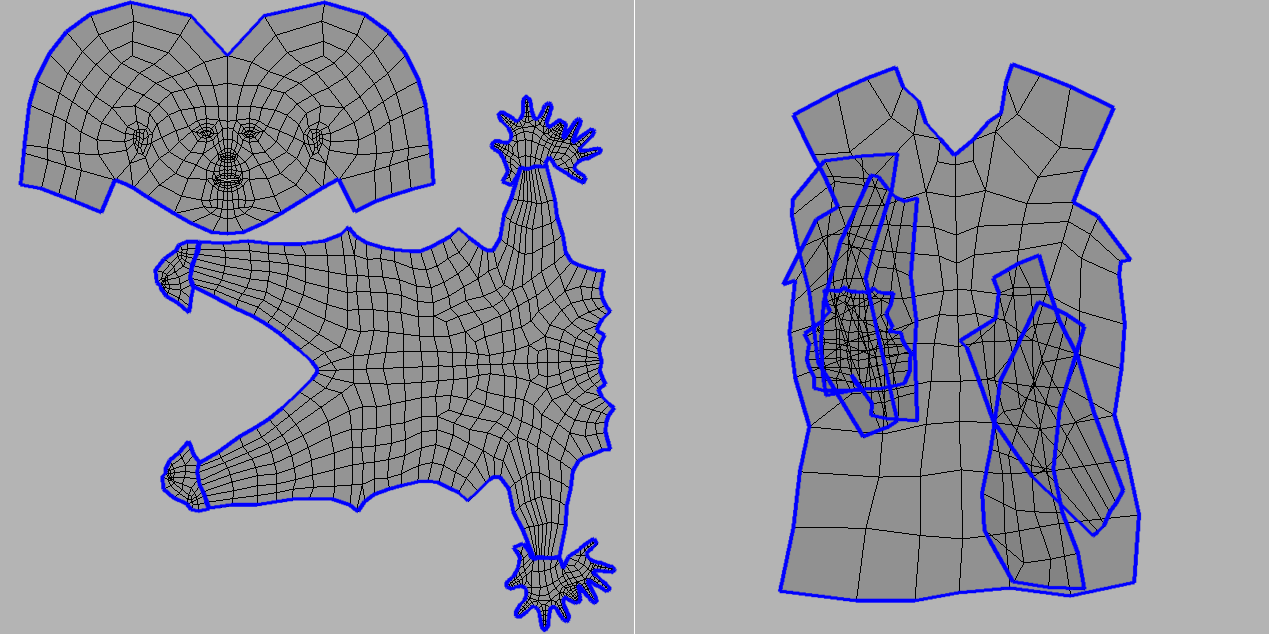
The other difficult part was getting the UV map data I needed—in particular the geometry of each individual UV map region. What I'm calling a "UV map region" here isn't quite the same as a "UV island". Islands are sets of connected UVs and they can overlap. In the maps below the islands are outlined in blue:
In my case I care about contiguous regions of UV map, whether or not they are connected. So the UV map on the right with all the overlapping islands would be considered a single UV map region, and each island in the UV map on the left is also its own UV map region.
To identify these regions I needed two bits of information:
The polygon boundaries of each island
A mapping of UVs to the island they belong to
Surprisingly there is no built-in Python function to access UVs by island. There is a way to hack it though:
# Make sure the correct object is selected# and that you're in edit modeobj=bpy.data.objects['your-object-name']bpy.context.view_layer.objects.active=objbpy.ops.object.mode_set(mode='EDIT')bm=bmesh.from_edit_mesh(bpy.context.active_object.data)uv_layers=bm.loops.layers.uv.verify()# Select all UVs# then generate seams from UV islandsbpy.ops.uv.select_all(action='SELECT')bpy.ops.uv.seams_from_islands()# Collect the island boundary edges hereedges=[]forfinbm.faces:forlinf.loops:ifl.edge.seamorl.edge.is_boundary:a=l[uv_layers].uvb=l.link_loop_next[uv_layers].uv# Blender's texture coordinates are flipped# than most image processing;# i.e. top-left is (0, 1) rather than (0, 0).# So we reflect everything over y=0.5 (i.e. flip vertically)# to compensate.edges.append(((a.x,1-a.y),(b.x,1-b.y)))
This method relies on Blender's built in "Seams from Islands" function, which marks the border edges of UV islands as a "seam". Then we can iterate all edges of the mesh to find those that are marked as a seam.
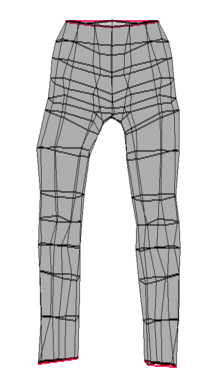
This actually worked fine until I tried it on a UV map where the seams produced by this function didn't actually match the island's borders:
Seams/islands extracted from the pants
Here the islands, outlined in red, are just the openings of the pants. The rest of the island border isn't selected.
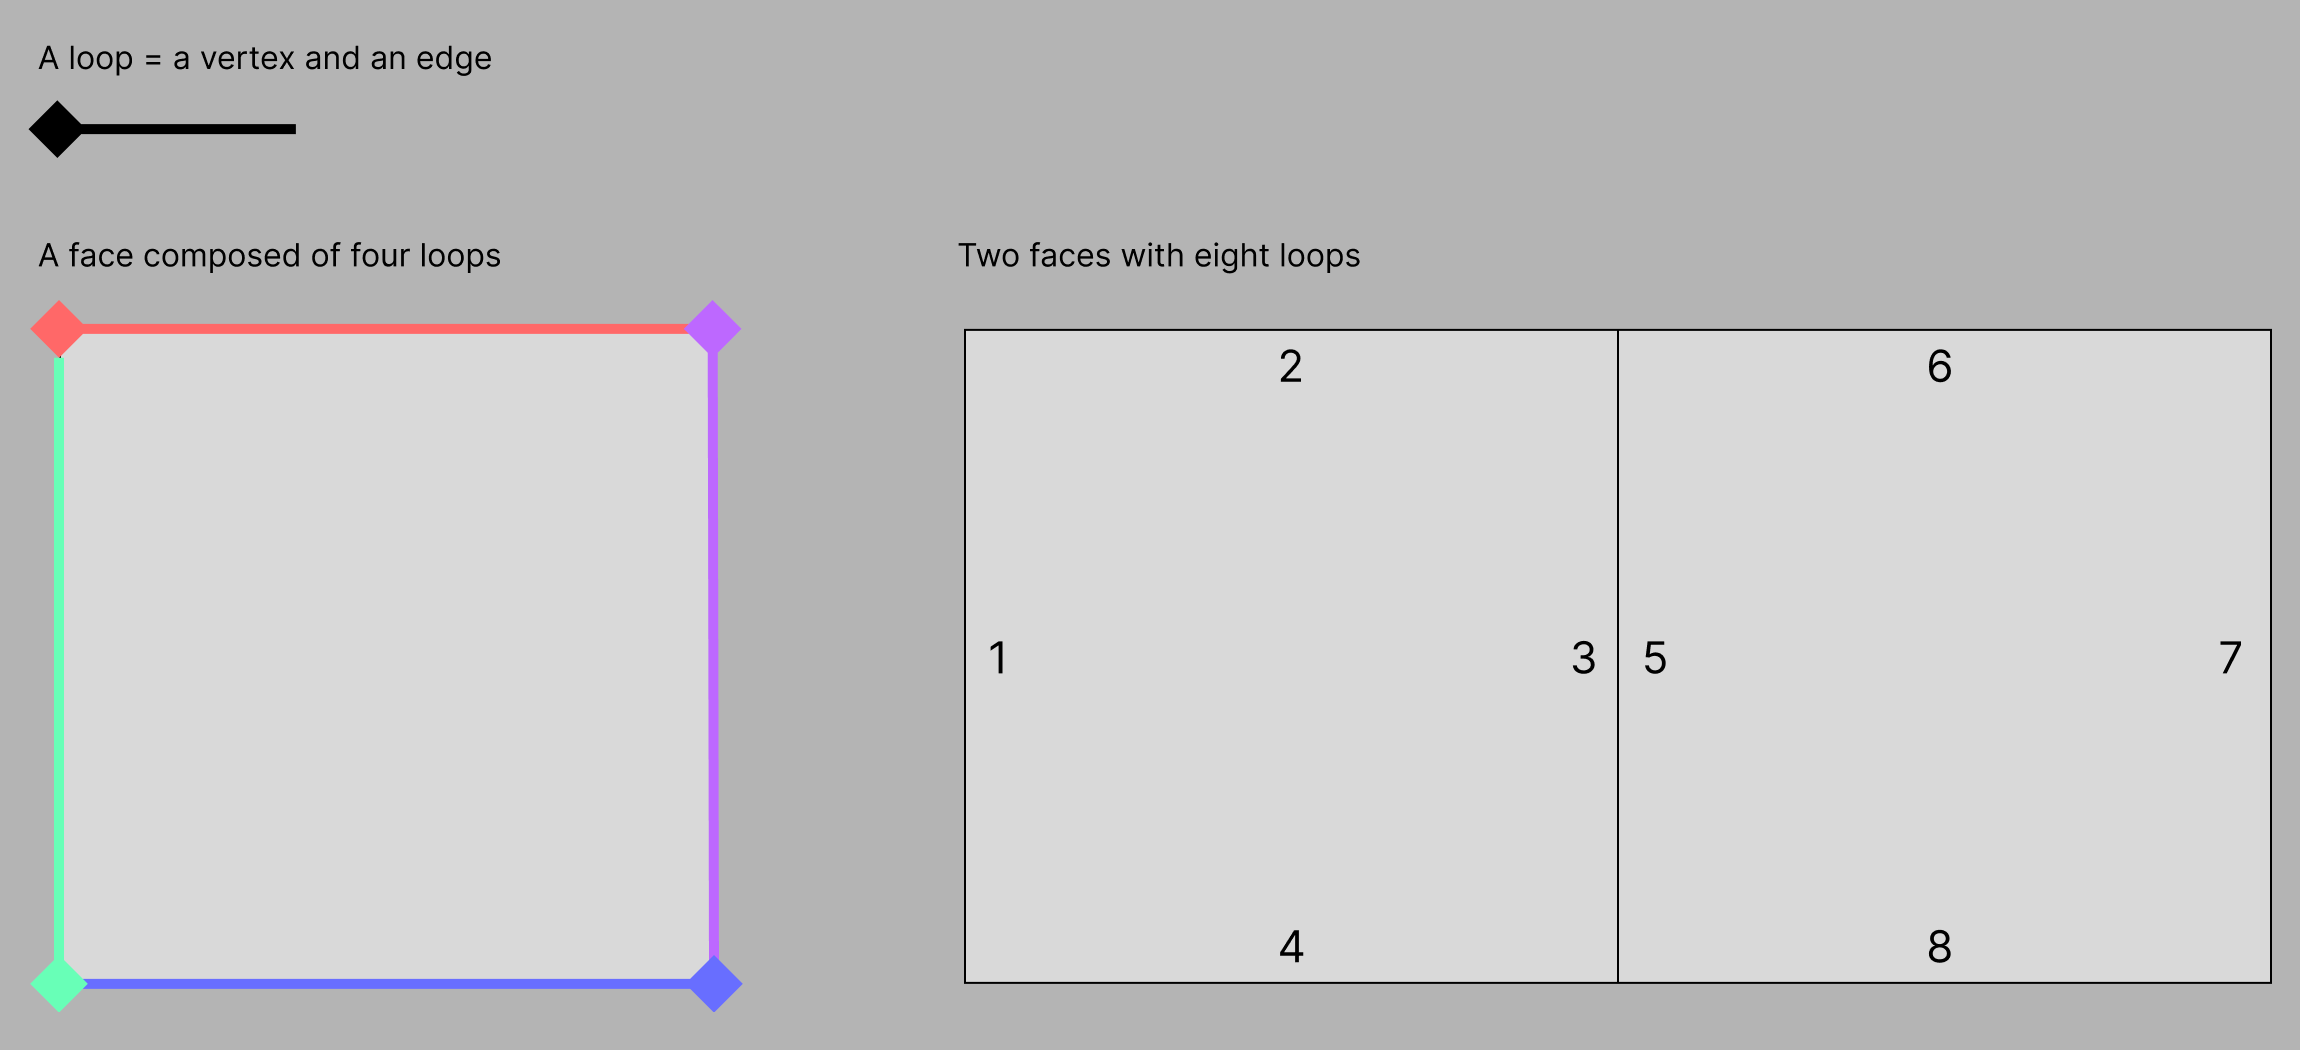
I didn't really understand why until I read more on how mesh geometry works in Blender. Meshes are composed of faces, and each face is composed of "loops". A loop is a vertex and an edge (which connects to another vertex), though I use "edge" and "loop" interchangeably here. Each face has its own loops, even if those edges are shared with other faces. In the example below there are two faces joined by an edge. That edge is actually two edges, one for each face.
Blender loops
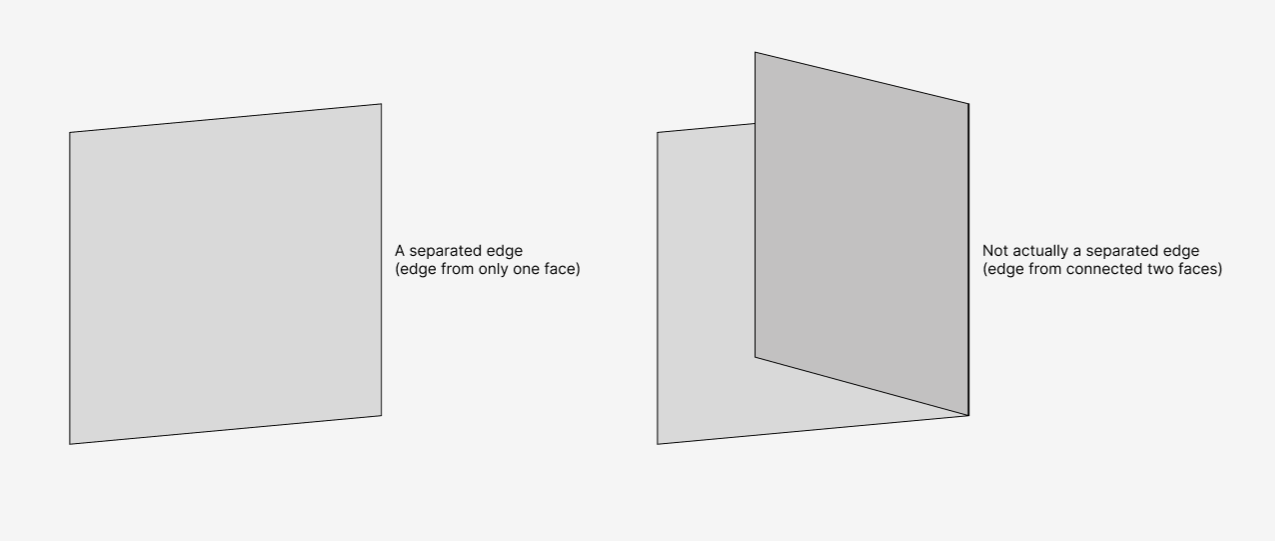
From looking at Blender's source code (at uv_seams_from_islands_exec) I believe the way "Seams from Islands" works is that the UVs for each shared edges/loops are compared; if the UVs aren't in the same locations then we know that those edges are separate in the UV map, and thus we have the border edge of an island. In the pants example above the parts that aren't selected aren't actually separated edges. It's hard to tell from the image, but they are edges of joined faces that are folded over:
Seam edge vs non-seam edge
This can also be illustrated by using a graph-based approach for detecting seams:
importnetworkxasnx# Same prep as abovebm=bmesh.from_edit_mesh(bpy.context.active_object.data)uv_layers=bm.loops.layers.uv.verify()# Collect all edges hereedges=[]forfinbm.faces:forlinf.loops:a=l[uv_layers].uvb=l.link_loop_next[uv_layers].uvedges.append(((a.x,1-a.y),(b.x,1-b.y)))# UVs don't have any ids;# we need to know when two UVs are actually the same UV.# We do this by seeing if two UVs are within some small range;# if so we consider them to be the same UV.eps=1e-6uv_idx=[]deffind_closest(uv:tuple[float,float]):x,y=uvfori,(x_,y_)inenumerate(uv_idx):x_diff=abs(x-x_)y_diff=abs(y-y_)ifx_diff<epsandy_diff<eps:returnielse:uv_idx.append(uv)returnlen(uv_idx)-1# Reconstruct the UV map geometry# as a graph.g=nx.Graph()fora,binedges:a_id=find_closest(a)b_id=find_closest(b)# Count how many edges connect# these two UVsifg.has_edge(a_id,b_id):edge=g.edges[a_id,b_id]edge['count']+=1else:g.add_edge(a_id,b_id,count=1)# UVs that are connected by only one edge# are island bordersborders=[]fora_id,b_id,dataing.edges(data=True):ifdata['count']==1:borders.append((a_id,b_id))
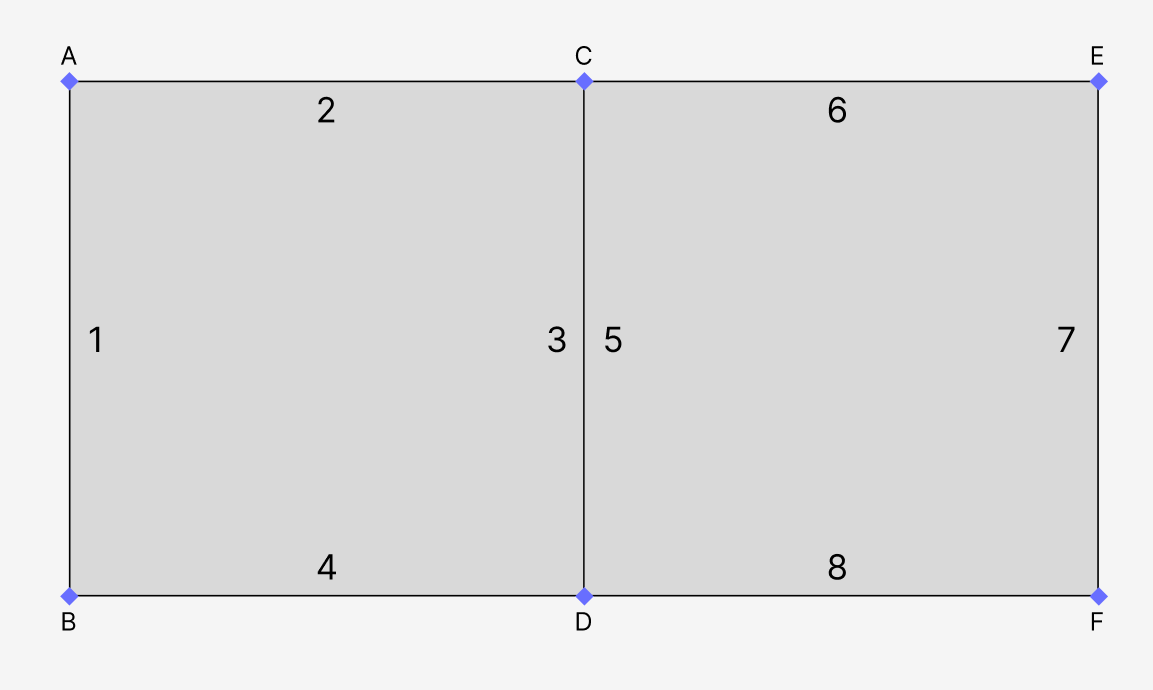
This approach also works on the fact that island borders are separated edges. The general idea is this:
The connection between UVs C and D is not a border because two edges connect them—edge 3 and 5, belong to the left and right faces respectively. The other connections on the other hand have only one edge, and thus they form the island border.
This nice thing about this approach is it's easy to identify which UVs belong to which islands. With the "Seams from Islands" approach I had a very crude method: just checking which UVs fall within which island polygons. This unfortunately doesn't work with overlapping islands because the UVs could be assigned to any of the overlapping islands. With this graph-based approach islands are just the connected components of the graph:
However because this is basically the same idea as "Seams from Islands" it suffers from the same issues. The pants UV map would fail in the same way.
The approach I'm using now is less elegant (using graph structures just feels neat) but should work better (I hope):
fromcollectionsimportdefaultdictfromshapely.opsimportunary_unionfromshapely.geometryimportPolygonfromshapely.validationimportmake_valid# Same setup as abovebm=bmesh.from_edit_mesh(bpy.context.active_object.data)uv_layers=bm.loops.layers.uv.verify()# Here we collect all edges,# but grouped into their parent facesfaces=[]forfinbm.faces:face=[]forlinf.loops:a=l[uv_layers].uvb=l.link_loop_next[uv_layers].uvifnotface:face.append((a.x,1-a.y))face.append((b.x,1-b.y))faces.append(Polygon(face))# Group faces into their parent islandsisland_faces=defaultdict(list)forfaceinfaces:# Since the UVs are all connected,# we can use any UV from the face to identify its parent islanduv=face.exterior.coords[0]# `find_closest` has same definition as above# and we still use the graph-based approach# for mapping UVs to islandsuv_id=find_closest(uv)island_id=uv_ids_to_islands[uv_id]# Fix face geometry as neededifnotface.is_valid:face=make_valid(face)island_faces[island_id].append(face)# Then merge the faces of each island to get# the island borders/silhouetteisland_shapes=[]forisland_id,valid_facesinisland_faces.items():merged=unary_union(valid_faces)island_shapes.append(merged)
Here I extract the geometry of every face of the mesh, rather than working with just the edges. I still use the graph-based approach to map faces to islands. Then each island's faces are merged using shapely and the island's borders are the exterior of this merged shape.
Here are the results of this approach, with the extracted borders in blue:
With the island borders extracted the subsequent steps are a bit easier, which is mainly identifying overlapping islands and merging them into one shape (what I was calling "UV map regions") and cutting out the matching texture regions.
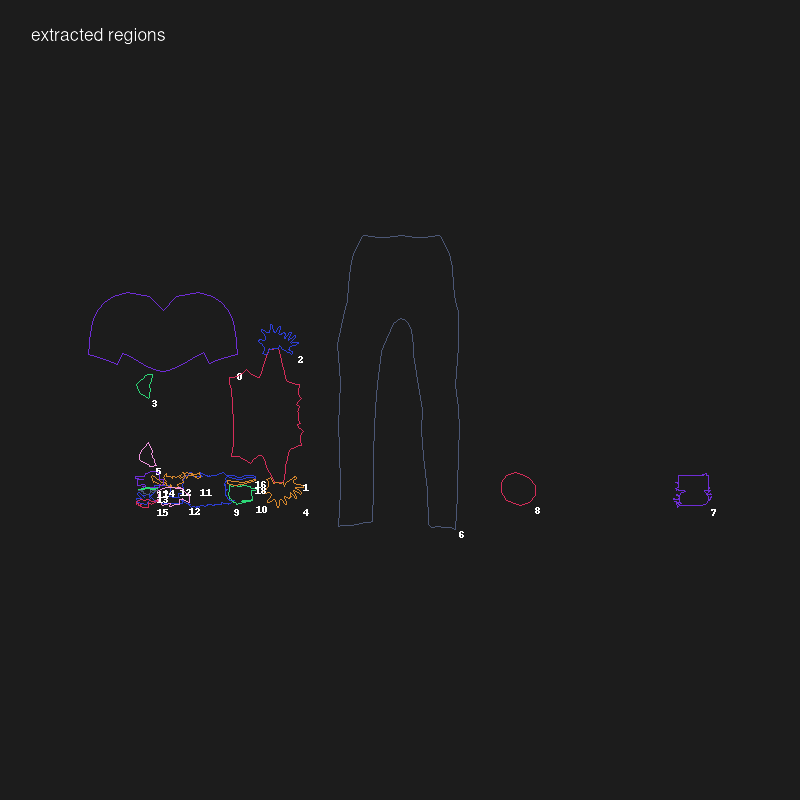
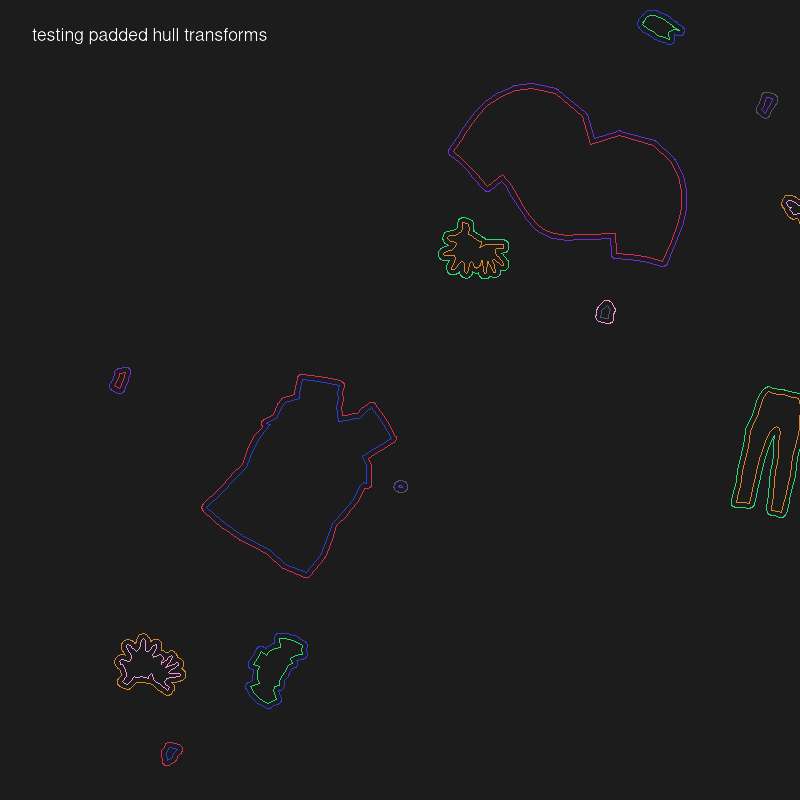
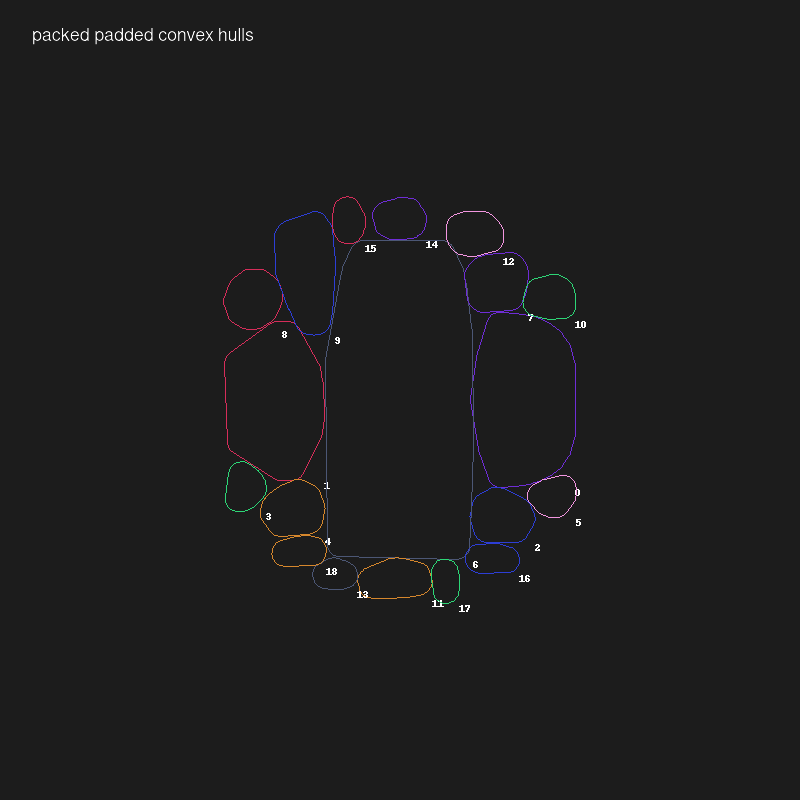
The other important piece is packing these UV map regions. I'm using nest2d, which is a Python interface to libnest2d, for bin packing. There were a couple challenges here too. I'm actually using a fork because the original version bizarrely leaves out a Python API to access the important packing information (translations and rotations of the packed polygons). I also had to expand the Python interface to support some additional libnest2d parameters to avoid packing overlaps. A final adjustment: libnest2d doesn't support concave shapes so instead of directly using the UV map region polygons I use their convex hulls instead. So the resulting packs won't be the most space-efficient, but that's ok.
Here are a couple example results from the script:
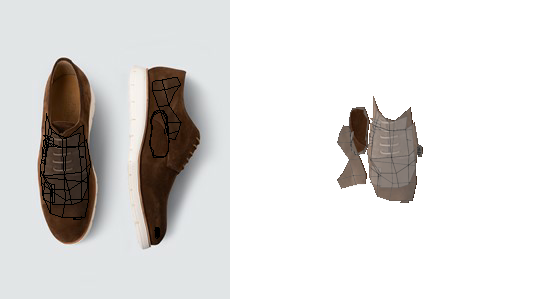
An example result. Original UV map and texture on the left, with the detected islands (blue) and convex hulls (red).
Another example result. Original UV map and texture on the left.
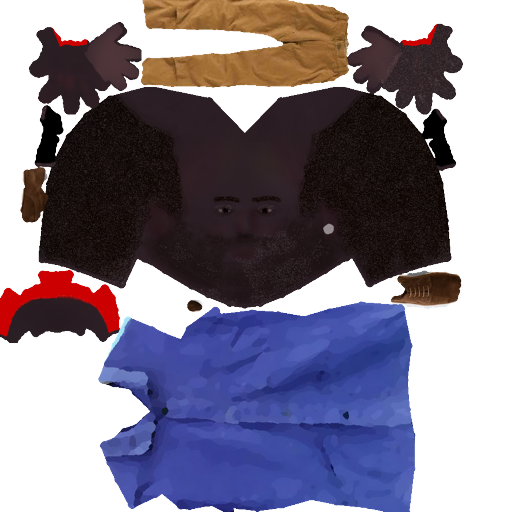
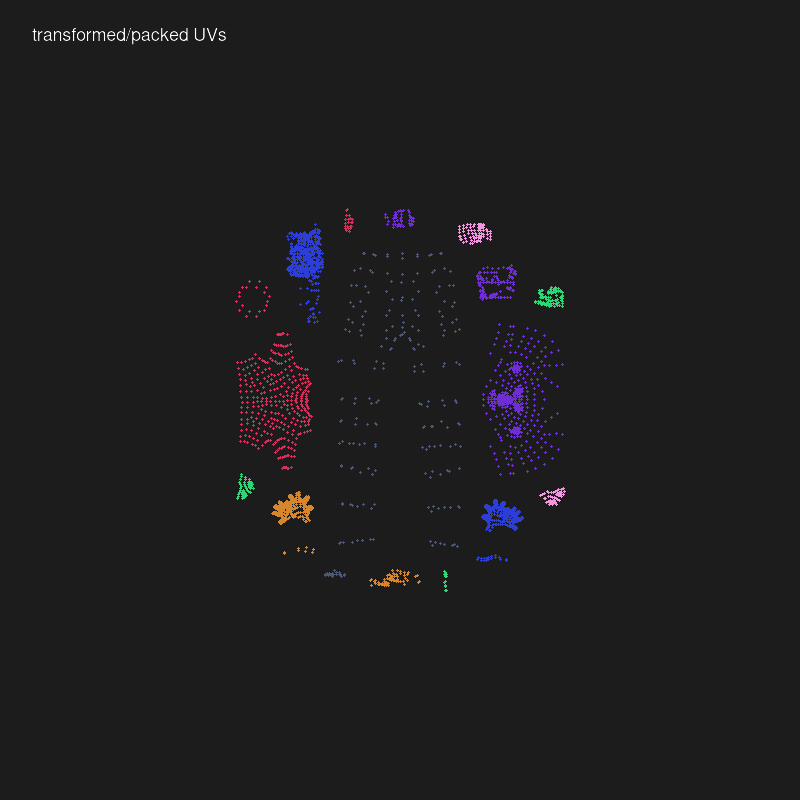
The other component of this system is what handles the actual merging of the Blender objects and materials (merge.py in the code). This was more straightforward: grab the textures for each object's material (assuming one main material), bin pack them into a single image, and update the UV maps accordingly. Then the packing system described here is applied to the merged object/texture to remove unnecessary image data and the final output is trimmed and/or scaled to be a square texture with dimensions that are powers of 2 (e.g. 512x512, 1024x1024, etc).
The resulting texture for the character I'm working with here:
Resulting texture
There is some weird artifacting going on; notice the noisy speckled texture on parts of the face and one of the hands. I'm not really sure why that's occurring, but it's not especially noticeable, so I won't worry about it for now.
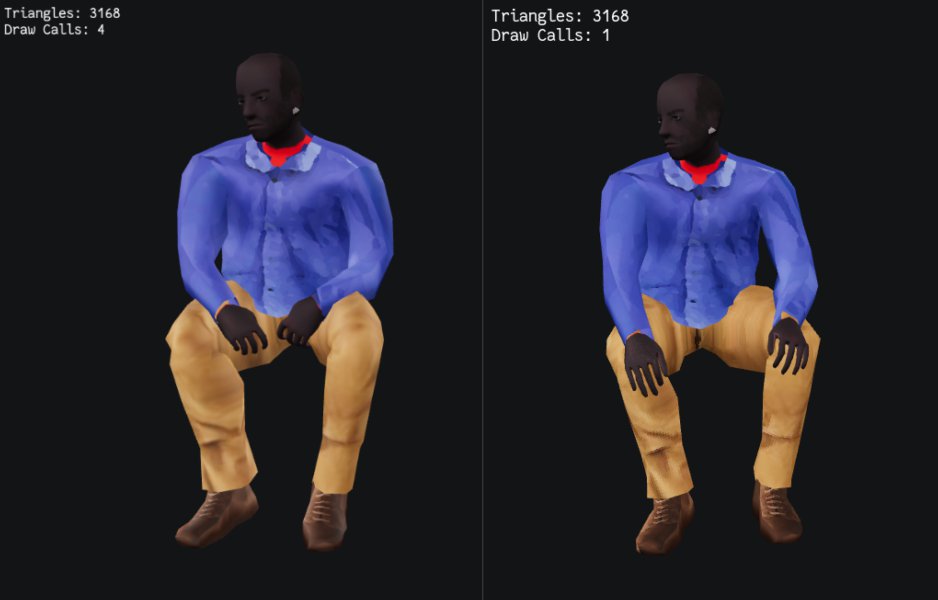
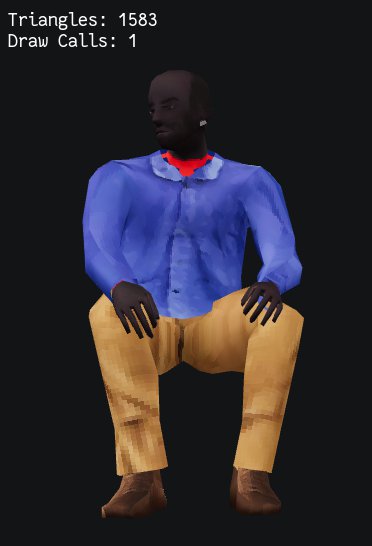
Here we see the draw calls for this character reduced from 4 to 1:
Draw call reduction
Of course after all of this effort there had to be more problems🙃. The first was a lot of white/blank texture areas showing up in the character. I had thought that this might be an issue—basically extracted textures have no bleed, so if the UV maps aren't exactly precise then they might cut into empty parts of the texture. The solution to this was to add a padding parameter that provides a few pixels of buffer around each texture clipping.
Yet even after that there was still one other problem. Though the Blender renders and in-browser GLTF preview look fine there is a weird seam that shows up in Godot:
Texture issue in Godot. Note the white seam at the top of his head.
Fortunately this wasn't too difficult to solve. It was unlikely to be an issue with the exported GLTF itself because the in-browser GLTF preview didn't have this issue. So it had to be something with Godot. For completeness I'll go into the details.
When you import an asset into Godot it may process it in some way. For textures this can mean manipulating the images in ways to improve game performance. One such manipulation is the generation of "mipmaps", which are scaled down versions of the texture to run when the object is at a smaller scale. The problem is that these mipmaps mean that the scaled down textures might not quite line up with the object's UV maps, which causes texturing bleeding (thus the white line in the render above).
The actual modifications to the imported texture are controlled by default import settings you can define for your project:
# Ensure that mipmaps and filter are disabled
# for each material texture.
# This is because mipmaps can cause issues with bleed,
# i.e. blank parts of the texture bleed through to the UV map.
# For flag values see: <https://docs.godotengine.org/en/stable/classes/class_texture.html#enum-texture-flags>
for child in Util.find_children_of_type(instance, MeshInstance):
    for i in range(child.mesh.get_surface_count()):
        var mat = child.mesh.surface_get_material(i)
        mat.albedo_texture.flags = 0
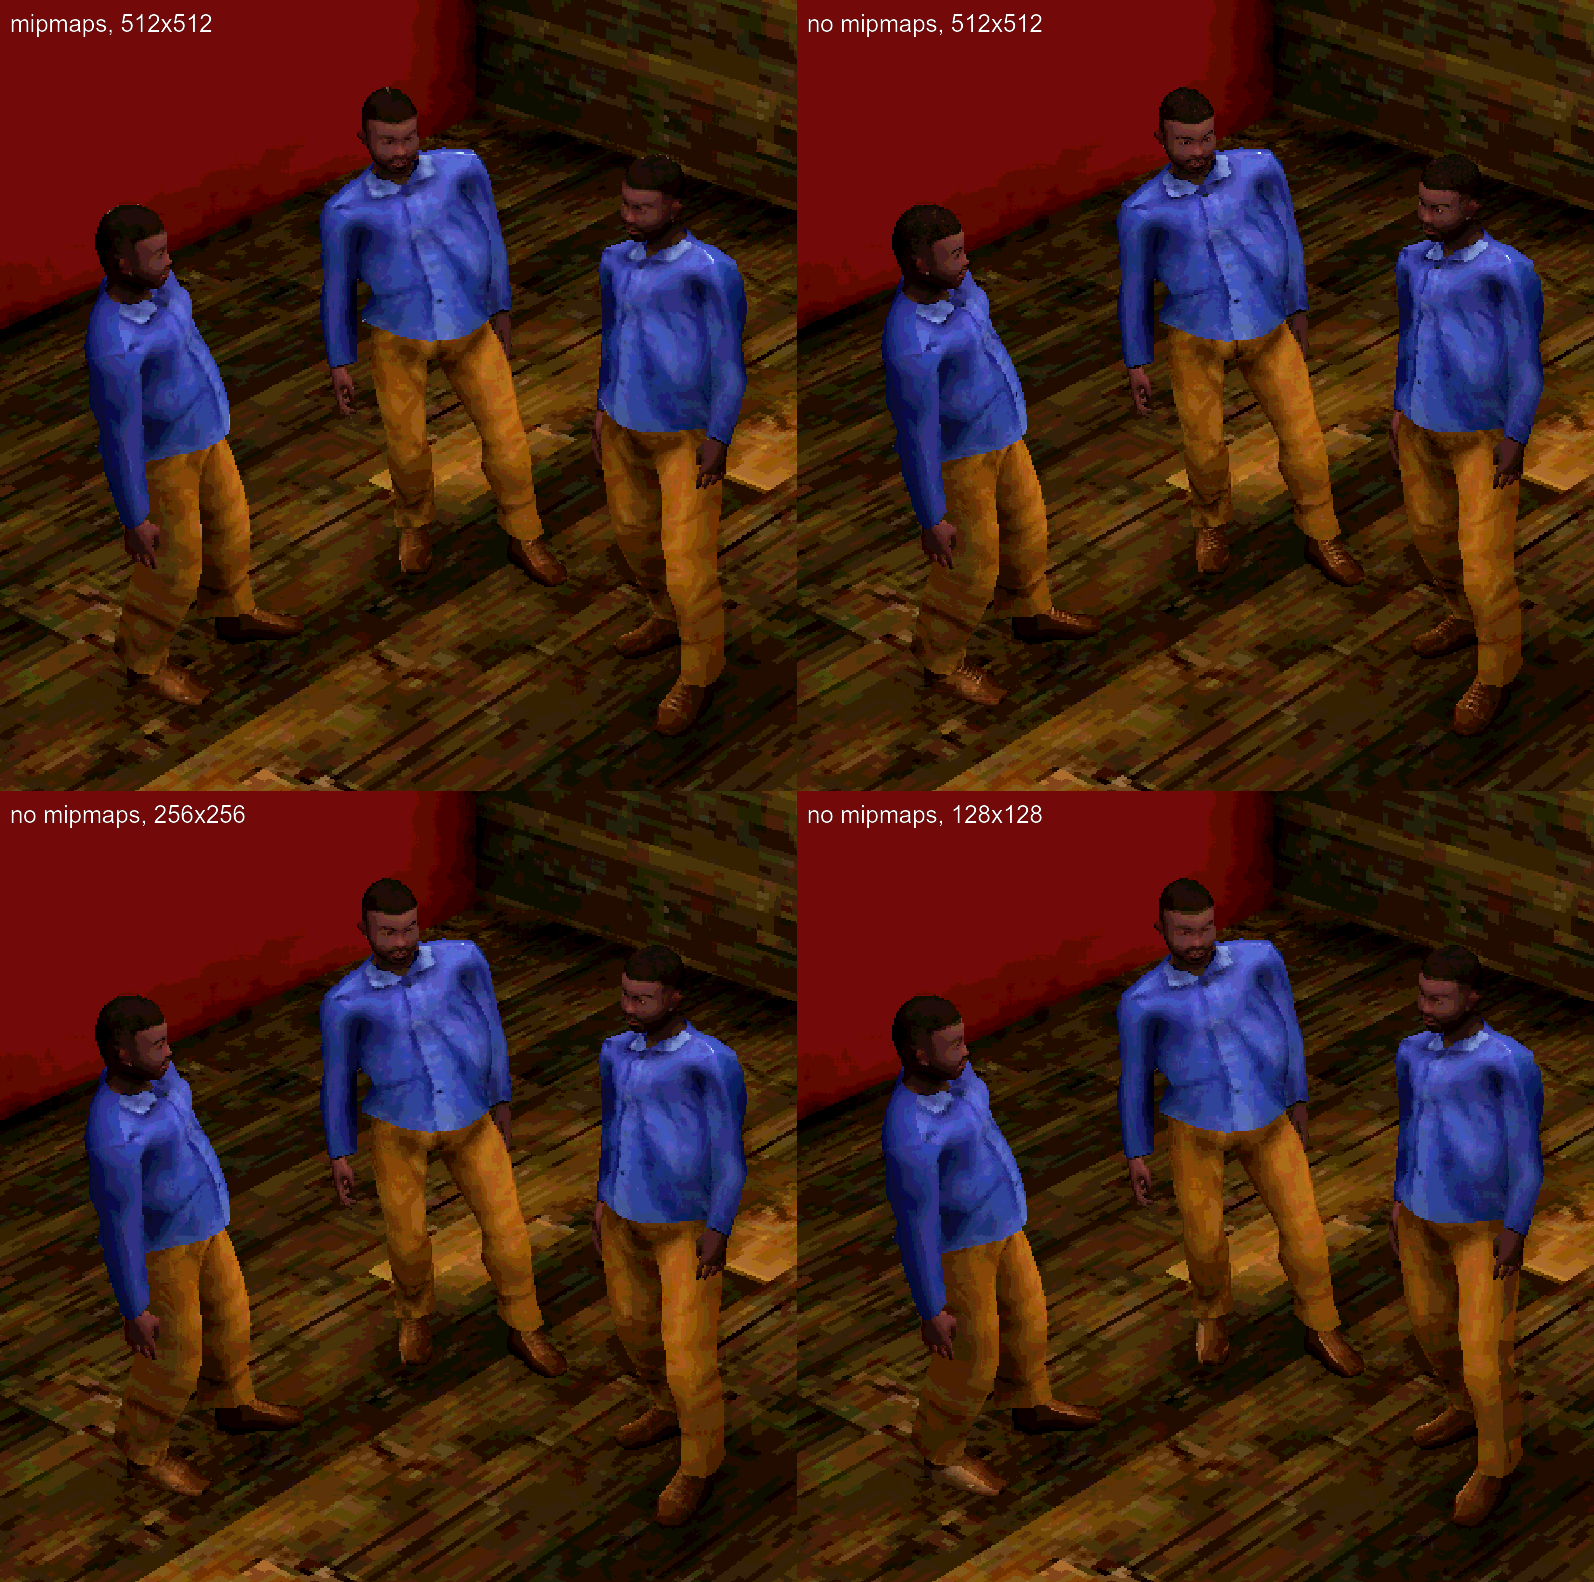
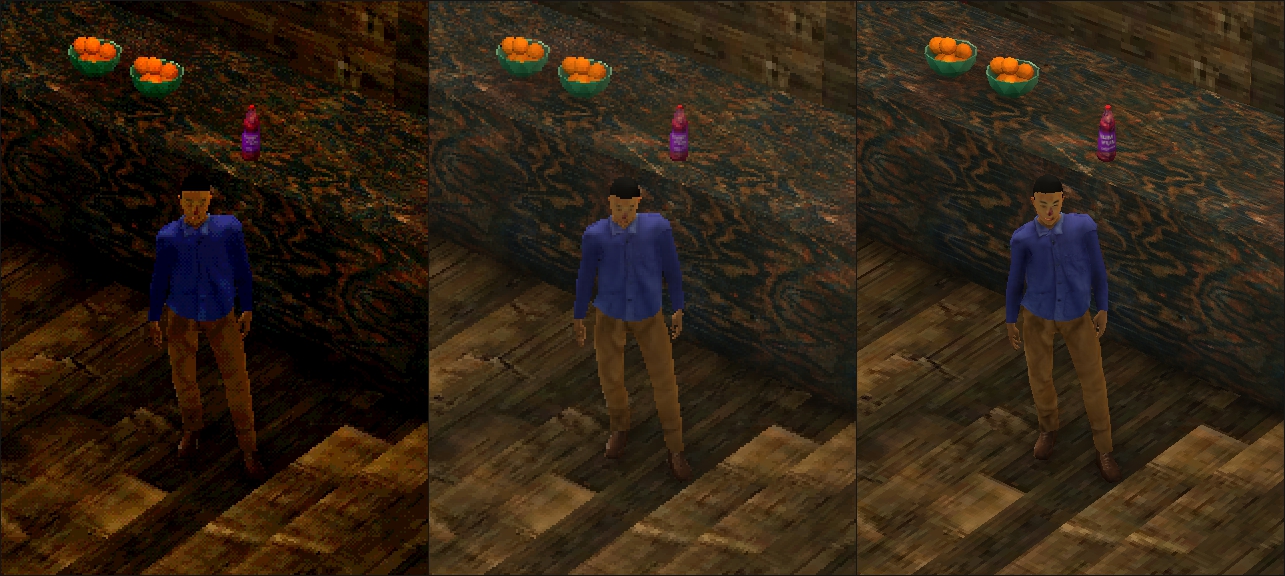
This works, but then I lose the advantage of mipmaps. There is a clear visual difference between enabling/disabling mipmaps. When turned off the original resolution texture is displayed which can mean showing more detail (I suggest clicking the image to see the full resolution version):
Mipmaps on/off compared, with different original texture sizes
Maybe it's because I'm used to it now, but the mipmaps version looks better to me. It's a bit softer and the eyes look better (though I think that's because I maybe have too bright of a white for the eyeballs). I figured if the lower-res mipmaps version looks better I should just use a lower-res texture to begin with. So I tried downscaling the original 512x512 texture to 256x256 and 128x128 and they both look good. The 128x128 one looks the closest to the mipsmap version, but isn't exactly the same (Godot may use a different downscaling algorithm; I used Pixeluvo to resize and they don't say what algorithm they use). Most importantly this manually downscaled version doesn't have the seam/bleed problem that Godot's version does. One further issue here is that the 128x128 version does lose some detail—the earrings are much, much harder to see there, so that might be an argument for the 256x256 texture.
This is all a good example of the unexpected and massive diversions that happen with a project like this. I spent so much time and energy on this that could have been spent on more interesting parts of the game. And it's totally possible that this all just premature optimization. I haven't developed a game like this so I don't have any intuition about what I should be focused on for performance. But I really want to avoid the scenario where I've generated all this content for the game and then I have to go back and redo everything because of some bad performance decision I made early on (like ignoring draw calls, poly counts, texture sizes, etc).
I don't think this level of detail is interesting to anyone except me lol. I mostly chronicled this so I have some documentation to refer to when in 3 months I've completely forgotten everything and find another edge case that requires me to re-think the whole system (I hope that doesn't happen, but you never know), but also because maybe there's some really simple industry standard approach that I completely missed (though I tried to look for one!).
In the end this was one of those things where you're dealing with two challenges at once: figuring out the high-level algorithm to solve the abstract problem you're dealing with and figuring out how to implement it in unfamiliar and at times un-/underdocumented or baffingly-designed APIs/libraries. Never a pleasant experience, but I hope it's worth it!
Update @ 12/9/22 14:30: Right after publishing this I realized that I don't need to simplify the base human geometry, but only the final geometry that will be exported. Simplifying the base human geometry was hard because of the reasons I mentioned in the last post: meeting the constraints of MakeClothes (quads or tris, minimizing poles) and because simplifying the geometry gives MakeHumans fewer vertices to manipulate the human form with, leading to wonky results. What I'm doing now is throwing a Decimate modifier on as the very last step before exporting the model. This not only simplifies the base human but also any clothes that are attached. At this stage MakeHuman has already done its work, so the constraints of quads/tris and poles no longer apply.
For now I'm using Decimate with a ratio of 0.5, cutting about half of the polys:
Reduced the poly count for this character from ~3k to ~1.5k.
Update @ 12/9/22 22:02: So there was another padding-related bug that was causing textures to overlap after packing them. Basically it came down to the fact that there are three different space systems that are used during the packing process: the UV space (where x and y are both in [0, 1]), the texture space (measured in pixels), and the packing space (which is just a scaled up version of the UV space so that coordinates can be integers). The padding is specified as pixels but I wasn't properly converting them to the packing space, so I just had to implement the correct conversion.
Here are some images from the debugging process (I thought they looked nice):
After much chipping away the character generation system ("chargen") is mostly complete!
As mentioned in the previous post the character generation system is driven by MakeHuman for the model generation, along with a custom texturing system for generating skin-level details.
This more or less reduces character creation to three distinct production tasks:
Creating clothes (and hair)
Creating new texture layers (e.g. tattoos, eyebrows, etc)
Creating animations
The process works like this:
Generate the skin-level details as a single texture.
Generate the model using MakeHuman
Dress the model using MakeHuman
Retarget and remap animations to the model
Export as a GLTF
Generate preview renders
For documentation purposes I'll go through each part in detail below...but first, some screenshots (see the end for a video demo):
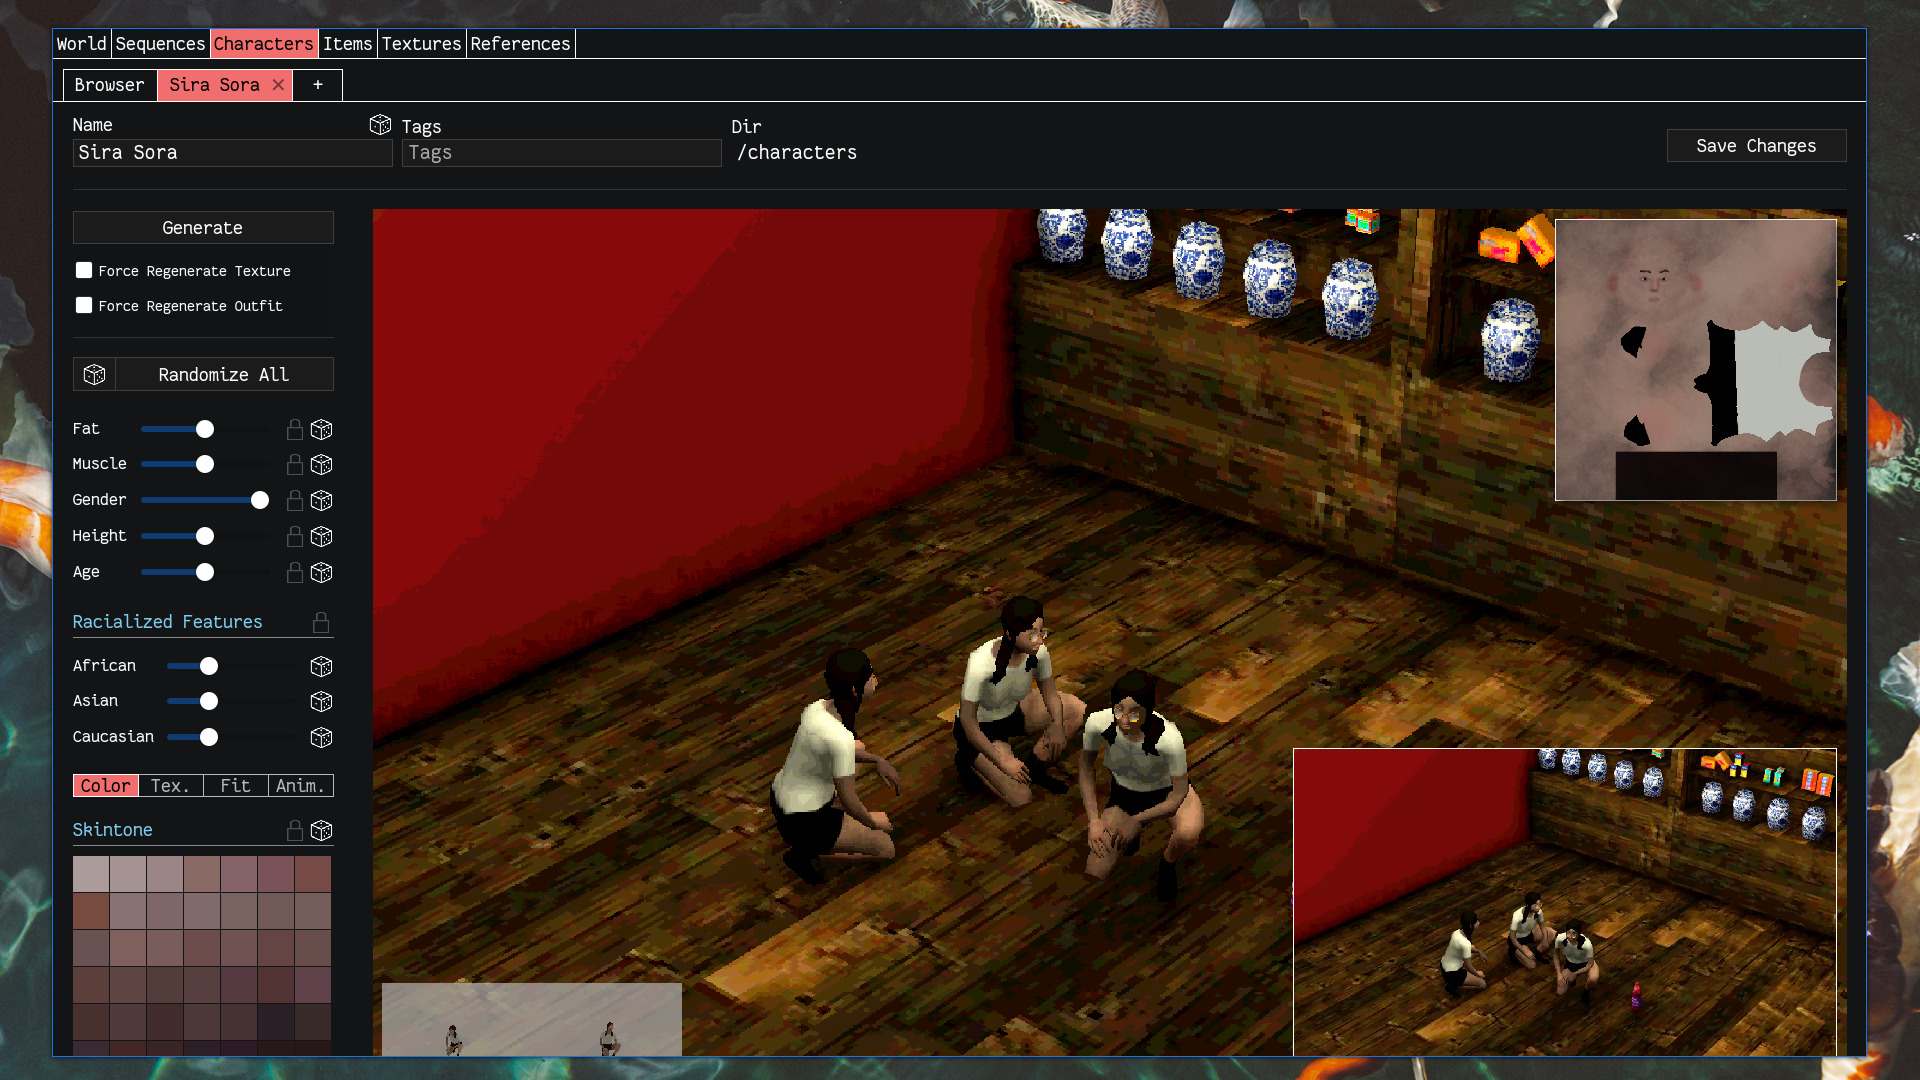
Top-level parameters, randomization, in-game previews, and texture view
Left: color parameters; right: a preview of the resulting GLTF model
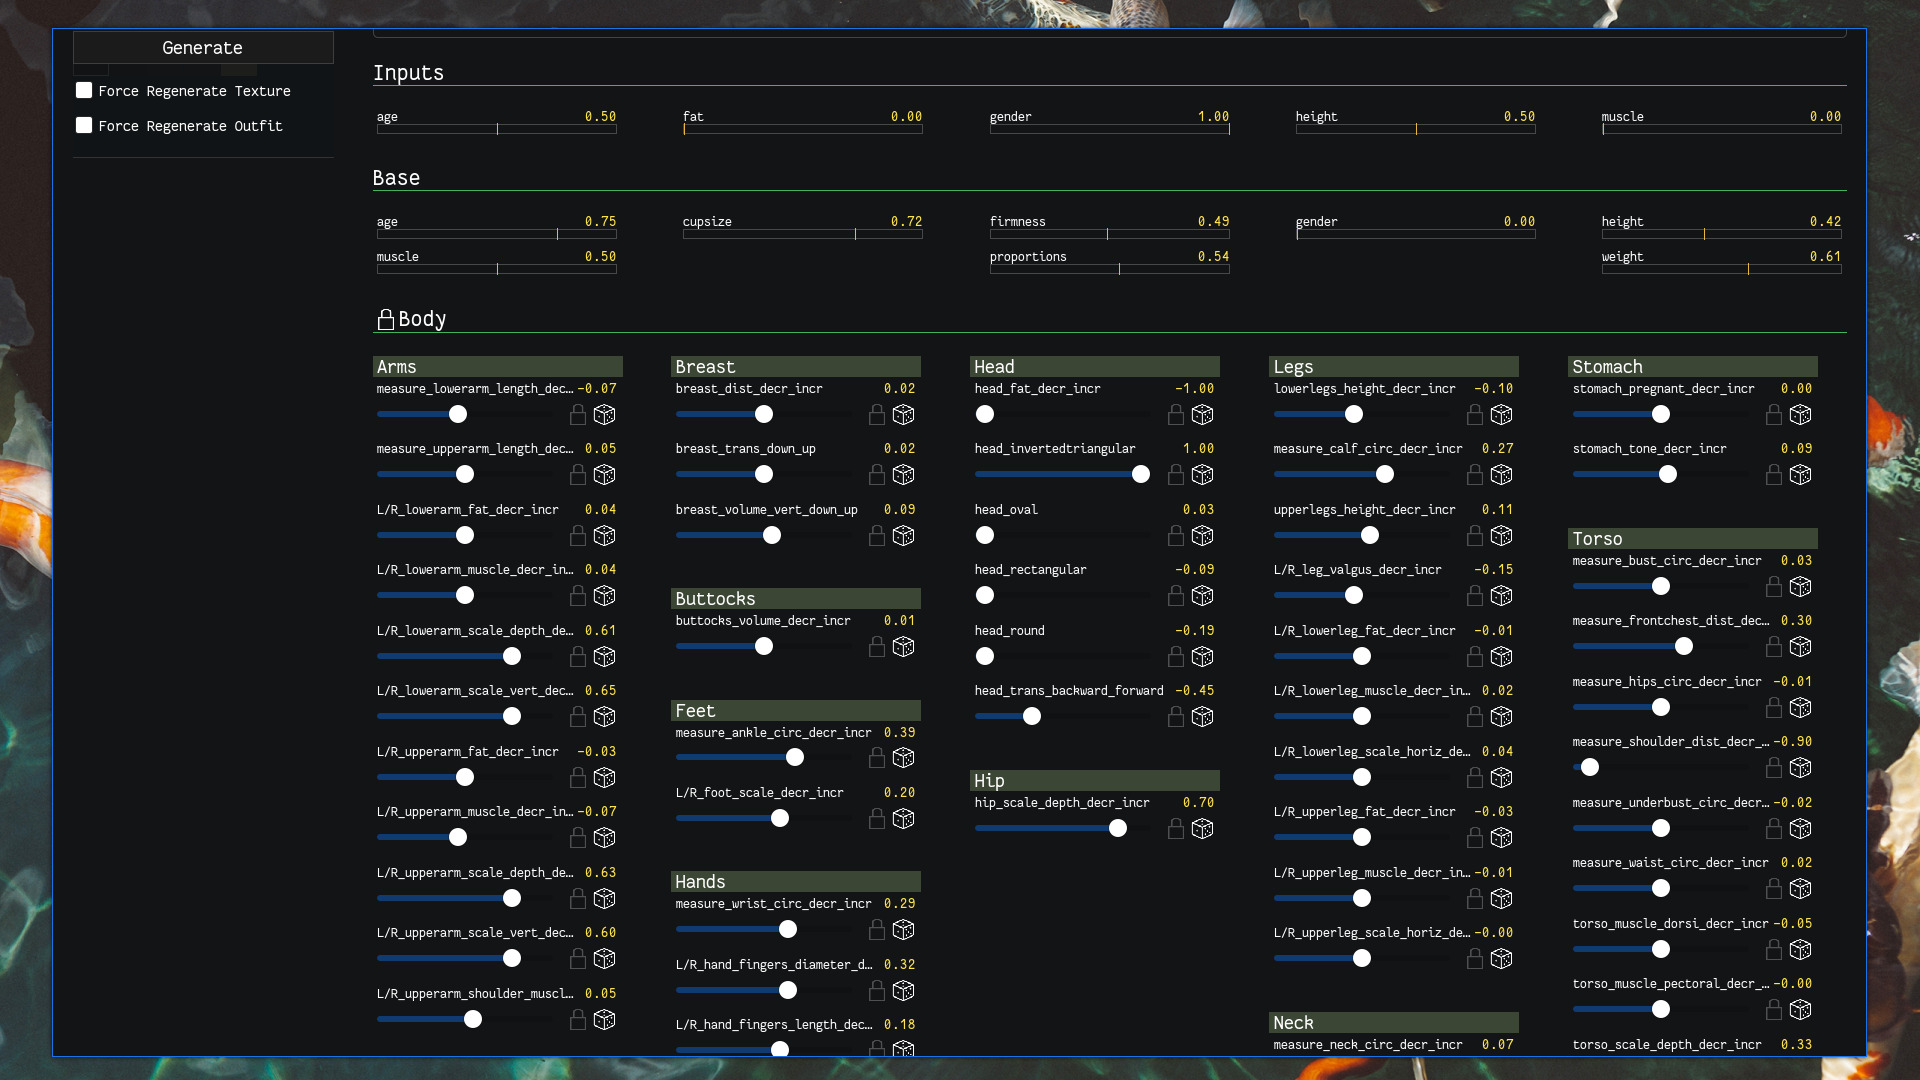
Body parameters derived from the top-level parameters, used for MakeHuman
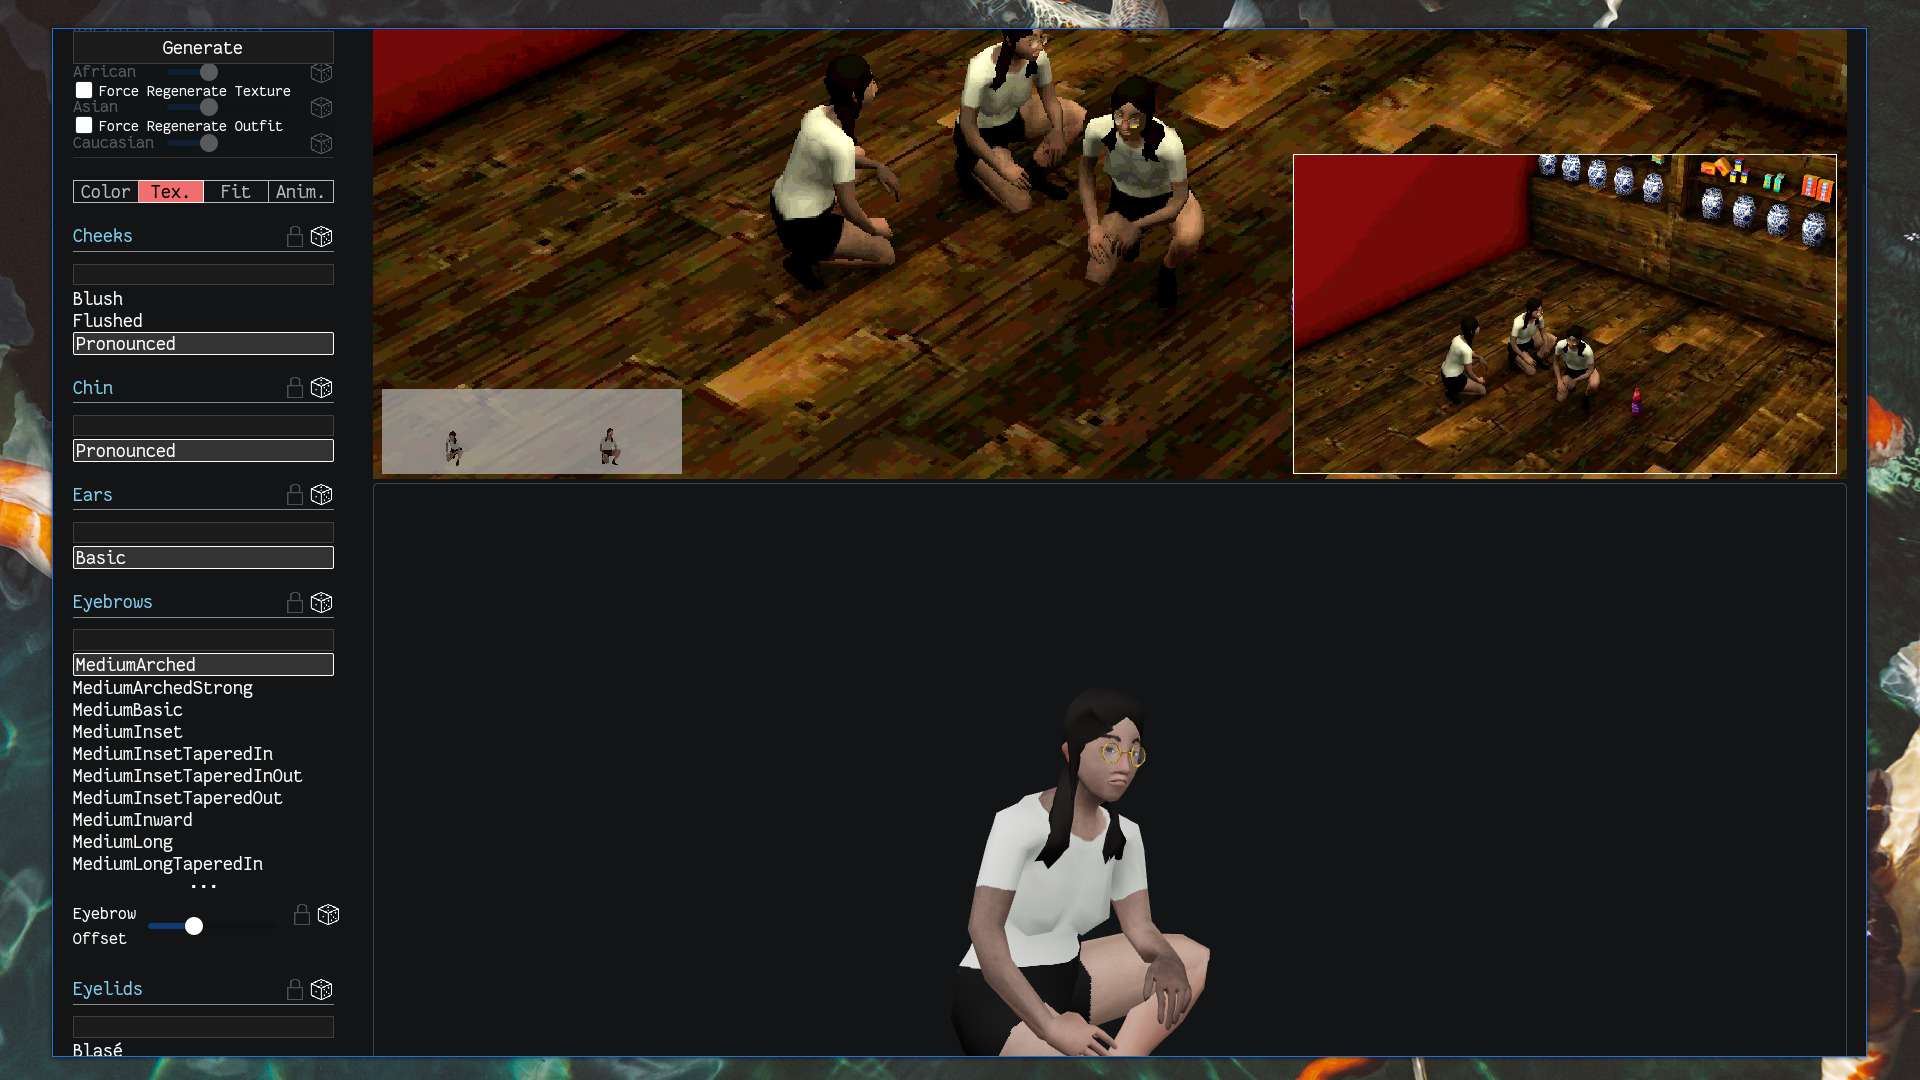
Left: some texture parameters
Generating the texture
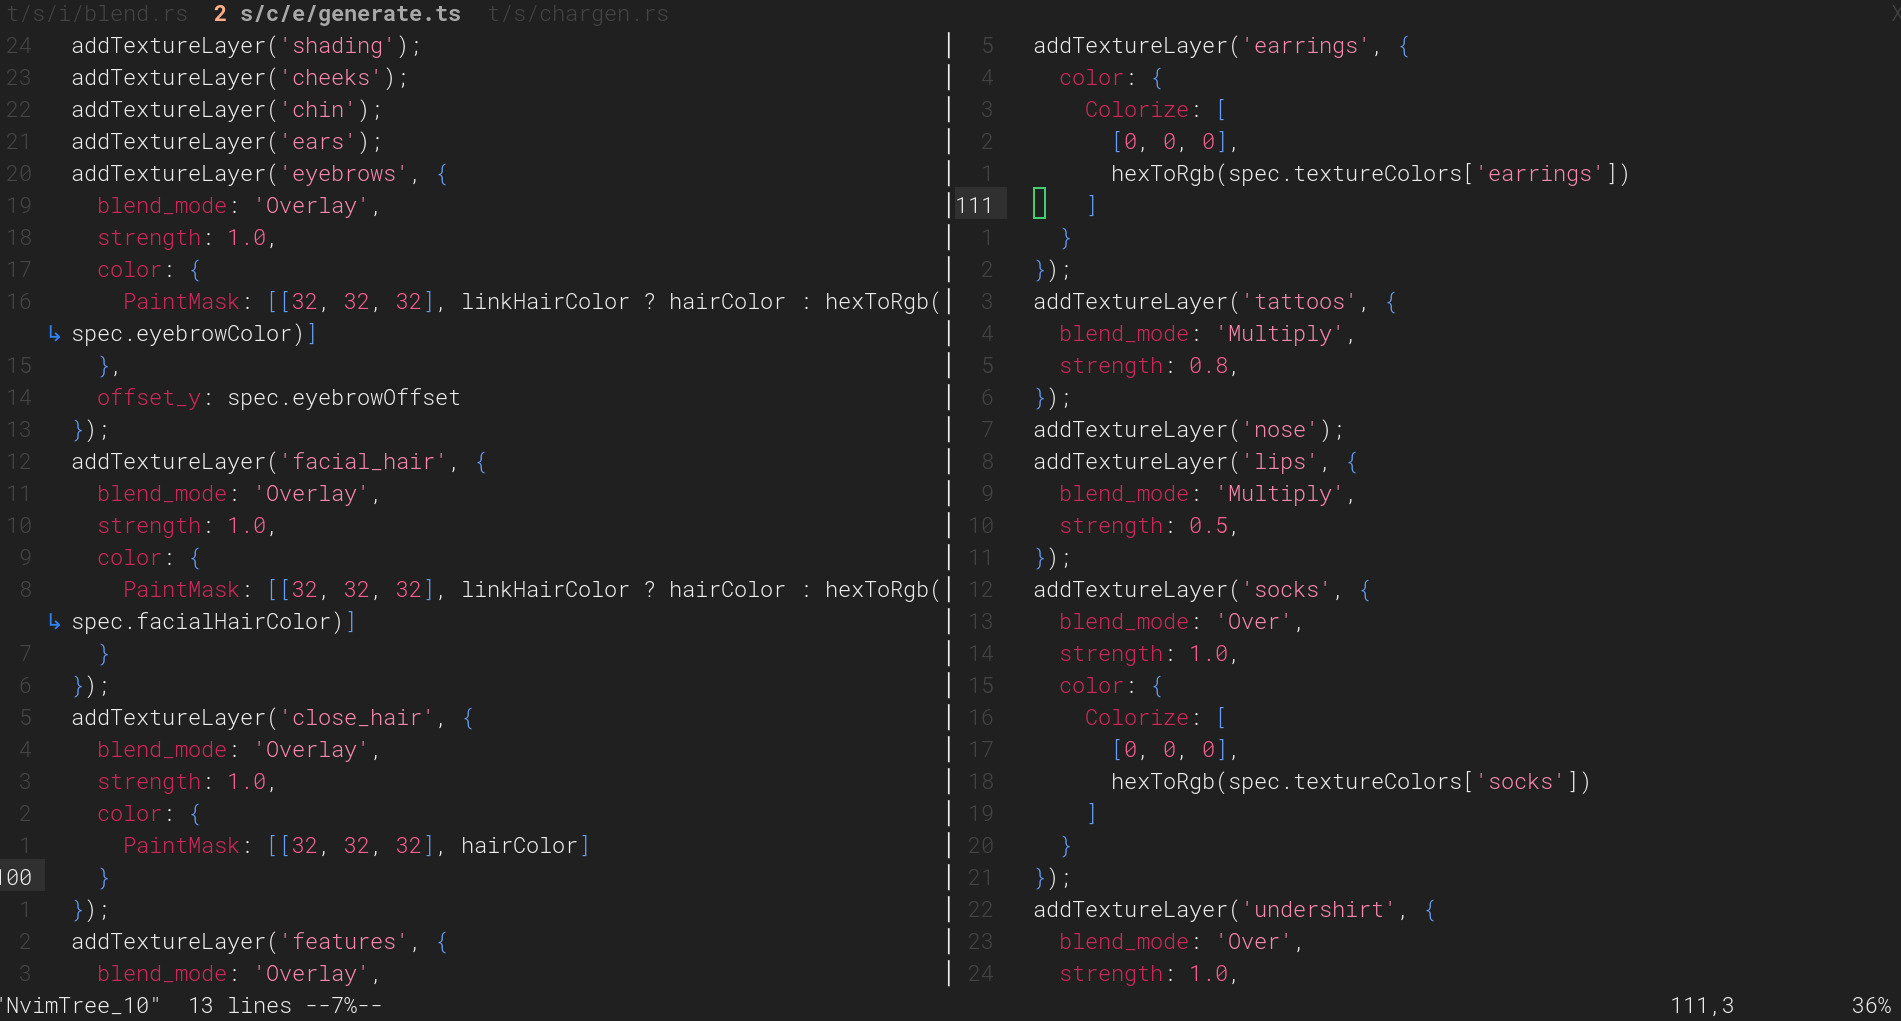
This texture is composed of different layers to represent different features: there's a base skintone layer, then additional layers of shading, e.g. some red in the cheeks and other high blood-flow areas, then other features like eyes, eyebrows, facial hair, close-cut hair, tattoos, and accessories/clothing items that don't need to have separate geometry (e.g. earrings, socks).
These layers are added using different blend modes—e.g. some layers are simply overlaid and others are multiplied—so they mix in better with the base layers.
Texture layering
Some layers are used as masks (rather than being used directly) so that they can be filled in with different colors. For example eyes (irises), hair, and socks. In these cases the texture uses a base color (usually something close to black or a very dark grey) that is used as the "anchor" or "reference" color, and then the image is colorized to maintain the relative changes in color throughout. For example, a mask texture might have the base color #181818 but also include blacks and greys that are slightly darker/lighter, and want to change it to a red, say #ff0000. The image will be recolored such that pixels that were #181818 become #ff0000 and other pixels become a shade of red as well, maintaining the same relative lightness/darkness to the base color.
Generating the base skintone texture was tricky at first. Something that is probably obvious to digital/visual artists but that I had to learn is that solid colors don't really look good or interesting (unless you're going all-in on solid colors, like those blocky start-up illustration styles), so the original characters looked kind of bland with their perfectly uniform skintones. Creating a color field with interesting texture and variation is easy enough to do by hand in a digital painting application but took a bit of work to do procedurally. I considered trying to use Perlin noise and its ilk but I don't have any intuition how to control noise well...so it would have taken me forever to get results I'd be happy with.
Instead the algorithm just roughly emulates how a person would produce such a texture...just using a paintbrush texture, painting a base layer of color, and then varying the color a bit and painting low-opacity random strokes on top:
Color painting output
Color painting output
I found that using LAB color space provided the best color variations that "vibrate" or "resonate" with the base color (I love the subtle pinks and greens and blues in the examples above).
This approach not only produces nice textures for the base skintone but also for hair.
Creating the other texture layers is straightforward—just paint onto a transparent image, using this reference image to know where things will show up:
UV reference image for texturing
The last bit worth mentioning here is performance/speed. There are a few very slow points in the character generation process and texture generation is one of them...sometimes. The image manipulation is happening in Rust, which is very fast if compiled in release mode. Otherwise it's on the order of 10x slower. Because I'm still developing this content management tool I'm not often building in release mode since you lose access to the browser dev tools when doing so.
Aside on texture sizes: The input texture layers are mostly 2048x2048 (aside from some earlier ones which are 1024x1024). The actual skin texture output is 1024x1024, but I create a downscaled copy at 256x256. This is really small, and pixelation is definitely noticeable in the higher-res viewer but not noticeable in-game, given the size of characters and the downscaling screen shader effect (n.b. the screenshots here are using the 1024x1024 textures, not the 256x256 ones). Again, not really sure that texture size/memory use will be an issue, but I don't need them to be bigger than this so might as well keep them small.
Generating the model
This step is the most straightforward since the bulk of the work is handled by MakeHuman. MakeHuman provides a number of parameters to control the body model, e.g. how much muscle there is in the upper arms, the shape of the face, etc. What I do is take a few higher-level parameters—gender, fat, muscle, height, age, and a few parameters that MakeHuman uses for more racialized features—and translate them into the more fine-grained parameters. These finer parameters are all random but parameterized by the higher-level ones, with the exception of some parameters such as facial parameters, which are totally random.
For example there's a parameter called arms_{L,R}_lowerarm_muscle_decr_incr. The sampling distribution for this might find most of its density in (-1, 0) if the muscle slider is turned all the way down, and would be in (0, 1) if turned all the way up.
This step also applies the MakeHuman "game engine" rig to the model.
Dressing the model
The dressing of the model (applying clothes and hair) is also very straightforward since it's again handled by MakeHuman. The part that's more complicated is the production of the actual clothes and hair assets to be used.
This process is tricky in part because I'm just not a very experienced modeler, but the lowish-resolution look is more forgiving of that. The main reason it's difficult is that MakeHuman/MakeClothes has a couple requirements that can be very hard to satisfy. The mesh must consist either entirely of quads or triangles—no mix allowed. In practice this would not be too bad—you can always convert a mesh entirely to triangles (using Blender's Triangulate Faces), which as far as I know is what a game engine typically does anyways—were it not for a second MakeHuman/MakeClothes requirement that limits the maximum edges allowed for each vertex. It's something like 8 edges max for any vertex (called "poles"). Going through and figuring out how to reconstruct your geometry to get rid of these poles is hard...some are easy, but others become weird geometry puzzles.
A pole
I haven't been able to come up with a good foolproof method to avoid this problem. I try to stick to quads when modeling clothes/hair but sometimes you just forget and end up introducing a triangle or n-gon somewhere. Or I want to reduce the poly count so I use Blender's Decimate modifier, which works amazing for reducing polys while preserving the general shape, but then introduces triangles and poles.
I did come up with one procedure for removing poles that has so far worked maybe 2/3 of the time, and is fortunately easy to script:
What this does is it deletes the problematic vertex/pole, builds an n-gon face out of its surrounding vertices, and then converts that into triangles. Usually this creates edges that get rid of the pole completely, but it can also just move the problem to a different vertex.
I anticipate spending a lot of time making clothes/hair because that's probably where the bulk of character variation will come from, so I hope I can figure out a more reliable solution soon.
The last thing to note here is that the grammar system I mentioned in the previous post is also implemented into the tool. Almost all the parameters depicted above can be randomized, including the character's outfit, which can be randomized using an outfit grammar.
One funny thing is that I spent a bunch of time modeling hair and it's given me a greater appreciation of the variety of hair styles and how much they change someone's look. I'm sure it's obvious to many people but not something I spent much time thinking about. Now I catch myself really studying the silhouettes of people's hair lol.
Mapping animations onto the model
There isn't a whole lot to say here since I haven't figured out a animation/mocap process, so I'm just relying on Mixamo for now. The process of retargeting/remapping these animations to the character model is fortunately very easy thanks to a Blender addon called "Auto-Rig Pro". I did have to create a custom remap config to go from Mixamo to MakeHuman's game engine rig though, and it was a bit tricky to make sure that all animations were correctly exported (due to me not understanding how Blender's actions and NLA editor work).
This step is also a hit for performance. The retargeting/remapping process just takes a lot of time: a few minutes for 3 animations, but this will vary on the keyframe length of each animation. Not sure that I can really do anything about that though.
Exporting the model to GLTF
This step is also pretty simple, just exporting the GLTF from Blender. The GLTF format is what Godot uses for importing the model.
The only thing I need to look into here is performance. It takes a ridiculous amount of time to export and absolutely shreds my CPU. I can barely do anything else while it's exporting. I'm not sure what's going on as it's just a fairly low poly model that's being exported.
Generating preview renders
The final step is generating preview renders to see what the model will actually look like. A couple of these renders are done in Blender but they aren't as useful as the in-game renders, which let me see how the character looks with the game's lighting conditions and screen shaders. This was also surprisingly easy to setup as Godot provides a convenient way to run the engine headlessly and take screenshots.
In-game preview
I was also able to use the same approach for previewing things in-game directly from Blender:
Quickly view an in-game preview from Blender
Fears and Steps for the Future
There's still more work to be done. I haven't fully finished integrating characters into Godot, so there may be other things that need to be fixed there. And I don't have a great intuition about what poly counts I should be going for, so a great anxiety is that my poly counts will be too high and I'll have to go back and redo the base character mesh and all the clothes/hair meshes. I don't really anticipate this being a problem because poly count is (what I think is) low across the board and from what I've read poly counts are less likely to be bottlenecks nowadays. But you never know with these things...and I could probably safely lower the poly count of the base mesh, so I should probably do that earlier rather than later...
Update: Lowering the mesh poly count
After writing this I investigated lowering the poly count for the mesh. The original human mesh is around 3k tris—for reference, the Final Fantasy VIII Kiros model I was using for testing is around 750 tris, which was for the original PlayStation. Individual items of clothing so far ranging from 250-800 tris, though I could probably reduce those a fair amount more. Some of these clothing items delete the parts of the human mesh they cover, so they add less to the overall poly count.
Lowering the poly count was a difficult process: after applying Blender's Decimate modifier there were several poles (the same issue mentioned above) that took a very, very long time to eliminate, but also because the poly reduction process and subsequent pole-editing messed up parts of the UV map which took awhile to fix (UV map editing in Blender is awful). I had to try and match the original UV map as much as possible or I'd need to re-create all the texture system layers, which I really did not want to do.
But I managed to produce a few lower-poly human meshes. The biggest reduction was down to about 750 tris. This lost too much detail, especially around the face. I tried a less extreme version that was about 1300-1400 tris, which was better, but having fewer vertices reduces the effectiveness of MakeHuman's parameters though and made some parts too angular. Then I tried another version targeting the Decimate to the hands (which is the most detailed region after the face) and feet (which usually aren't going to be visible and don't need much detail), getting things down to about 2k tris while entirely preserving the face and preserving the original UV map as much as possible. A 33% reduction in polys isn't bad!
In the higher resolution previews the hands are noticeably blockier:
Lower poly in high res
But this is less apparent in-game:
In-game preview
For all I know this is a premature optimization and ~3k poly character models are fine. In theory if I ever need to switch the base human model I can just do so by batch re-generating all of the characters, but as the game develops it may become more complicated to do that. Hopefully I'll have a better sense of what poly count works before that.
Small update: So something about the reduced poly mesh messes up the vertex mapping to the base MakeHuman mesh, I think. Basically vertices on the face/head are being deleted when vertices in the torso should be deleted. I may need to try a cleaner approach to reducing the poly count, that won't mess up the underlying geometry as much...e.g. doing it by hand.
Update: Improving GLTF export times
The GLTF export times were around 10 minutes with 3 animations, which was way too slow. I was not exporting much—only the renderable/visible objects, which was just the lowish-poly human mesh and clothes. Everything else was hidden. But for some reason (which may be related to this issue) the GLTF exporter still processes hidden meshes, even if they aren't to be included in the final GLTF. So the base MakeHuman mesh, which is pretty detailed, was taking up the bulk of the processing time. After deleting that mesh and some other objects (rather than just hiding them) the export time went down to about a minute. The character generation system does this exporting through a headless Blender script, but when exporting from the Blender UI it takes only ~15-16 seconds. No idea what could be the cause of that discrepancy.
Now the main bottleneck is the retargeting/remapping of animations, but again, I don't think I can do much to speed that up.
The character generation system is starting to come together. There are still a few things to figure out, but I think I have the bulk of it figured out.
The character generation system is roughly broken down into four sub-problems:
Mesh generation: how will the actual geometry of a character be generated?
Texturing: how will the skin-level features (skin tone, eyes, eyebrows, nose, mouth, close-cut hair, facial hair, tattoos, scars, etc) of a character be generated?
Clothing/hair: how will additional geometry, like clothing and hair, be generated and mapped to the human mesh?
Rigging: how will the character's skeleton be configured?
A good system will encompass these sub-problems and also make it easy to:
generate characters according to specific constraints through a single UI (eventually as a tab in the CMS)
add or modify clothing, hair, etc
generate a large amount of variation across characters
In summary, the whole system should be represented by a single configuration screen, and with a single press of a button I can produce a fully rigged and clothes character model. I'm not quite at that point yet but making good progress.
The system so far is all built around the open source MakeHuman, which makes the whole process much simpler. It provides a way to generate parameterized human meshes that supports the easy adding of components like clothing, and it has an addon for working directly within Blender. MakeHuman works by generating a "base mesh" which then can be used with other meshes ("proxies") that map to the vertices of the base mesh. When the base mesh is transformed—either through animation or through a variety of different body shape/proportion parameters—these proxies are transformed too. Clothes are proxies, but so are "topologies" which replace the base mesh as the human mesh. This allows me to use a custom lower-poly mesh instead of the higher-resolution default mesh.
So MakeHuman takes care of mesh generation, and it provides a way to attach clothing and hair. The clothing and hair still need to be modeled individually, but this is less daunting a task as I figure I'll only need to create a relatively small amount of clothing forms that each have several different textures. It may be easier to automate the generation of some of these textures, e.g. color variations. In the end this is not too different than your run-of-the-mill modeling and texturing; there are just a couple of extra steps to ensure that the clothes map on to the human mesh correctly.
MakeHuman also generates a rig for the mesh, so that sub-problem may be taken care of too. But because I haven't figured out the animation process, I don't know exactly if/how I'll integrate the auto-generated mesh. For my test characters I've just been using Mixamo's auto-rigger...so for now this one needs more work.
So that leaves texturing, or what I called "skin-level features". These are features that don't really have any volume to them, such as tattoos, scars, and undergarments and socks. This isn't too difficult in theory: you just need to generate an image texture. The approach is to work in layers, and assemble a final texture by sampling/generating different layers for different features. So the bottom-most layer is the skintone, and on top of that you'd paste on layers of underwear, socks, eyes, nose, mouth, etc.
The base skin UV map
The face is of course very important here, and it's the hardest to get right. I don't yet have a good way of generating facial features. While the other parts (socks, undergarments, etc) can be generated by hand because they don't require a ton of variation (e.g. I could probably get away with like 20 different pairs of socks), faces should be unique per character (PCs and NPCs alike). I would rather not have to create all of these by hand.
I've had some success using Stable Diffusion to generate faces to work from but it's not consistent enough to automate (faces may not be head-on and so require some manual adjusting, for example). I think a parameterized generator might make the most sense here, where, for example, facial features are defined by bezier curves with constrained parameter ranges, and each face is just a sample of that parameter space. There could then be a pool of textures (for skin tones, lip color, eye color, etc) that are also sampled from to fill in the details.
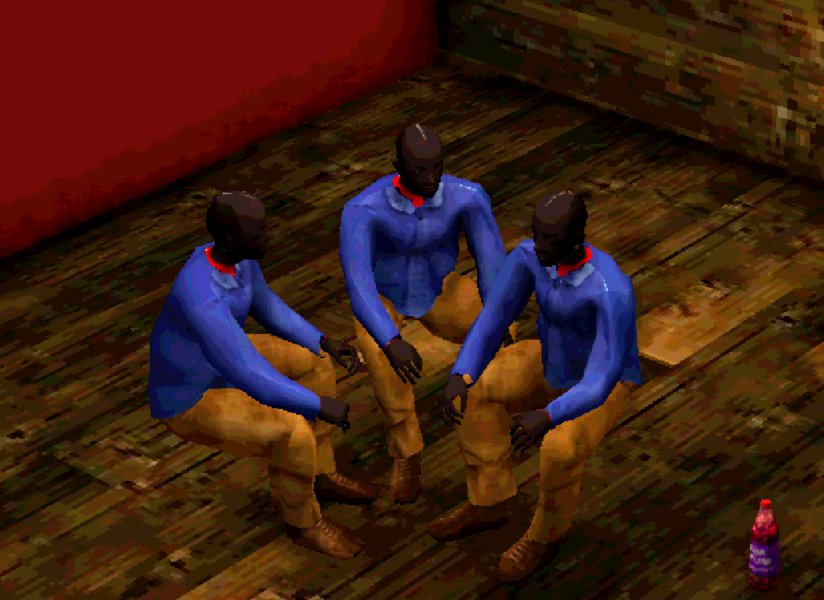
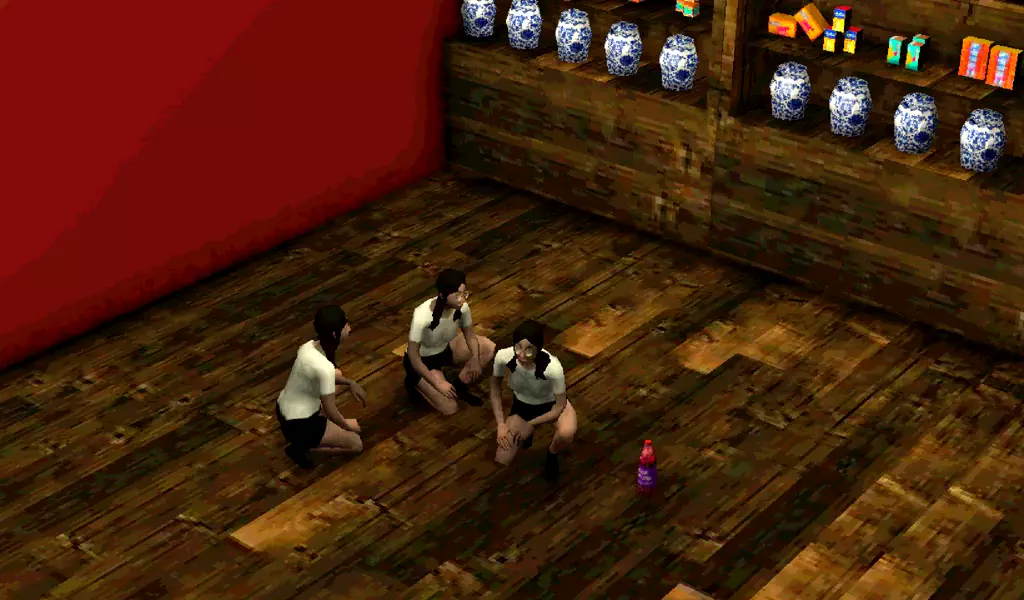
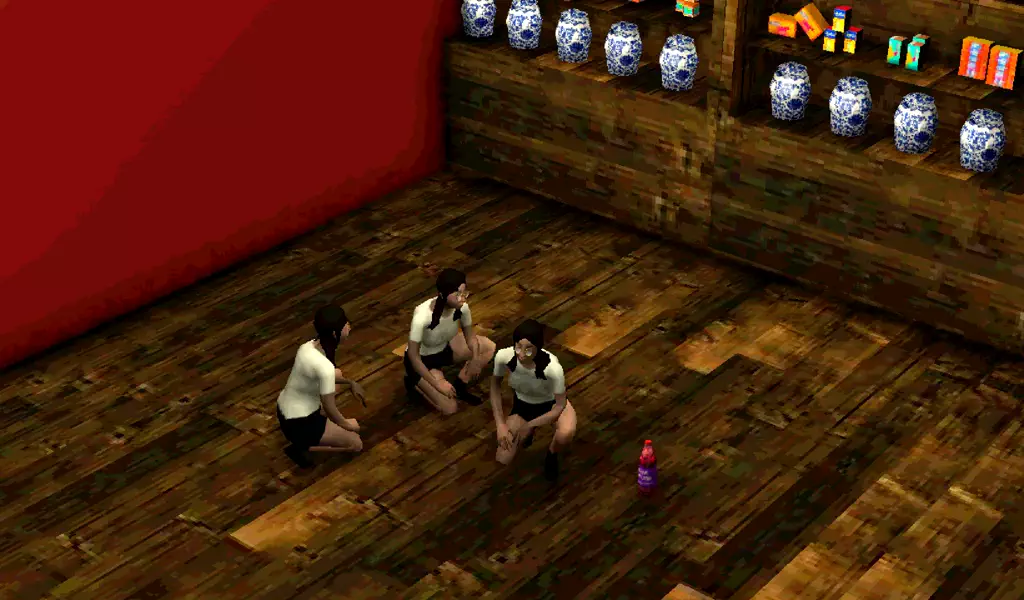
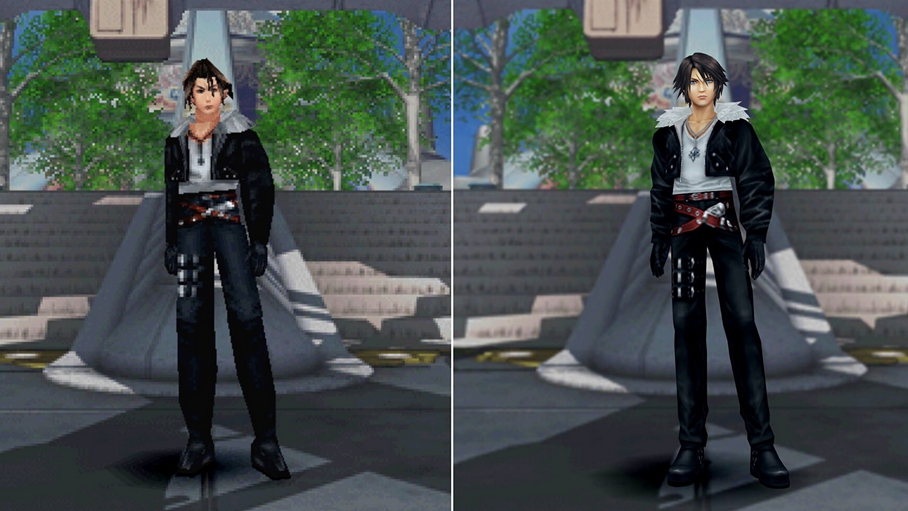
For testing I just created the skin-level texture by hand, just so I could place a character into the game and see if it works visually:
And here is a comparison with the screen effects, without the dithering, and without the resolution downsampling:
The face definitely needs work but I feel ok—but not thrilled—about everything else. It does feel somewhere between the graphics from the original FF8 and its remaster (except for the face), which is sort of what I was going for. I think I need to sit with it for awhile, see how it feels as the rest of the game's environments develop, and try different character models, clothing, etc. It's at least a starting point—I feel a bit reassured that I have some method for generating decent-looking characters, one that could be modified if needed.
On this point: I'm kind of hoping that all the models and characters and so on just kind of work together visually, visually but not expecting that to be the case. I'm trying to design this character generation system so that I can make adjustments to e.g. textures, models and have those adjustments propagate through all existing character models. That gives me more latitude to experiment with the game's visual aesthetic and makes me feel less like I'm committing to a particular one so early on.
This brings me to the actual generation system—everything up to this point is more about producing the assets that are then mix-and-matched to generate the actual characters. I don't want to allow for totally random character generation because there are combinations that are atypical or implausible. With clothes, for example, people generally don't wear a dress and pants at the same time, so I want to prevent this particular outfit from being generated (apologies if you do dress this way regularly). A context-free grammar (CFG) makes the most sense to me because it allows you to define set configurations that have variation, thus avoiding these problems of complete randomness.
With a CFG you will essentially define different "outfits", where each component of the outfit can be drawn from a pre-defined list of options. Say for example I need to generate a lot of road workers. A simple CFG might look like:
A CFG is recursive in the sense that, if I want to create a RoadWorker, the program will see that HardHat itself can be expanded into different options. And then the program will see that one of those options, HardHatWithLight, can also be expanded into more options. So it will do this until it's got all options, and sample from those.
Another feature to add is the ability to draw from the CFG with some fixed options. Like say I'm generating an audience for a group where everyone has to wear an orange beret; I can fix that option the program would only generate characters in an outfit which is allowed to include an orange beret.
Finally, every time a character is generated with the CFG, the resulting model will be saved with the combination of terms used to generate that character (in the case of a RoadWorker that might be YellowHardHat,BlueShirt,OrangeHighVisVest,...). This makes it easy to "regenerate" or update existing characters if one of the underlying models change. That way I can feel free to tweak the textures and models of clothing and other components without needing to manually update every character that I've generated so far.
In the near term this will probably all work via a Python script, but it would be amazing to be able to see changes in a character real-time. So a character might be generated through the CFG, but can be hand-adjusted afterwards, e.g. by swapping out that BlueShirt for a BlackShirt, or, if I go the bezier curve route for face features, by adjusting the eye shape for this character, etc. This might be feasible by calling MakeHuman and Blender via their Python interfaces, rendering the model, and then displaying the rendered image, but it sounds really complicated and janky. I'll have to think on it some more.
It's been awhile but I have been working on Fugue here and there. The biggest accomplishment is a more cohesive content management system, making it easier to keep most game-related content in one place and in a consistent structure. That way I don't have to worry about misplacing things and I can build more automated processing tools without the whole development process becoming a total mess (I hope).
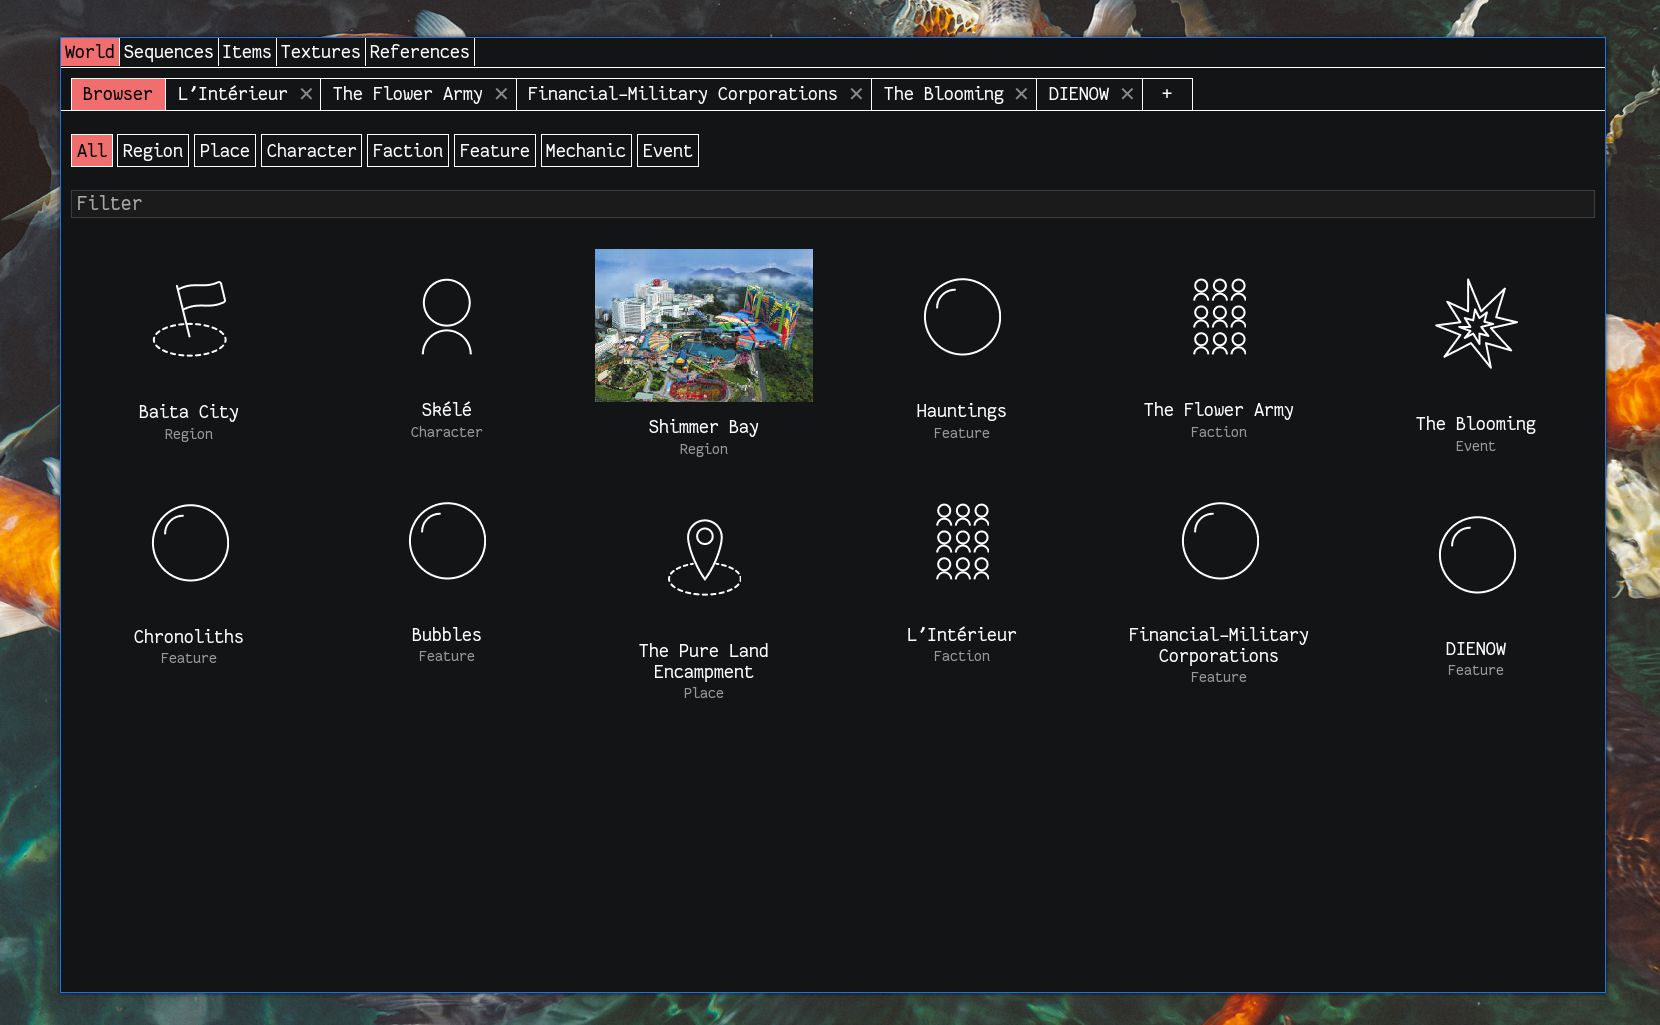
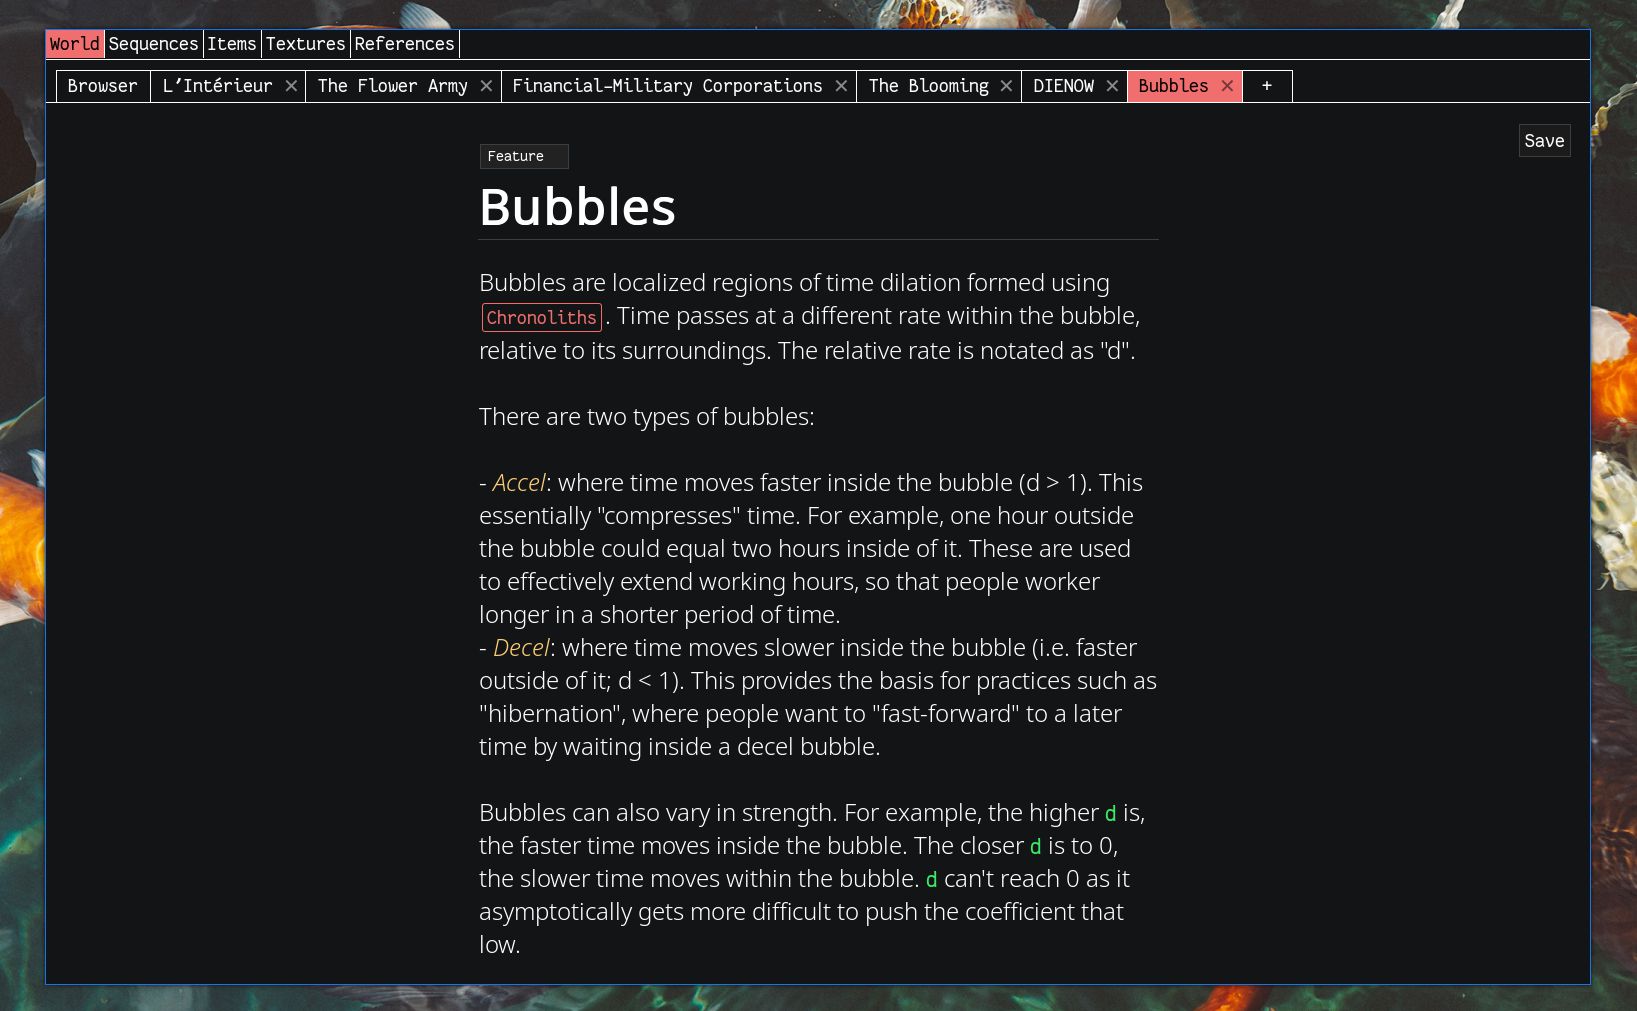
World Wiki
One of the CMS tools is a simplified wiki for the game world and mechanics. I'm working on copying over all my random scattered notes but this is so much easier to think with already.
World Wiki entry
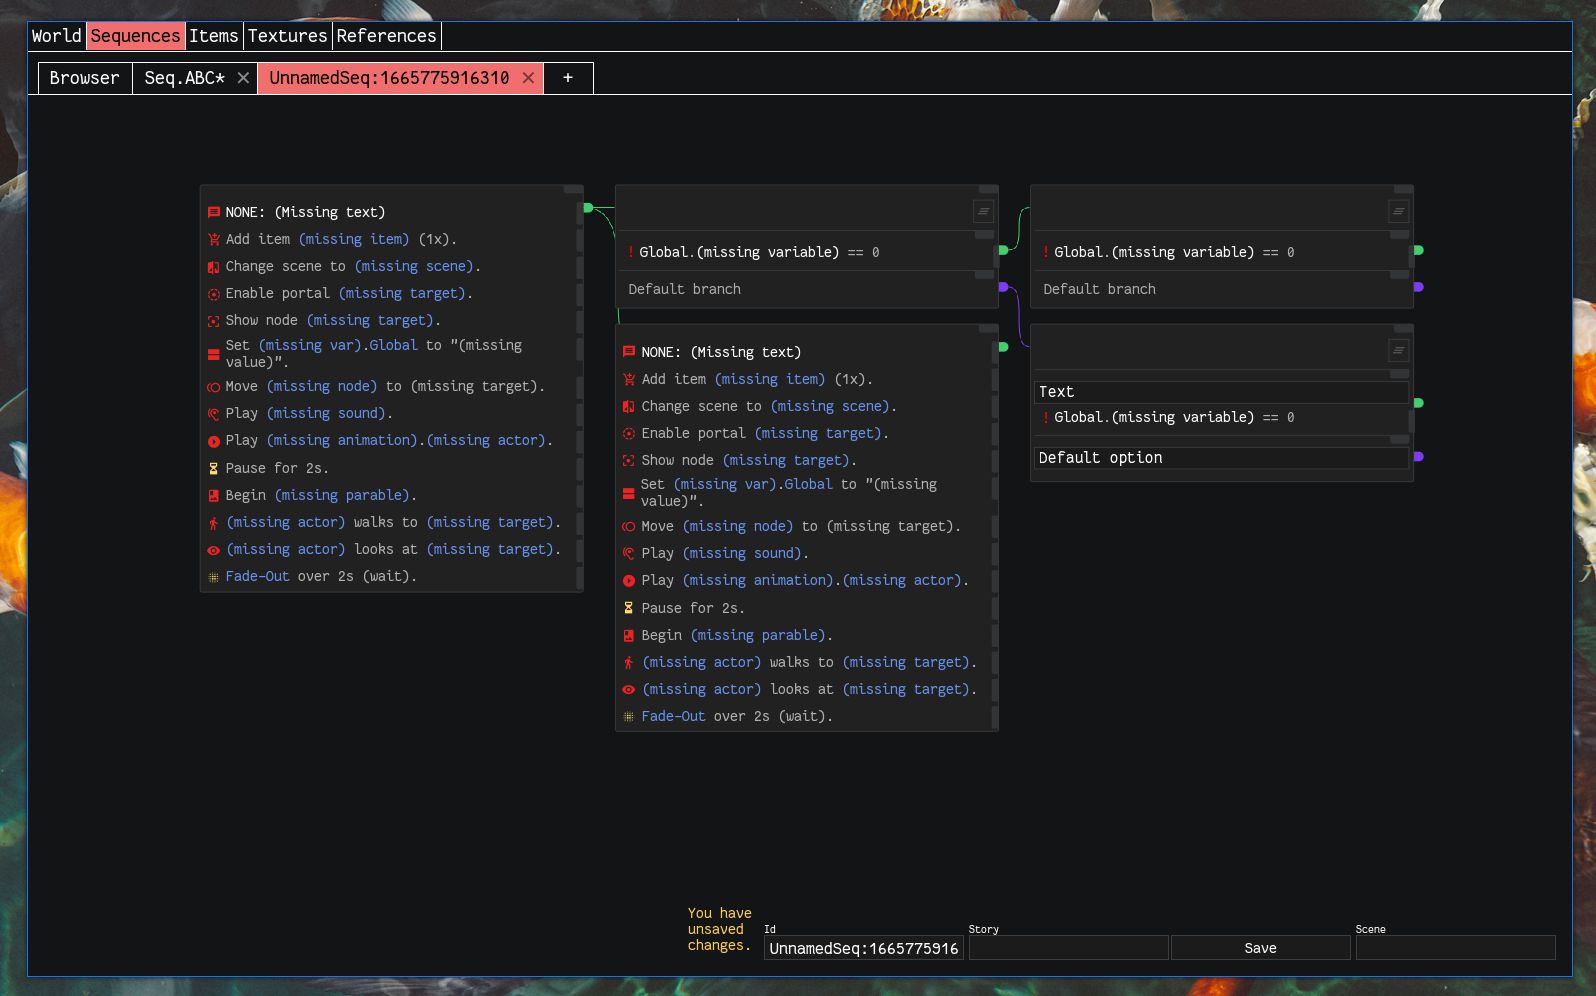
Sequence Editor
I've also ported over the sequence editor. I'm not 100% certain that I'll stick with Godot and so I want to be able to write all the action/dialogue sequences in a portable format. This saves sequences as a .seq file (which is really just a JSON file). Godot supports import plugins which are able to import custom filetypes into Godot resources. I'm doing the same with items (not pictured here), which as saved as .item (again, just a JSON file).
The actual integration with Godot is very hands-off. I just symlink the relevant CMS folders into my Godot project, and then the importer plugins handle the rest. That way I don't have to mess around with copying over files, worrying if they're the latest/correct version, etc. Whatever the CMS shows is what Godot sees.
Having a totally custom sequence editor gives a lot more control than the Godot addon I created. The downside is that validating actors/agents, scene objects, etc is difficult because that data is in Godot scene files (.tscn). These are plaintext but still requires parsing, so I wrote a .tscn parser which will pull out all the relevant entities that might be available to a sequence. I decided to use these extracted entities as suggestions for a sequence, not for validation. I thought that perhaps the workflow would be: write sequences in the CMS and then setup the Godot scene to match it, in which case validation is probably best handled from within Godot.
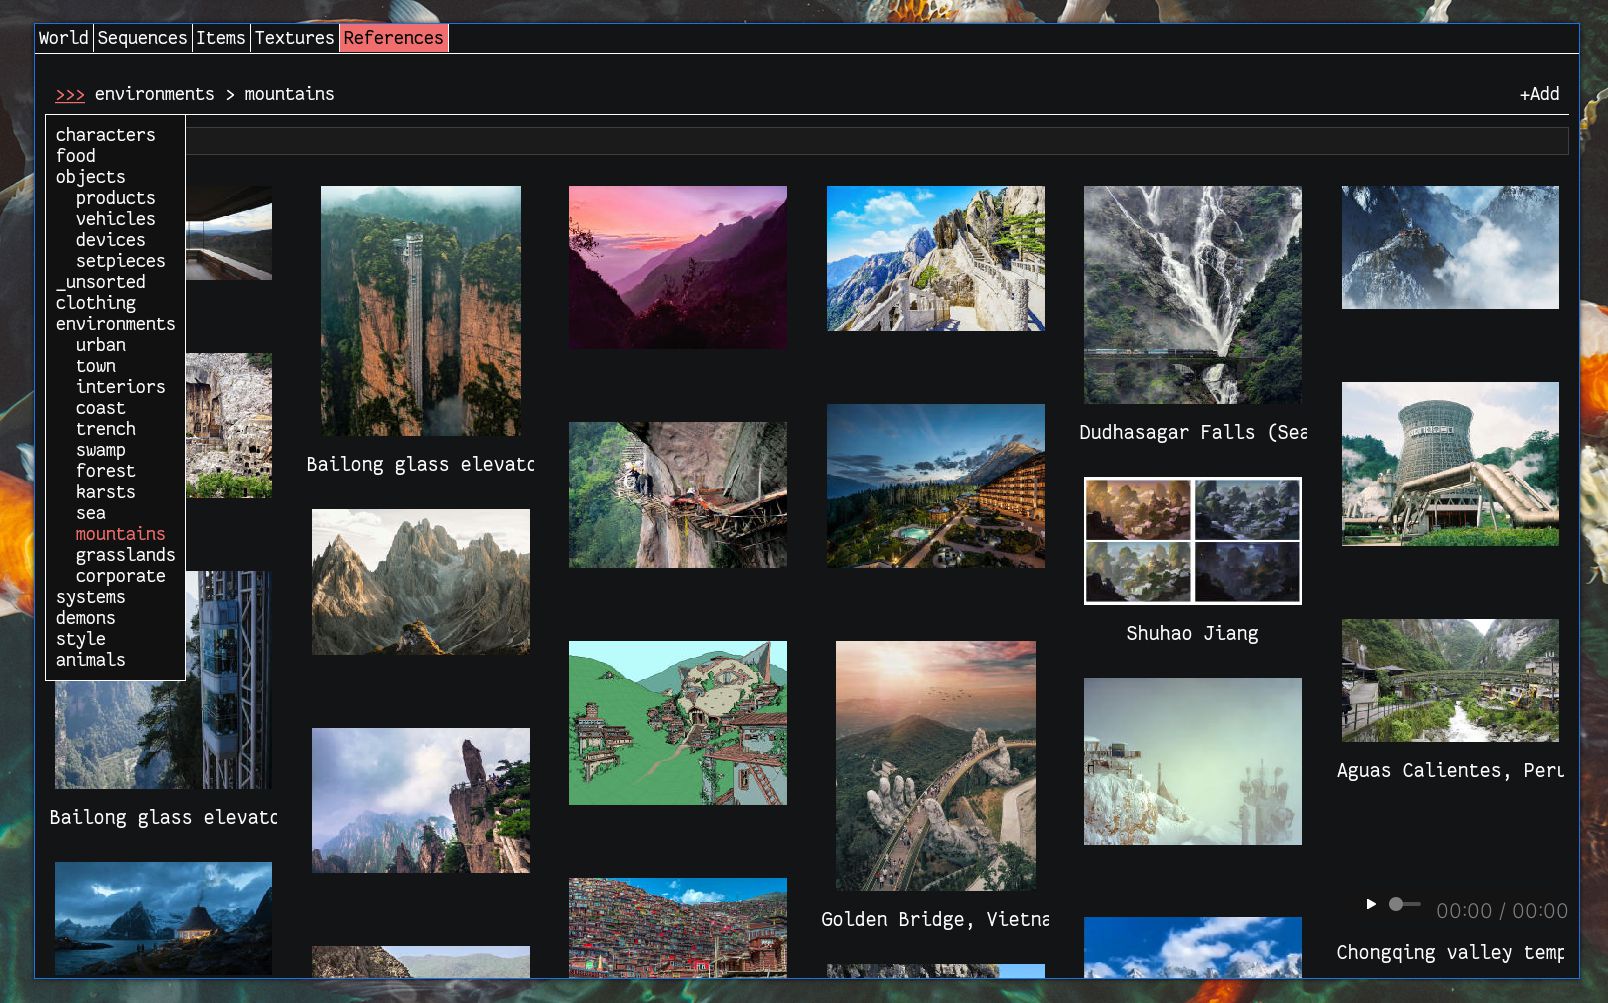
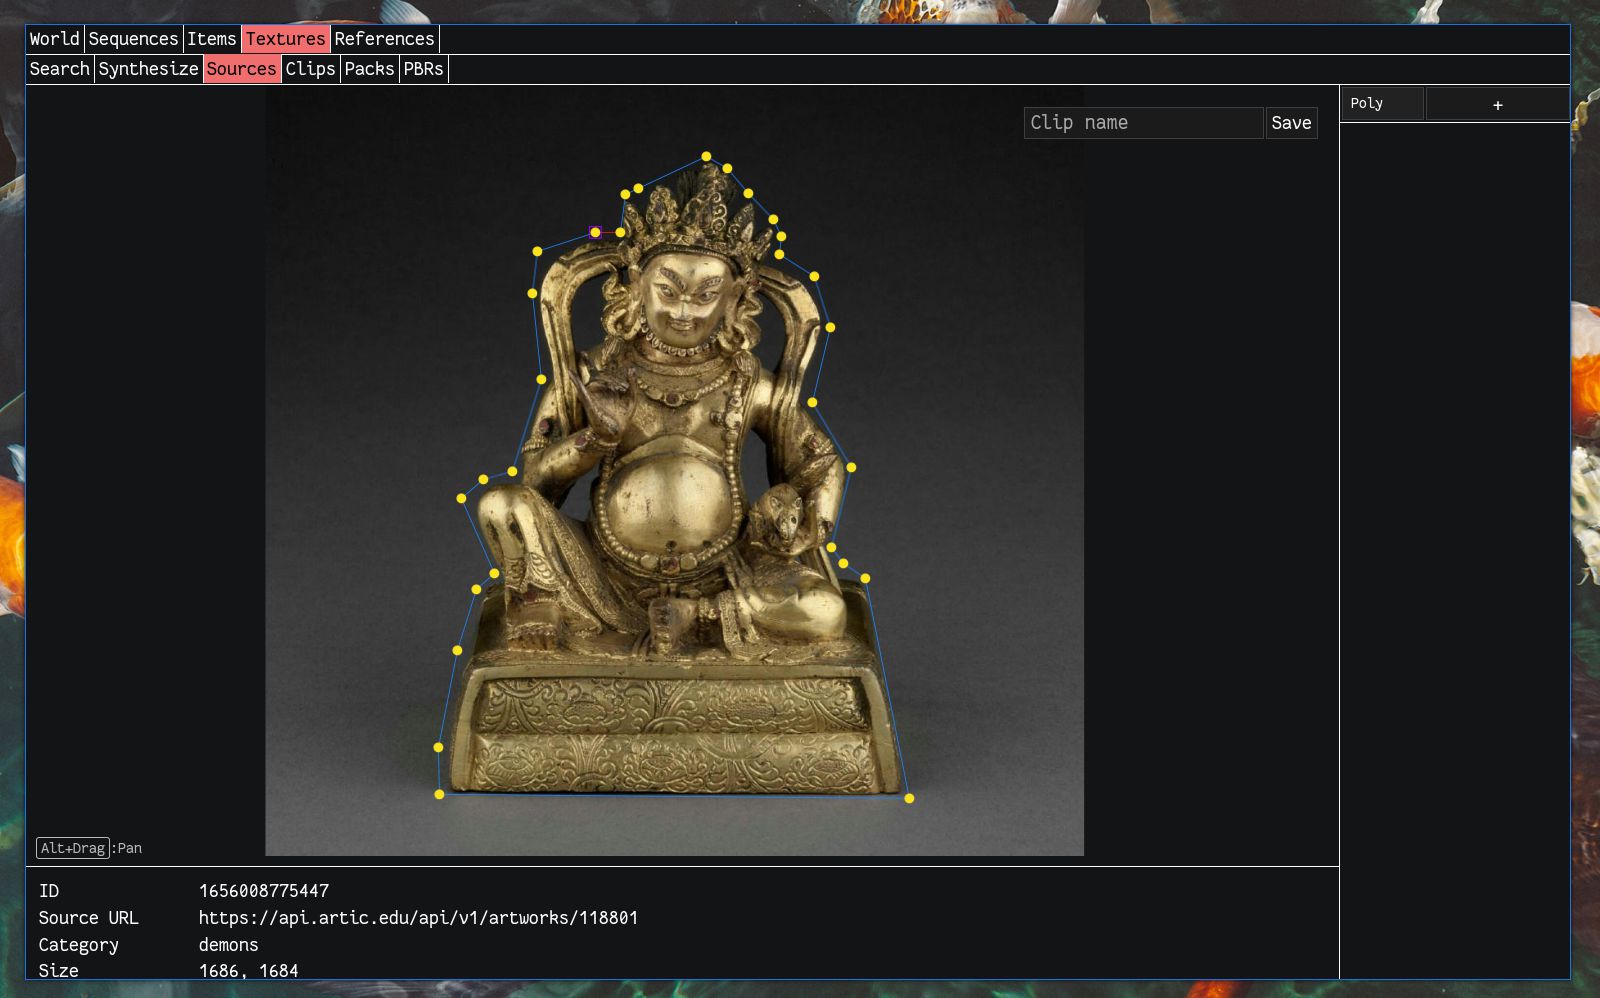
The rest is less interesting. There's a visual reference manager, which is really just a fancy image viewer:
Outside of this CMS tool I've been experimenting with character modeling/generation, which is one of the last major (and most intimidating) content production questions (along with character animation—I'm waiting for the next release of FreeMoCap, and I've kind of accepted that object modeling will just happen by hand). I feel that I'm getting close to a good process. Hopefully I'll figure it out soon.