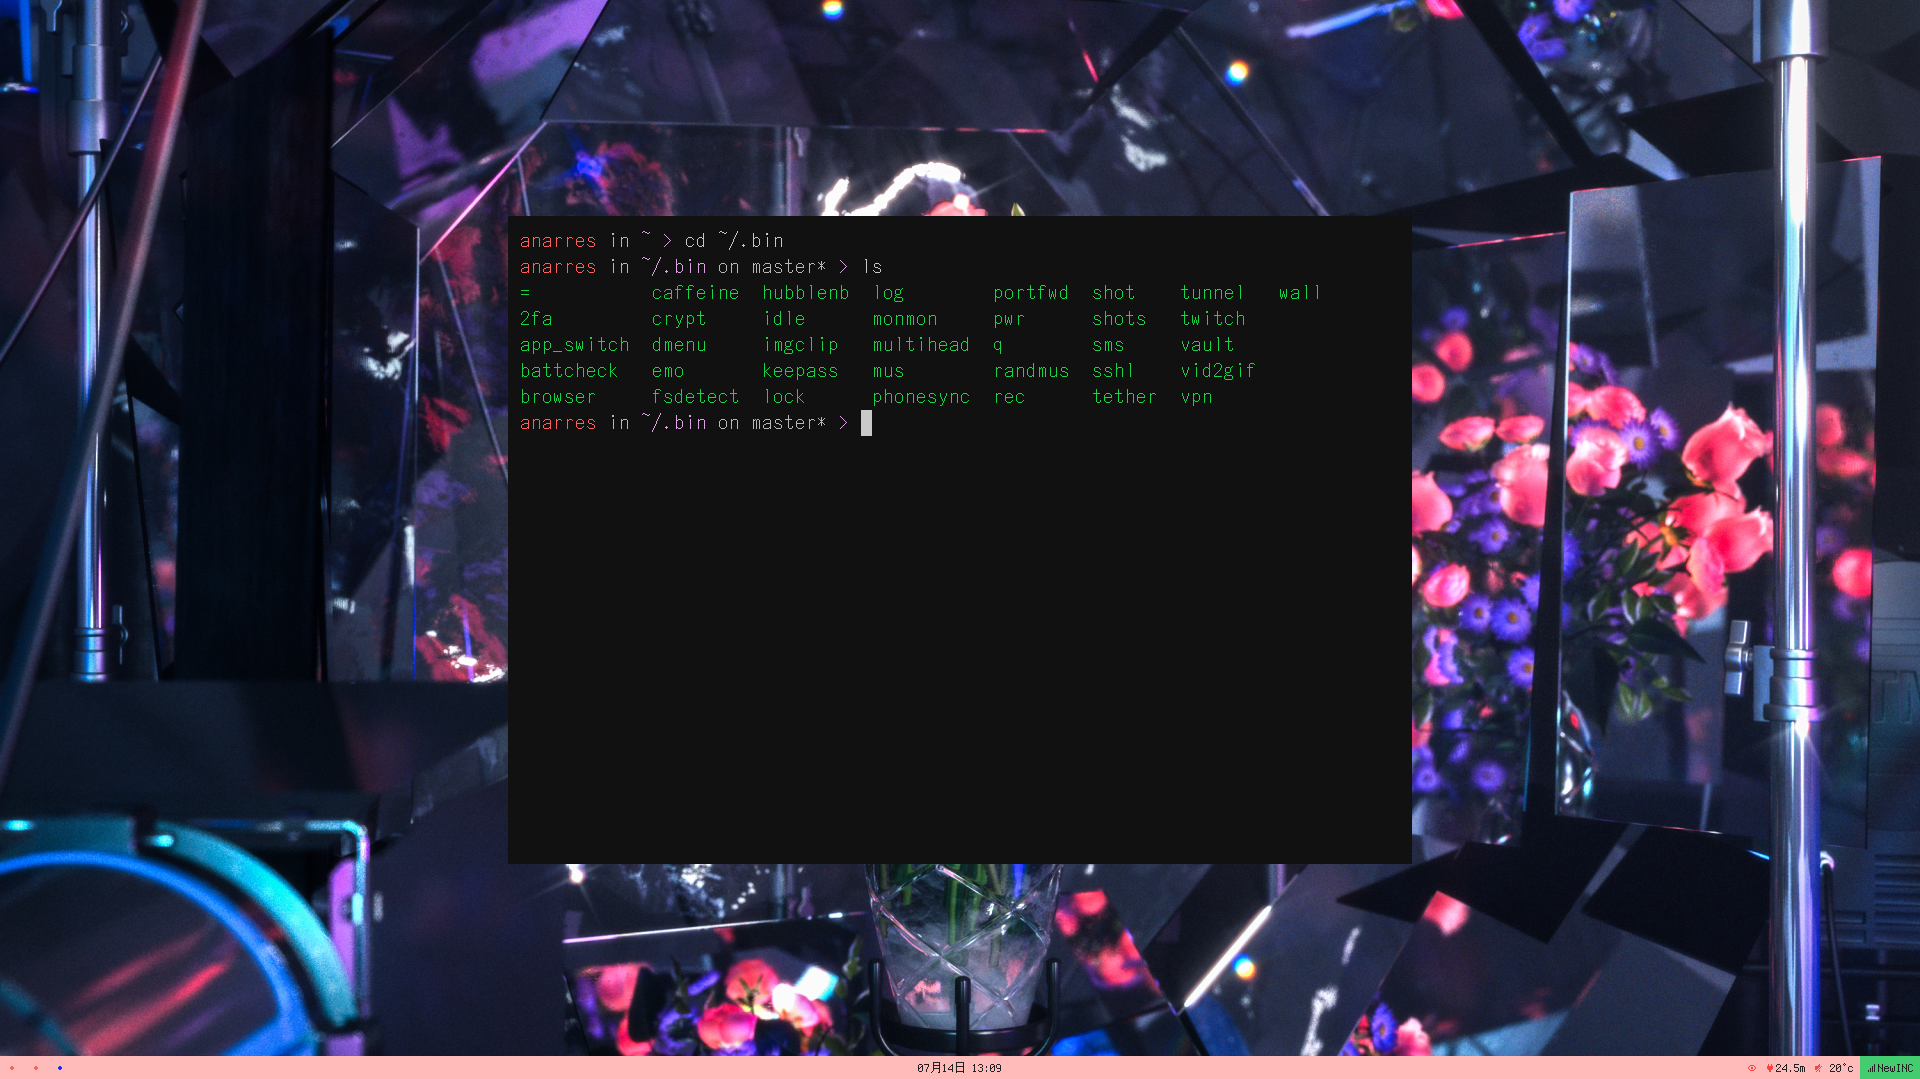
I’ve been using Linux as my main driver (Ubuntu 14.04, recently and catastrophically upgraded to 16.04, with no desktop environment; I’m using bspwm as my window manager) for about two years now. It’s been challenging and frustrating, but ultimately rewarding – the granular control is totally worth it.
Over these two years I’ve gradually accumulated a series of Bash and Python scripts to help me work quickly and smoothly. They generally operate by two principles: accessible from anywhere and usable with as few keystrokes as possible.
All the scripts are available in my dotfiles repo in the bin folder.
Screenshots and recordings
A few of the scripts are devoted to taking screenshots (shot) or screen recordings (rec). This is a basic feature in OSX (and many Linux desktop environments, afaik), but something I had to implement manually for my system. The benefit is being able to customize the functionality quite a bit. For example, the rec script will automatically convert the screen recording into an optimized gif (using another script, vid2gif).
The shot script lets me directly copy the image or the path to the screenshot immediately after it’s taken, but sometimes I need to refer to an old screenshot. It’s a pain to navigate to the screenshot folder and find the one I’m looking for, so I have another script, shots, which lets me browse and search through my screenshots and screengifs with dmenu (which is a menu that’s basically accessible from anywhere).
Passwords and security
Entering passwords and managing sensitive information is often a really inconvenient process, but some scripts make it easier.
I use KeePassX to manage my passwords, which means when I want to enter a password, I have to open up KeePassX, unlock the database, search for the password, and then copy and paste it into the password input.
This is a lot of steps, but my keepass script does all this in much fewer keystrokes.
I open it super+p, enter my master password, directly search for my password, and select it. Then it pastes the password into the input form automatically.
It can also create and save new passwords as needed.
I use 2FA on sites that support it, which means there’s another step after entering a password - opening up the authenticator to get the auth code. I have another script, 2fa, which I open with super+a, that copies the appropriate auth code into my clipboard so I can paste it in straight away.
These two scripts make logging in and good account security way easier to manage.
For local data that I want to encrypt, I have a script called crypt that lets me easily encrypt/decrypt individual files or directories with my GPG key. I use this script in another script, vault, which makes it easy to encrypt/decrypt a particular directory (~/docs/vault) of sensitive information.
Finally, I have a lock script for when I’m away from my computer that pixelates the screen contents and requires my password to unlock (this was snagged from r/unixporn).
Working with hubble
My main driver is a relatively low-powered chromebook (an Acer C720), so for heavy processing I have a beefy personal server (“hubble”) that I access remotely. It’s not publicly accessible - as in, it’s not a box provided by a service like Digital Ocean but a literal computer under my desk. This introduces some challenges in reliably connecting to it from anywhere, so I have a few scripts to help out with that.
hubble can consume quite a bit of power so I don’t like to leave it running when it’s not in use. It’s easy enough to shut off a server remotely (shutdown now) but turning it on remotely is trickier.
There’s a really useful program called wakeonlan that lets you send a special packet to a network interface (specifying its MAC address) that will tell its machine to boot up. However, you still need a computer running on the same network to send that packet from.
I keep a Banana Pi running at all times on that network. Its power consumption is much lower so I don’t feel as bad having it run all the time. When I need to access hubble, I ssh into the Pi and then run wakeonlan to boot it up.
This Pi isn’t publicly accessible either - there’s no public IP I can ssh directly into. Fortunately, using the script tunnel, I can create an ssh tunnel between the Pi and my hosting server (where this website and my other personal sites are kept), which does have a public IP, such that my hosting server acts as a bridge that the Pi piggybacks off of.
Finally, sometimes I’ll run a web service on hubble but want to access it through my laptop’s browser. I can use portfwd to connect a local laptop port to one of hubble’s ports, so that my laptop treats it as its own. It makes doing web development on hubble way easier.
Misc.
I have several other scripts that do little things here and there. Some highlights:
q: quickly searches my file system, with previews for images.
sms: lets me send an arbitrary notification over Signal, so I can, for example, run a long-running job and get texted when it’s finished: ./slow_script && sms "done!" || sms "failed!". This also accepts attachments!
twitch: lets me immediately start streaming to Twitch.
caffeine: prevents the computer from falling asleep. I have it bound to super+c with a eye indicator in my bar.
phonesync: remotely sync photos from my phone to my laptop and media from my laptop to my phone (they must be on the same LAN though).
emo: emoji support on Linux is still not very good; this script lets me search for emoji by name to paste into an input. Still thinking of a better solution for this…
bkup: this isn’t in my dotfiles repo but I use it quite a bit – but it lets me specify a backup system in YAML (example) that is run with bkup <backup name>.
office: unfortunately this repo is not yet public (need to clean out some sensitive info) but this is a suite of scripts that automates a lot of freelance paperwork-ish stuff that I used to do manually in InDesign or Illustrator:
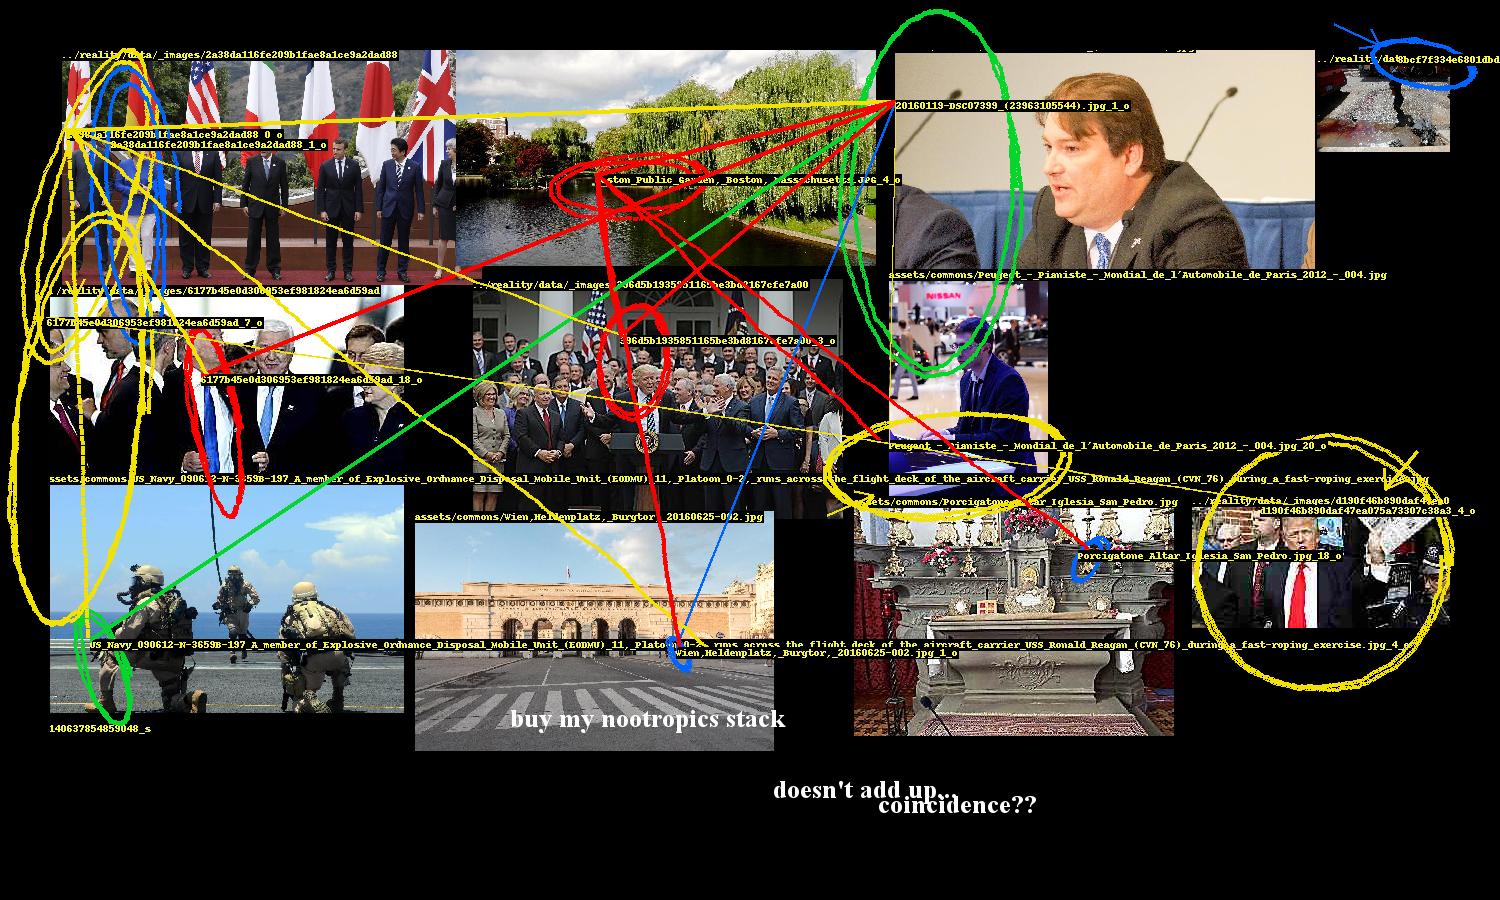
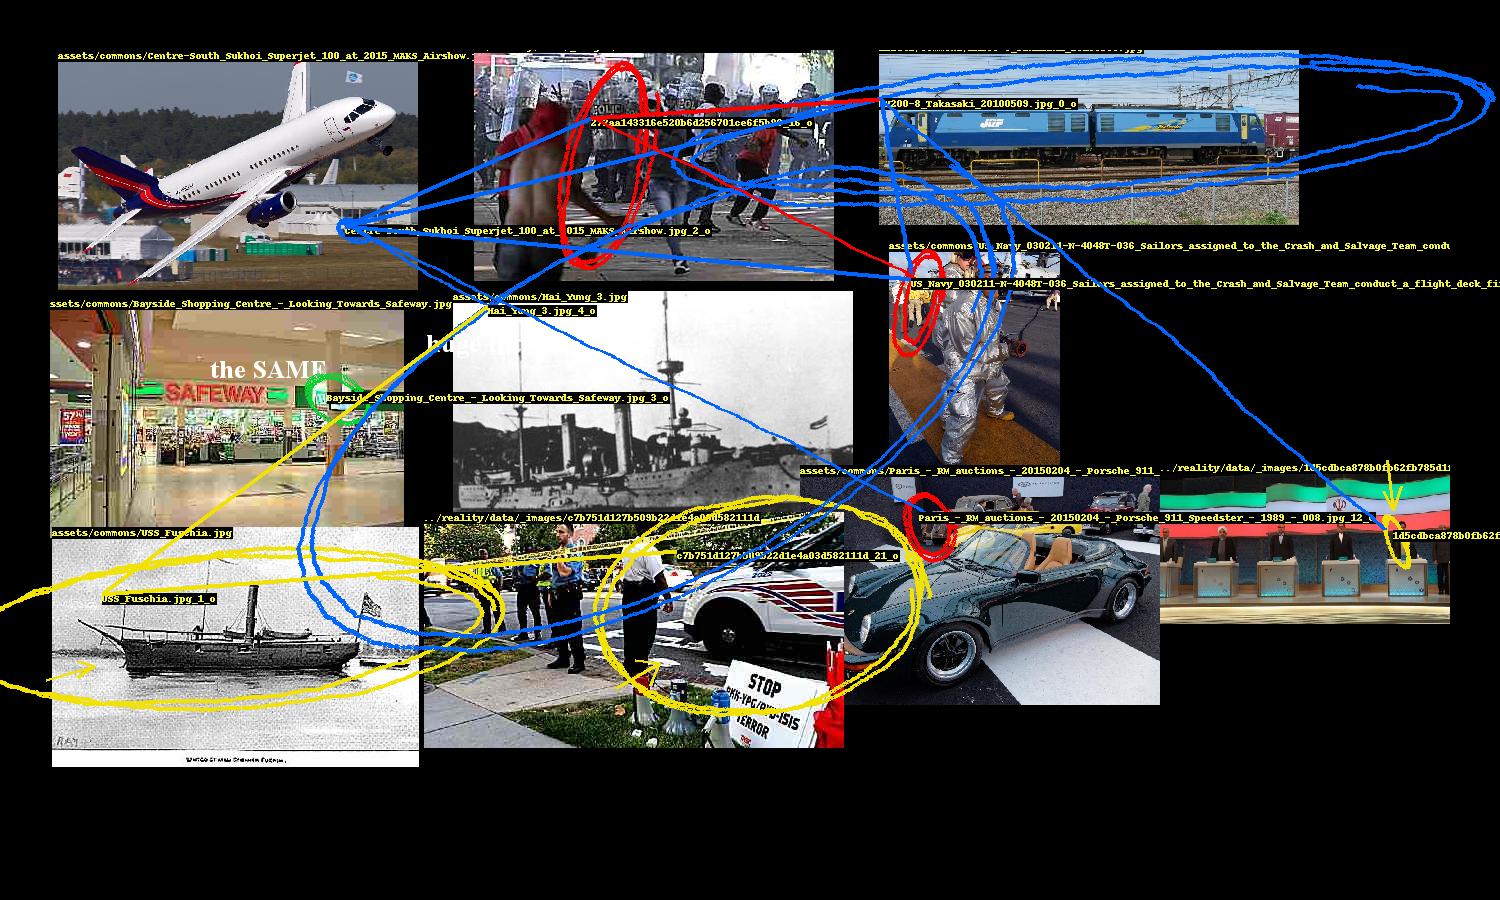
I recently wrote a conspiracy-generating bot for The New Inquiry’s Conspiracy issue. The basic premise is that far-fetched conspiracy theories emerge from the human tendency for apophenia - finding meaning in random patterns - and that the problematic algorithm-level aspects of machine learning are instances of a similar phenomenon. The bot leverages how computer models can misidentify faces and objects as similar and presents these perceptual missteps as significant discoveries, encouraging humans to read additional layers of absent meaning.
The bot consists of the following core components:
In this post I’ll give a high-level explanation for the basic structure of the bot. If you’re interested in details, the full source code is available here.
Sourcing images, the material of conspiracy
For this bot the ideal conspiracy is one that connects seemingly unrelated and distance events, people, and so on not only to each other but across time. If that connection is made to something relevant to the present, all the better. The bot’s source material then should combine obscure images with a lot of breadth (encompassing paintings, personal photos, technical drawings, and the like) with immediately recognizable ones, such as those from recent news stories.
Wikimedia Commons is perfect for the former. This is where all of Wikipedia’s (and other Wiki sites’) images are hosted, so it captures the massive variety of all those platforms. Wikimedia regularly makes full database dumps available, including one of all of the Commons’ image links (commonswiki-latest-image.sql.gz). Included in the repo is a script that parses these links out of the SQL. The full set of images is massive and too large to fit on typical commodity hard drives, so the program provides a way to download a sample of those images. As each image is downloaded, the program runs object recognition (using YOLO; “people” are included as objects) and face detection (using dlib), saving the bounding boxes and crops of any detected entities so that they are easily retrieved later.
Extracted faces and objects
For recent news images the bot uses reality, a simple system that polls several RSS feeds and saves new articles along with their main images and extracted named entities (peoples, places, organizations, and so on). When new articles are retrieved, reality updates a FIFO queue that the bot listens to. On new articles, the bot runs object recognition and face detection and adds that data to its source material, expanding its conspiratorial repertoire.
Each of these sources are sampled from separately so that every generated conspiracy includes images from both.
At time of writing, the bot has about 60,000 images to choose from.
Generating conspiracies
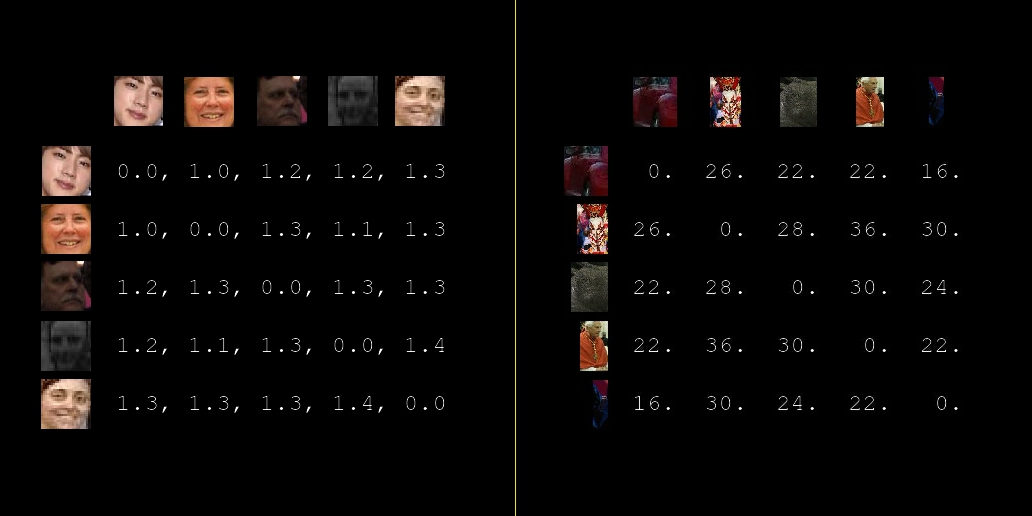
To generate a conspiracy, 650 images are sampled and their entities (faces and objects) are retrieved. The program establishes links between these entities based on similarity metrics; if two entities are similar enough, they are considered related and included in the conspiracy.
Face and object distance matrices
The FaceNet model used to compute face similarity. For objects, a very naive approach is used: the perceptual hashes of object crops are directly compared (perceptual hashes are a way of “fingerprinting” images such that images that look similar will produce similar hashes).
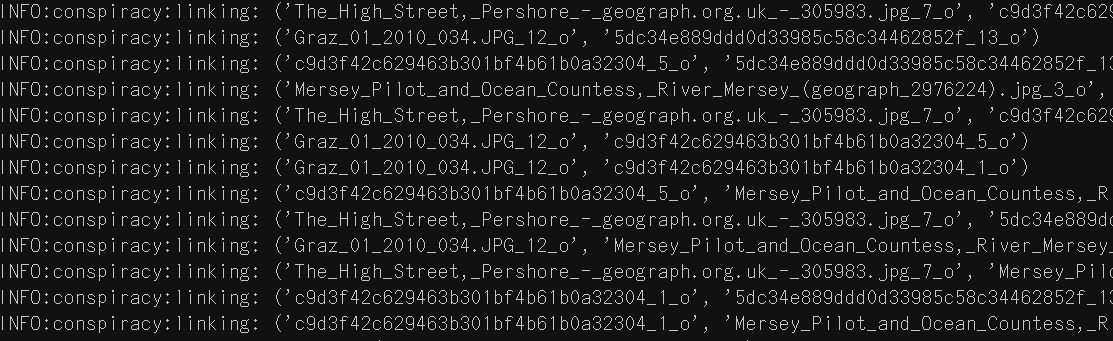
Links generated by similarity
Because reality saves a news article’s text along with its image, we can also search through that text and its extract entities to pull out text-based conspiracy material. The program starts by looking for a few simple patterns in the text, e.g. ENTITY_A is ... ENTITY_B, which would match something like Trump is mad at Comey. If any matches are found, a screenshot of the article’s page is generated. Then optical character recognition (OCR) is run on the screenshot to locate one of those extracted phrases. If one is found, a crop of it is saved to be included in the final output.
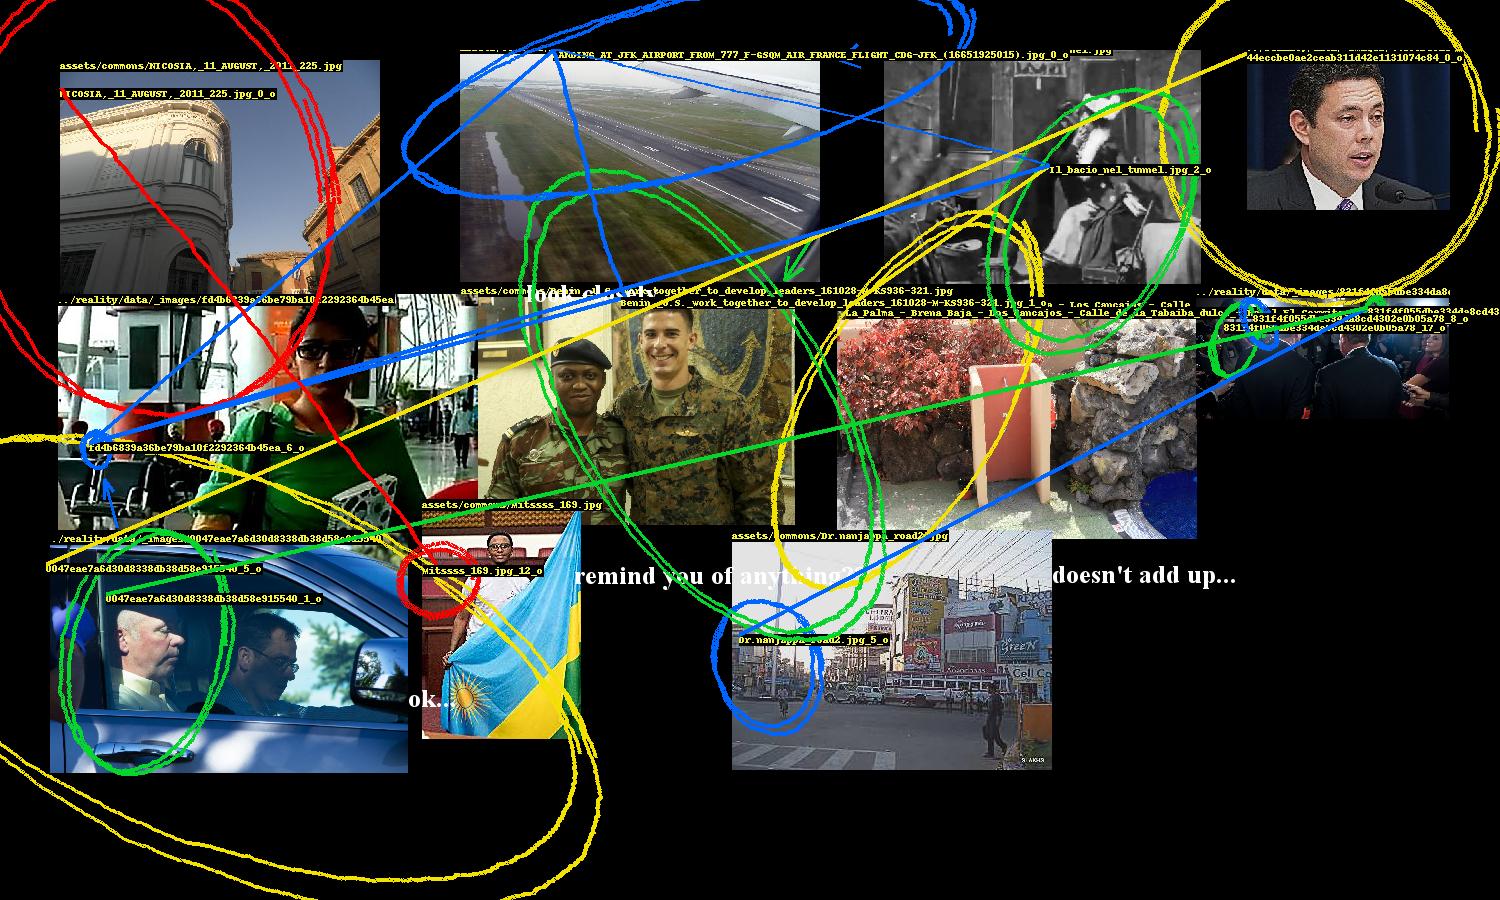
This network of entity relationships forms the conspiracy. The rest of the program is focused on presentation.
Image layout and annotation
Once relationships between faces and objects are established, the next challenge is to present the implicated images in a convincingly conspiratorial way. This problem breaks down into two parts: image 1) layout and 2) annotation.
1) Layout
Layout is tricky because it’s a bin packing problem, which is NP-hard, but fortunately there exists implementations of good solutions, such as rectpack, which is used here. There is no guarantee that all of the selected images will fit, so there is some additional processing to ensure that the images that do get included have a maximal amount of connectivity between them.
The generated network of entity relationships forms a graph of the selected images. Two images have an edge between them if at least one pair of their entities are linked. We start with the image that has the highest degree (i.e. the image that is connected to the most other images). We look at what images its connected to and pick the image with the highest degree out of those, and repeat. The result is a sequence of connected images, descending by degree.
Ordering images based on links
Here’s where some style is added. Images are not placed exactly as prescribed by the bin packing algorithm; there is some “shakiness” where they are placed with some margin of error. This gives the layout a rushed, haphazard look, enhancing the conspiracy vibe.
2) Annotation
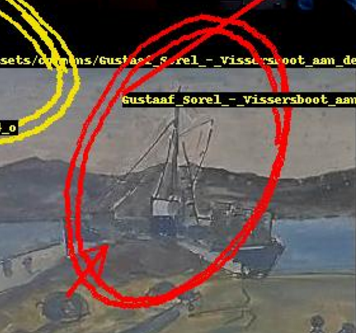
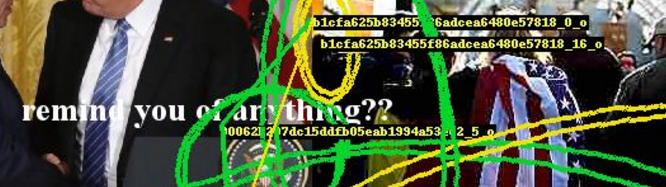
A conspiracy’s entities need to be highlighted and the links between them need to be drawn. While Pillow, Python’s de facto image processing library, provides ways to draw ellipses and lines, they are too neat and precise. So the program includes several annotation methods to nervously encircle these entities, occasionally scrawl arrows pointing to them, and hastily link them.
These were fun to design. The ellipse drawing method uses an ellipse function where the shape parameters a, b are the width and height of the entity’s bounding box. The function is rotated to a random angle (within constraints) and then the ellipse is drawn point by point, with smooth noise added to give it an organic hand-drawn appearance. There are additional parameters for thickness and how many times the ellipse should be looped.
“Hand-drawn” annotations
This part of the program also includes computer text, which are randomly sampled from a set of conspiracy clichés, and also writes entity ids on the images.
Text annotations
Further manipulation
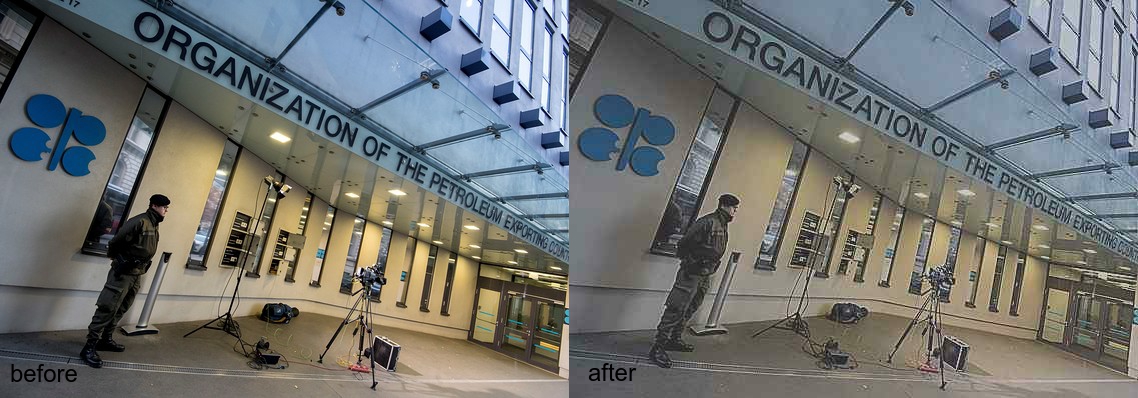
Images are randomly “mangled”, i.e. scaled down then back up, unsharpened, contrast-adjusted, then JPEG-crushed, giving them the worn look of an image that has been circulating the internet for ages, degraded by repeat encodings.
Image mangling
Assembling the image
Once all the images are prepared, placed, and annotated, the final image is saved and added to the webpage.
There you have it - an algorithm for conspiracies.
Last weekend Fei, Dan, and I put on our first Party Fortress party.
Fei and I have been working with social simulation for awhile now, starting with our Humans of Simulated New York project from a year ago.
Over the past month or two we’ve been working on a web system, “highrise” to simulate building social dynamics.
The goal of the tool is to be able to layout buildings and specify the behaviors of its occupants, so as to see how they interact with each other and the environment, and how each of those interactions influences the others.
Beyond its practical functionality (it still has a ways to go), highrise is part of an ongoing interest in simulation and cybernetics. Simulation is an existing practice that does not receive as much visibility as AI but can be just as problematic. It seems inevitable that it will become the next contested space of technological power.
highrise is partly a continuation of our work with using simulation for speculation, but whereas our last project looked at the scale of a city economy, here we’re using the scale of a gathering of 10-20 people. The inspiration for the project was hearing Dan’s ideas for parties, which are in many ways interesting social games. By arranging a party in a peculiar way, either spatially or socially, what new kinds of interactions or relationships emerge? Better yet, which interactions or relationships that we’ve forgotten start to return? What relationships that we’ve mythologized can (re)emerge in earnest?
highrise was the engine for us to start exploring this, which manifested in Party Fortress.
I’ll talk a bit about how highrise was designed and implemented and then the living prototype Party Fortress.
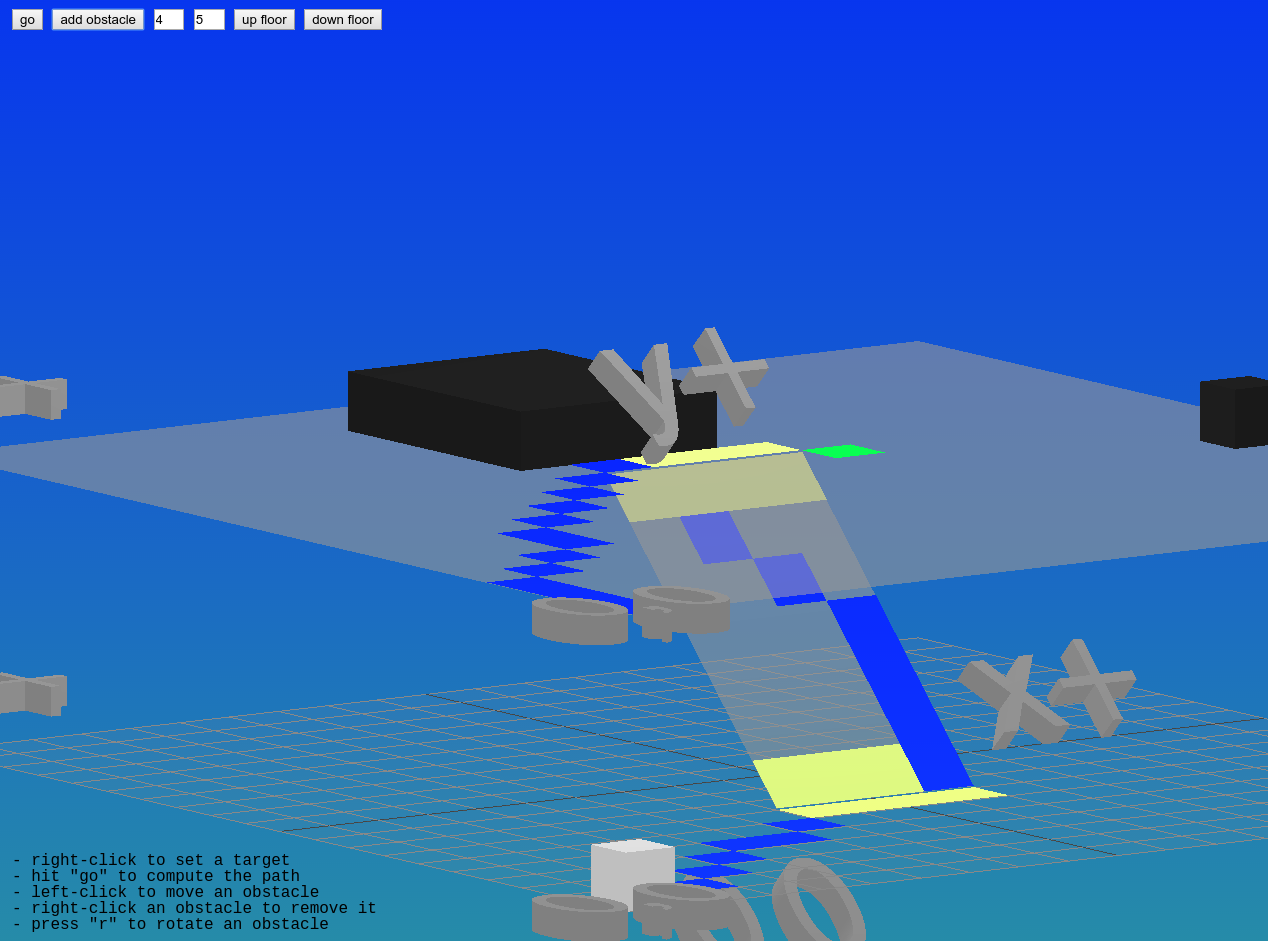
Buildings: Floors and Stairs
First we needed a way to specify a building. We started by reducing a “building” to just floors and stairs, so we needed to develop a way to layout a building by specifying floor plans and linking them up with stairs.
Early sketches of
We wanted floor plans to be easily specified without code, so developing some simple text structure seemed like a good approach. The first version of this was to simply use numbers:
Here 0 is empty space, 1 is walkable, and 2 is an obstacle. In the example above, each 2D array is a floor, so the complete 3D array represents the building. Beyond one floor it gets a tad confusing to see them stacked up like that, but this may be an unavoidable limitation of trying to represent a 3D structure in text.
Note that even though we can specify multiple floors, we don’t have any way to specify how they connect. We haven’t yet figured out a good way of representing staircases in this text format, so for now they are explicitly added and positioned in code.
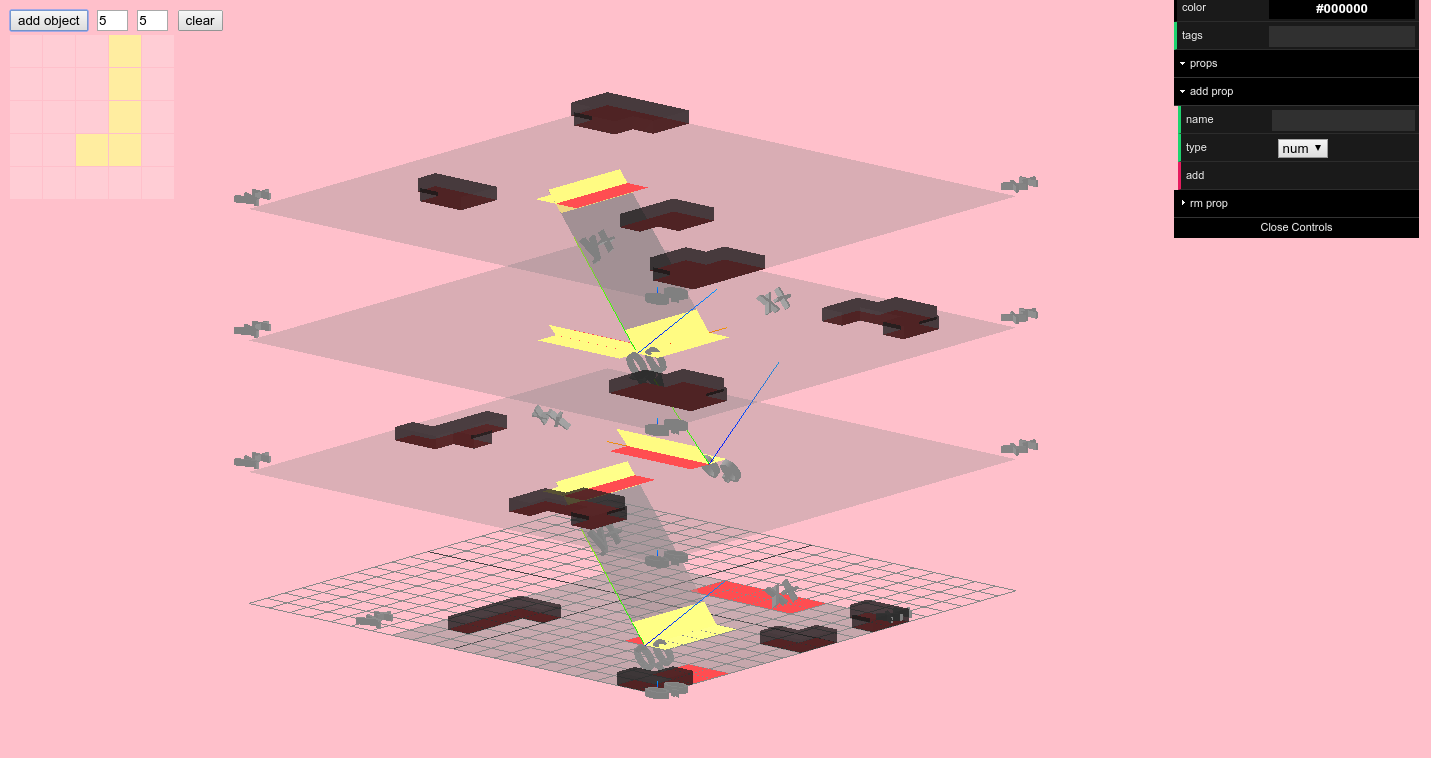
Objects
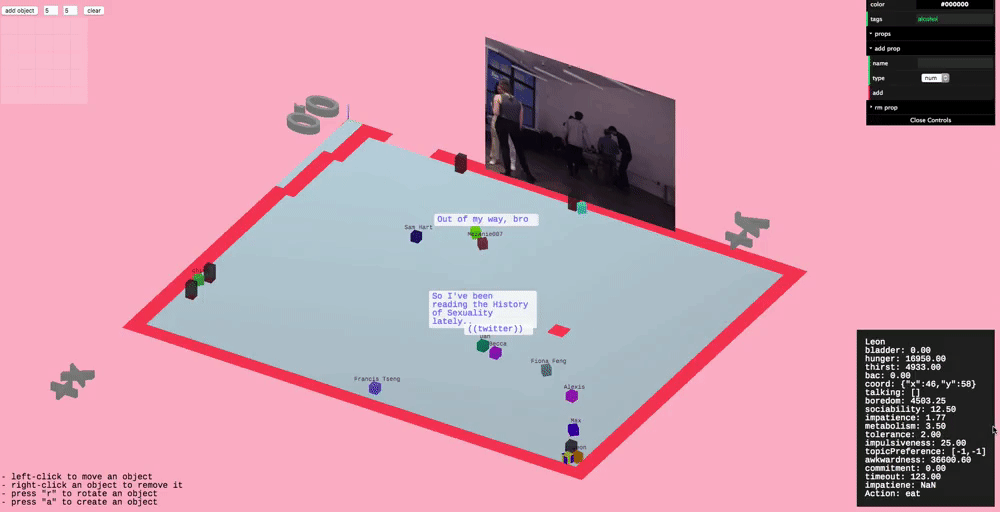
A floor plan isn’t enough to properly represent a building’s interior - we also needed a system for specifying and placing arbitrary objects with arbitrary properties. To this end we put together an “object designer”, depicted below in the upper-left hand corner.
The object designer
The object designer is used to specify the footprint of an object, which can then be placed in the building. When an object is clicked on, you can specify any tags and/or key-value pairs as properties for the object (in the upper-right hand corner), which agents can later query to make decisions (e.g. find all objects tagged food or toilet).
Objects can be moved around and their properties can be edited while the simulation runs, so you can experiment with different layouts and object configurations on-the-fly.
Expanding the floor plan syntax
It gets annoying to need to create objects by hand in the UI when it’s likely you’d want to specify them along with the floor plan. We expanded the floor plan syntax so that, in addition to specifying empty/walkable/obstacle spaces (in the new syntax, these are '-', ' ', and '#' respectively), you can also specify other arbitrary values, e.g. A, B, ☭, etc, and these values can be associated with object properties.
This still isn’t as ergonomic as it could be, so it’s something we’re looking to improve. We’d like it so that these object ids can be re-used throughout the floor plan, e.g:
so that if there are identical objects they don’t need to be repeated. Where this becomes tricky is if we have objects of footprints larger than one space, e.g.:
Do we have three adjacent but distinct A objects or one contiguous one?
This ergonomics problem, in addition to the stair problem mentioned earlier, means there’s still a bit of work needed on this part.
(Spatial) Agents
The building functionality is pretty straightforward. Where things start to teeter (and get more interesting) is with designing the agent framework, which is used to specify the inhabitants of the building and how they behave.
It’s hard to anticipate what behaviors one might want to model, so the design of the framework has flexibility as its first priority.
There was the additional challenge of these agents being spatial; my experience with agent-based models has always hand-waved physical constraints out of the problem. Agents would decide on an action and it would be taken for granted that they’d execute it immediately. But when dealing with what is essentially an architectural simulation, we needed to consider that an agent may decide to do something and need to travel to a target before they can act on their decision.
So we needed to design the base Agent class so that when a user implements it, they can easily implement whatever behavior they want to simulate.
Decision making
The first key component is how agents make decisions.
entropy, which represents the constant state changes that occur every frame, regardless of what action an agent takes. For example, every frame agents get a bit more hungry, a bit more tired, a bit more thirst, etc.
successor, which returns the new state resulting from taking a specific action. This is applied only when the agent reaches its target. For example, if my action is eat, I can’t actually eat and decrease my hunger state until I get to the food.
actions, which returns possible actions given a state. E.g. if there’s no food at the party, then I can’t eat
utility, which computes the utility for a new state given an old state. For example, if I’m really hungry now and I eat, the resulting state has lower hunger, which is a good thing, so some positive utility results.
Agents use this utility function to decide what action to take. They can either deterministically choose the action which maximizes their utility, or sample a distribution of actions with probabilities derived from their utilities (i.e. such that the highest-utility action is most likely, but not a sure bet).
This method also takes an optional expected parameter to distinguish the use of this method for deciding on the action and for actually computing the action’s resulting utility. In the former (deciding), the agent’s expected utility from an action may not actually reflect the true result of the action. If I’m hungry, I may decide to eat a sandwich thinking it will satisfy my hunger. But upon eating it, I might find that it actually wasn’t that filling.
execute, which executes an action, returning the modified state and other side effects, e.g. doing something to the environment.
Movement
Agents also can have an associated Avatar which is their representation in the 3D world. You can hook into this to move the agent and know when it’s reached it’s destination.
Agent movement
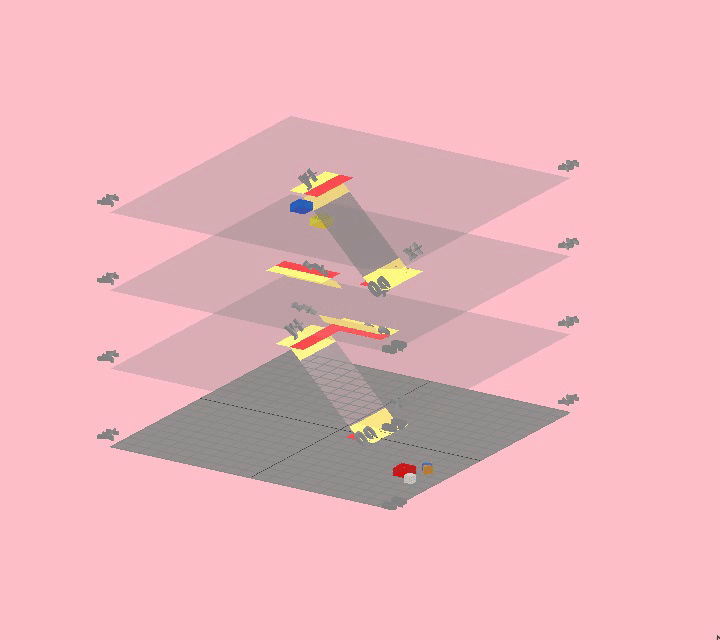
Multi-floor movement was handled by standard A* pathfinding:
A* pathfinding ()
Each floor is represented as a grid, and the layout of the building is represented as a network where each node is a floor and edges are staircases. When an agent wants to move to a position that’s on another floor, they first generate a route through this building network to figure out which floors they need to go through, trying to minimize overall distance. Then, for each floor, they find the path to the closest stairs and go to the next floor until they reach their target.
Building network example
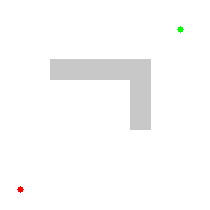
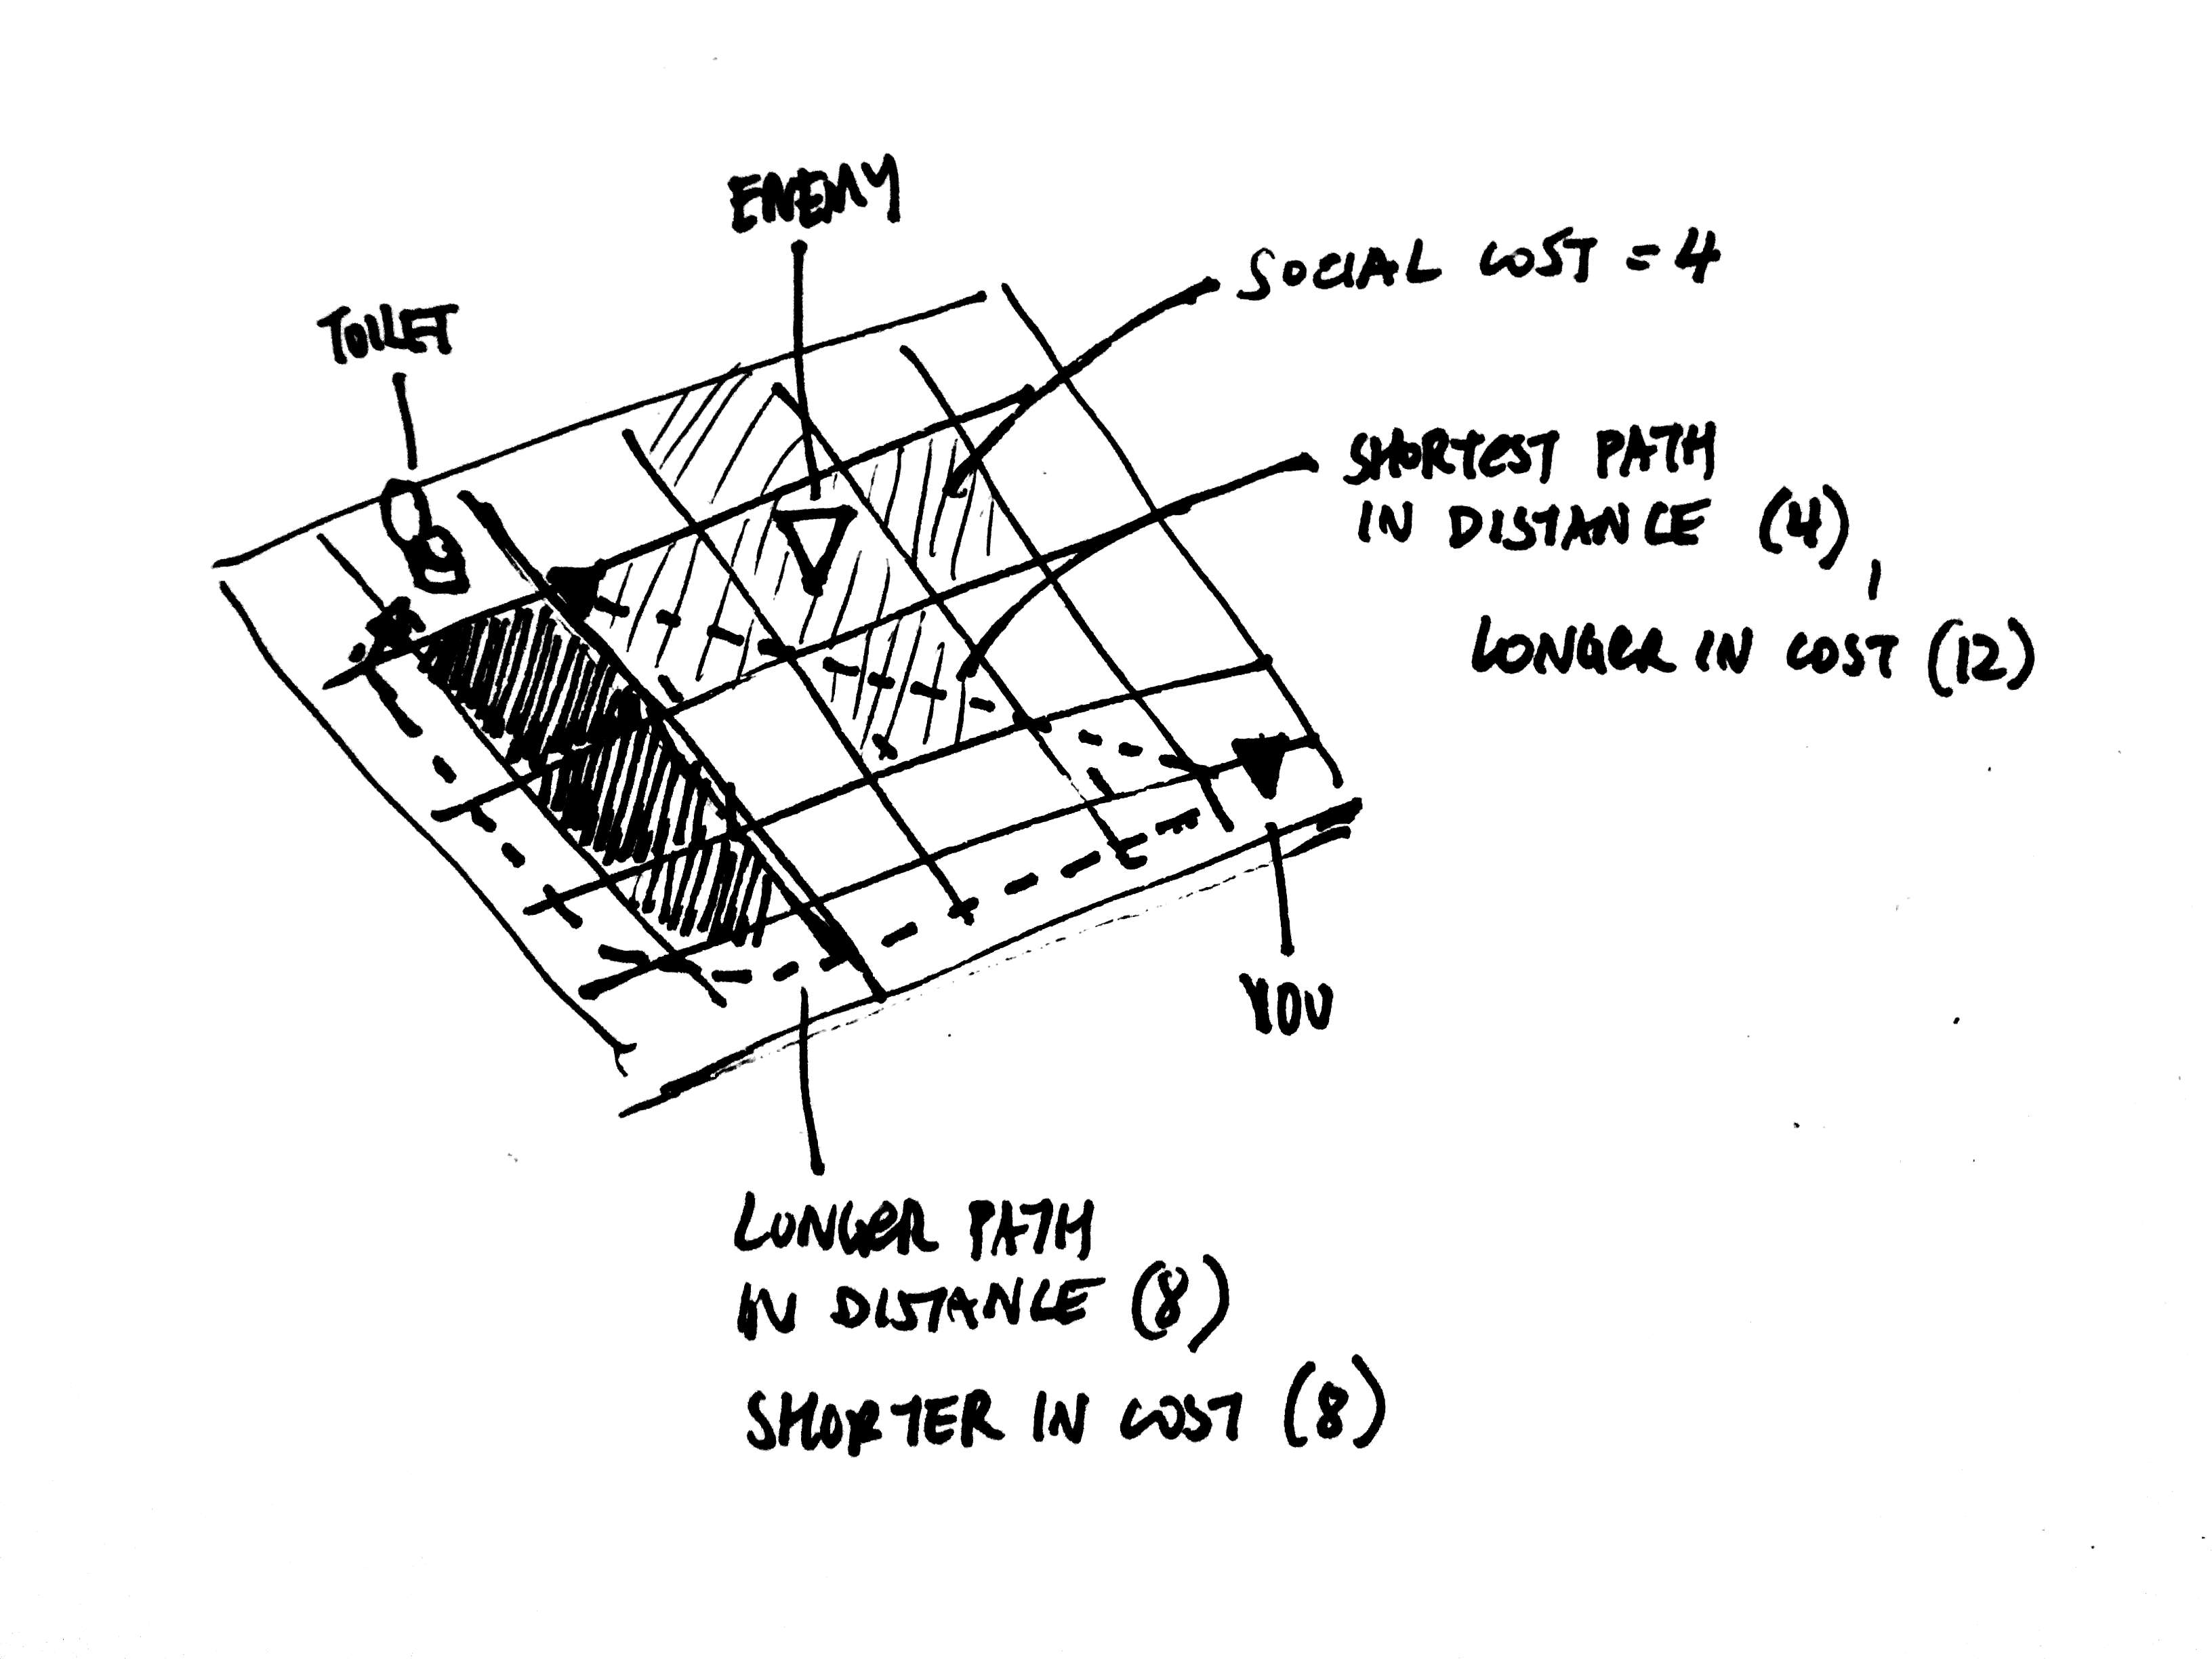
There are some improvements that I’d really like to make to the pathfinding system. Currently each position is weighted the same, but it’d be great if we held different position weights for each individual agent. With this we’d be able to represent, for instance, subjective social costs of spaces. For example, I need to go to the bathroom. Normally I’d take the quickest path there but now there’s someone I don’t want to talk there. Thus the movement cost of those positions around that person are higher to me than they are to others (assuming everyone else doesn’t mind them), so I’d take a path which is longer in terms of physical distance, but less imposing in terms of overall cost when considering this social aspect.
Subjective path weight example
Those are the important bits of the agent part. When we used highrise for Party Fortress (more on that below), this was enough to support all the behaviors we needed.
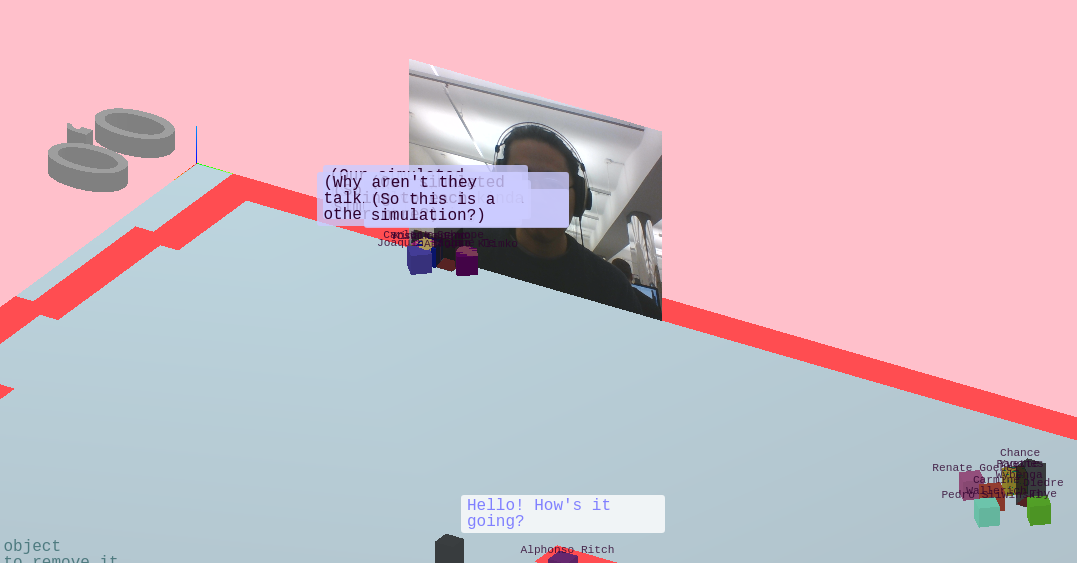
Party Fortress
Since the original inspiration for highrise was parties we wanted to throw a party to prototype the tool. This culminated in a small gathering, “Party Fortress” (named after Dwarf Fortress), where we ran a simulated party in parallel to the actual party, projected onto a wall.
Behaviors
We wanted to start by simulating a “minimum viable party” (MVP), so the set of actions in Party Fortress are limited, but essential for partying. This includes: going to the bathroom, talking, drinking alcohol, drinking water, and eating.
The key to generating plausible agent behavior is the design of utility functions. Generally you want your utility functions to capture the details of whatever phenomena you’re describing (this polynomial designer tool was developed to help us with this).
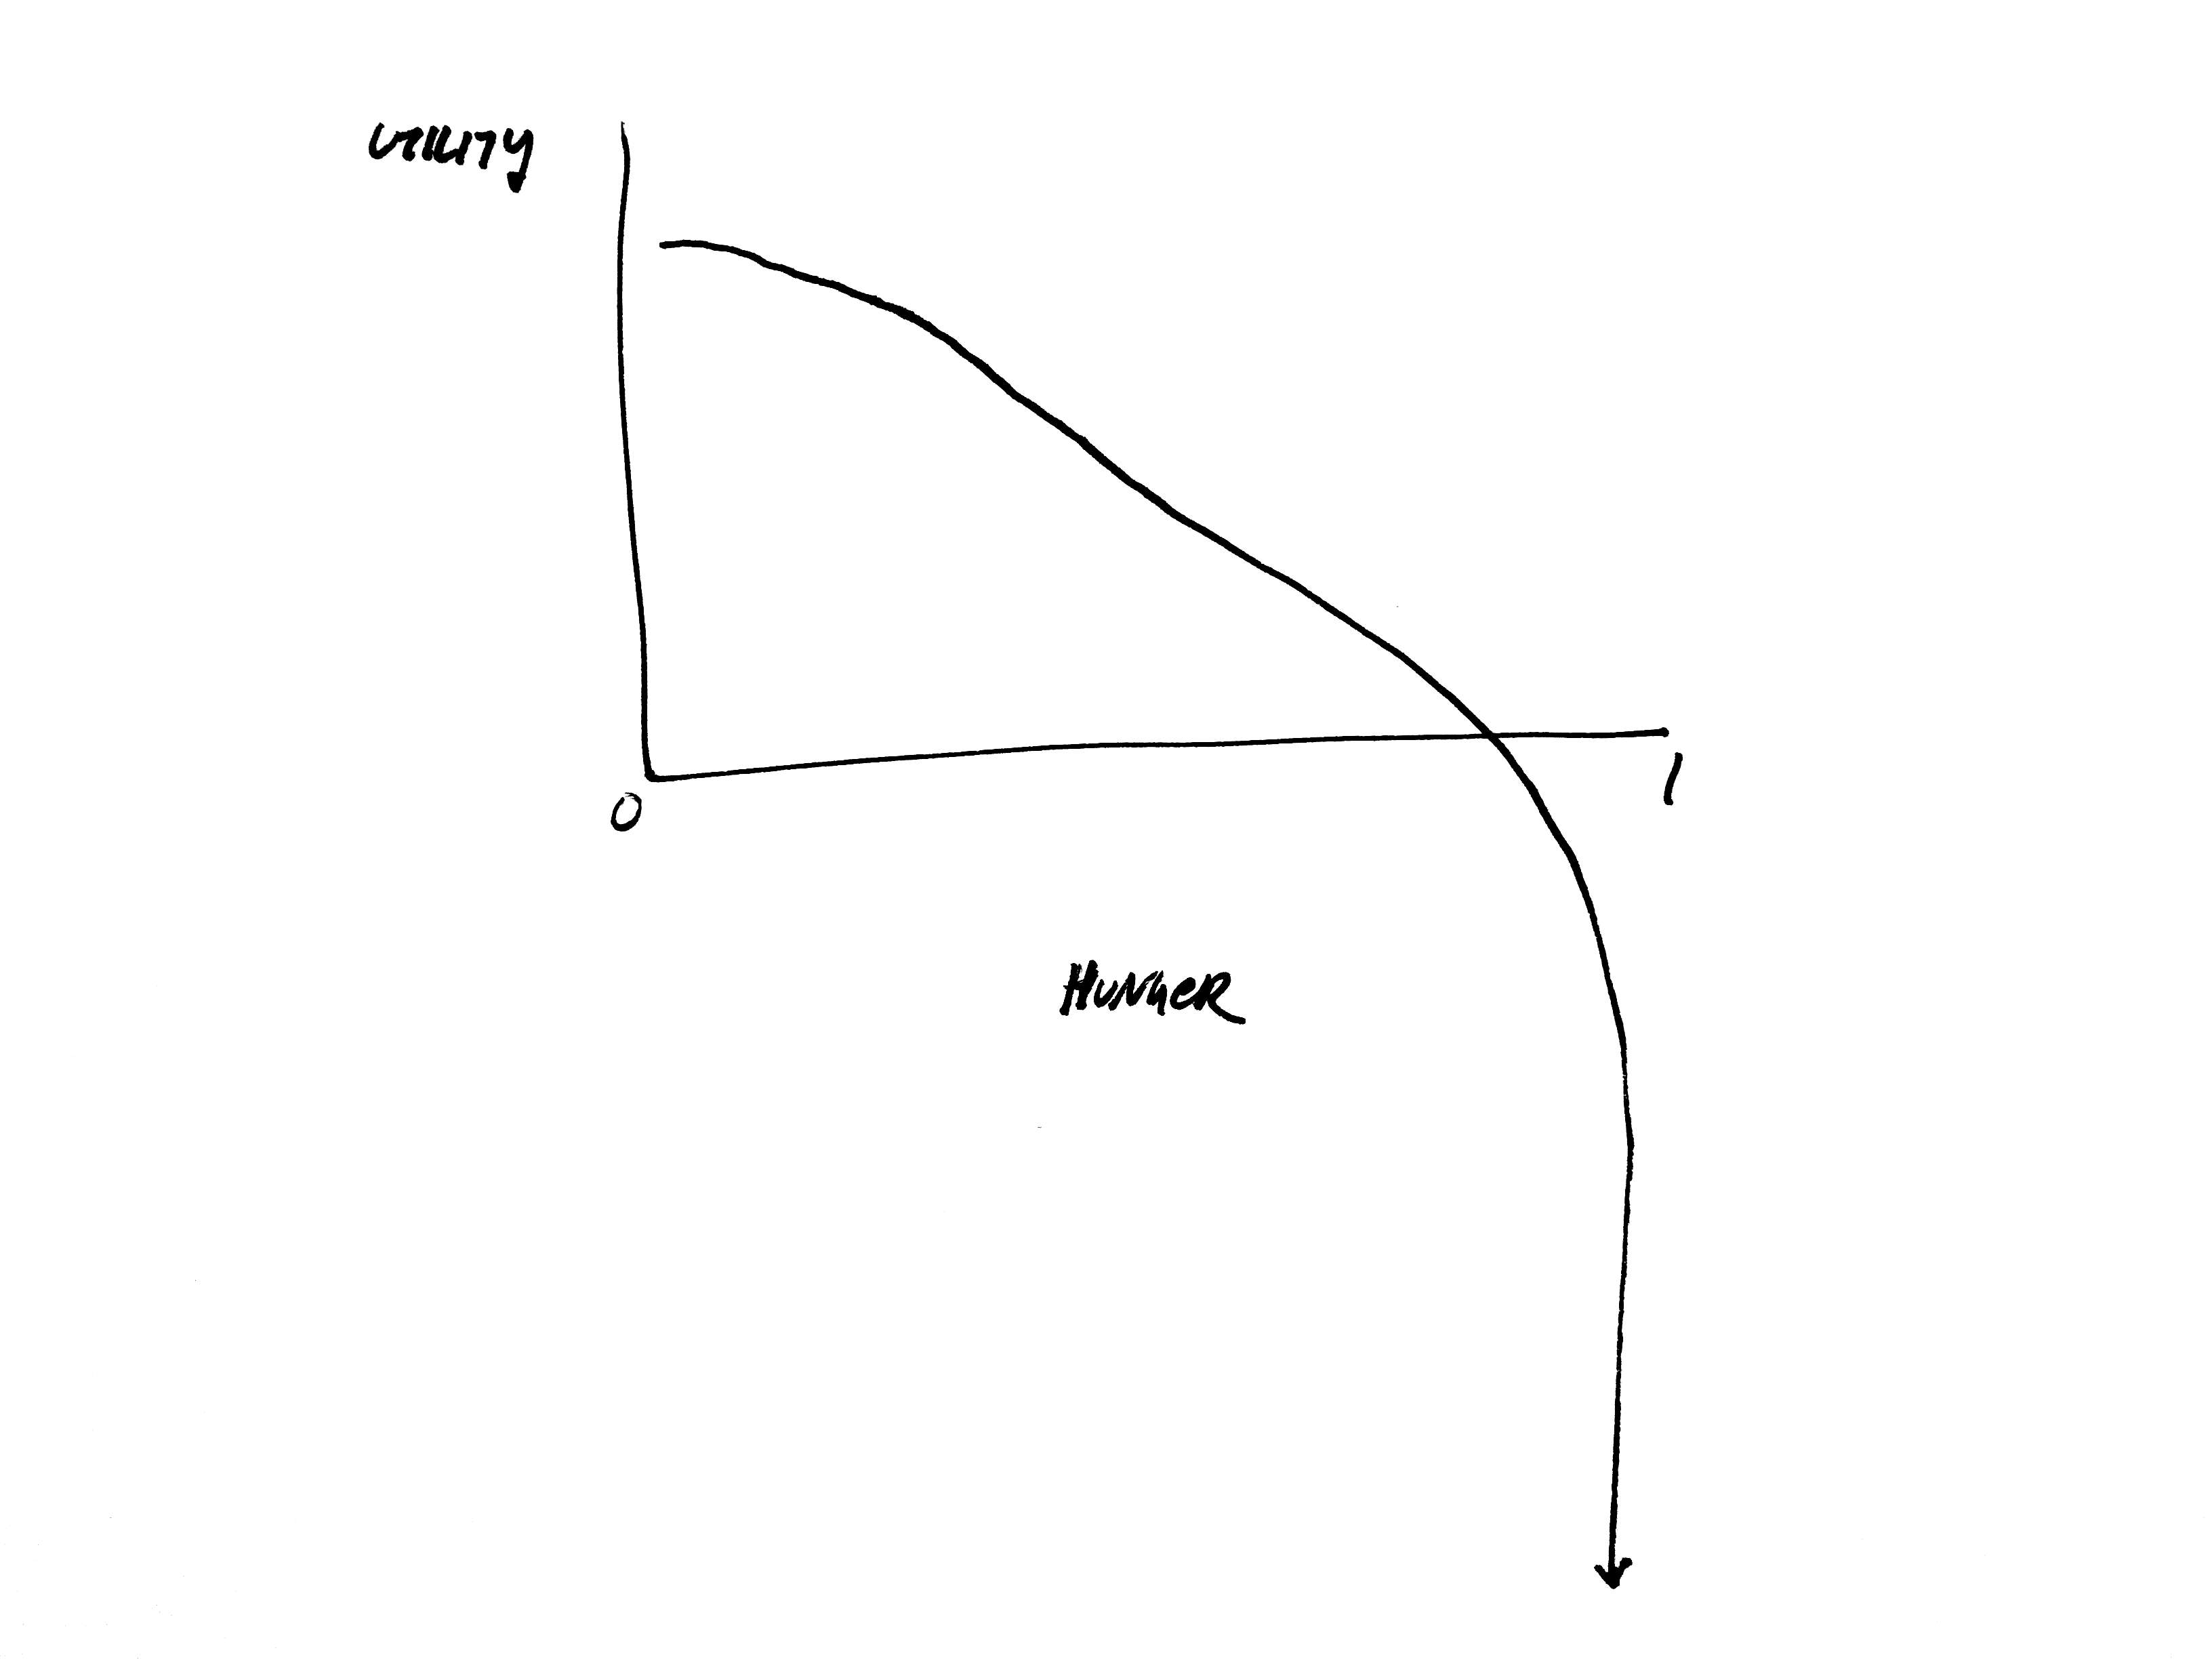
For example, consider hunger: when hunger is 0, utility should be pretty high. As you get hungry, utility starts to decrease. If you get too hungry, you die. So, assuming that our agents don’t want to die (every simulation involves assumptions), we’d want our hunger utility function to asymptote to negative infinity as hunger increases. Since agents use this utility to decide what to do, if they are really, really hungry they will prioritize eating above all else since that will have the largest positive impact on their utility.
Hunger utility function
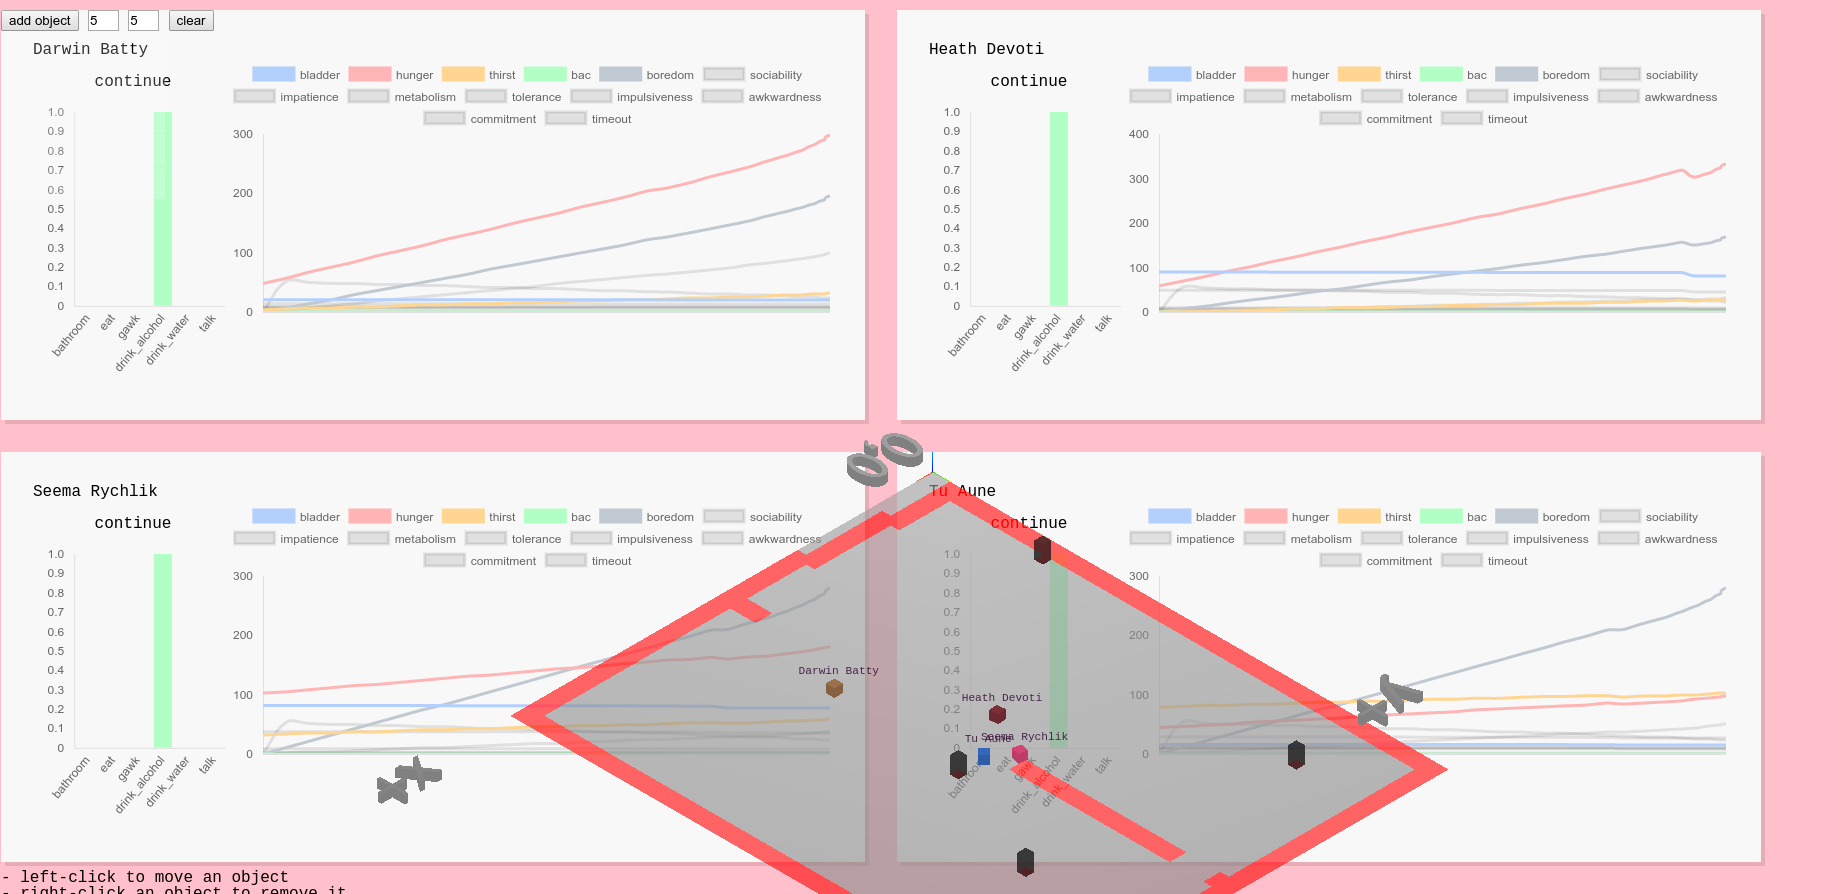
So we spent a lot of time calibrating these functions. The more actions and state variables you add, the more complex this potentially gets, and makes calibration much harder. We’re still trying to figure out a way to make this a more streamlined process involving less trial-and-error, but one helpful feature was visualizing agents’ states over time:
Agent state charts
Commitment
One challenge with spatial agents is that as they are moving to their destination, they may suddenly decide to do something else. Then, on the way to that new target, they again may decide to something else. So agents can get stuck in this fickleness and never actually accomplish anything.
To work around this we incorporated a commitment variable for each agent. It feels a bit hacky, but basically when an agent decides to do something, they have some resolve to stick with it unless some other action becomes overwhelmingly more important. Technically this works out to mean that whatever action an agent does has its utility artificially inflated (so it’s more appealing to continue doing it) until they finally execute it or the commitment wears off. This could also be called stubbornness.
Conversation
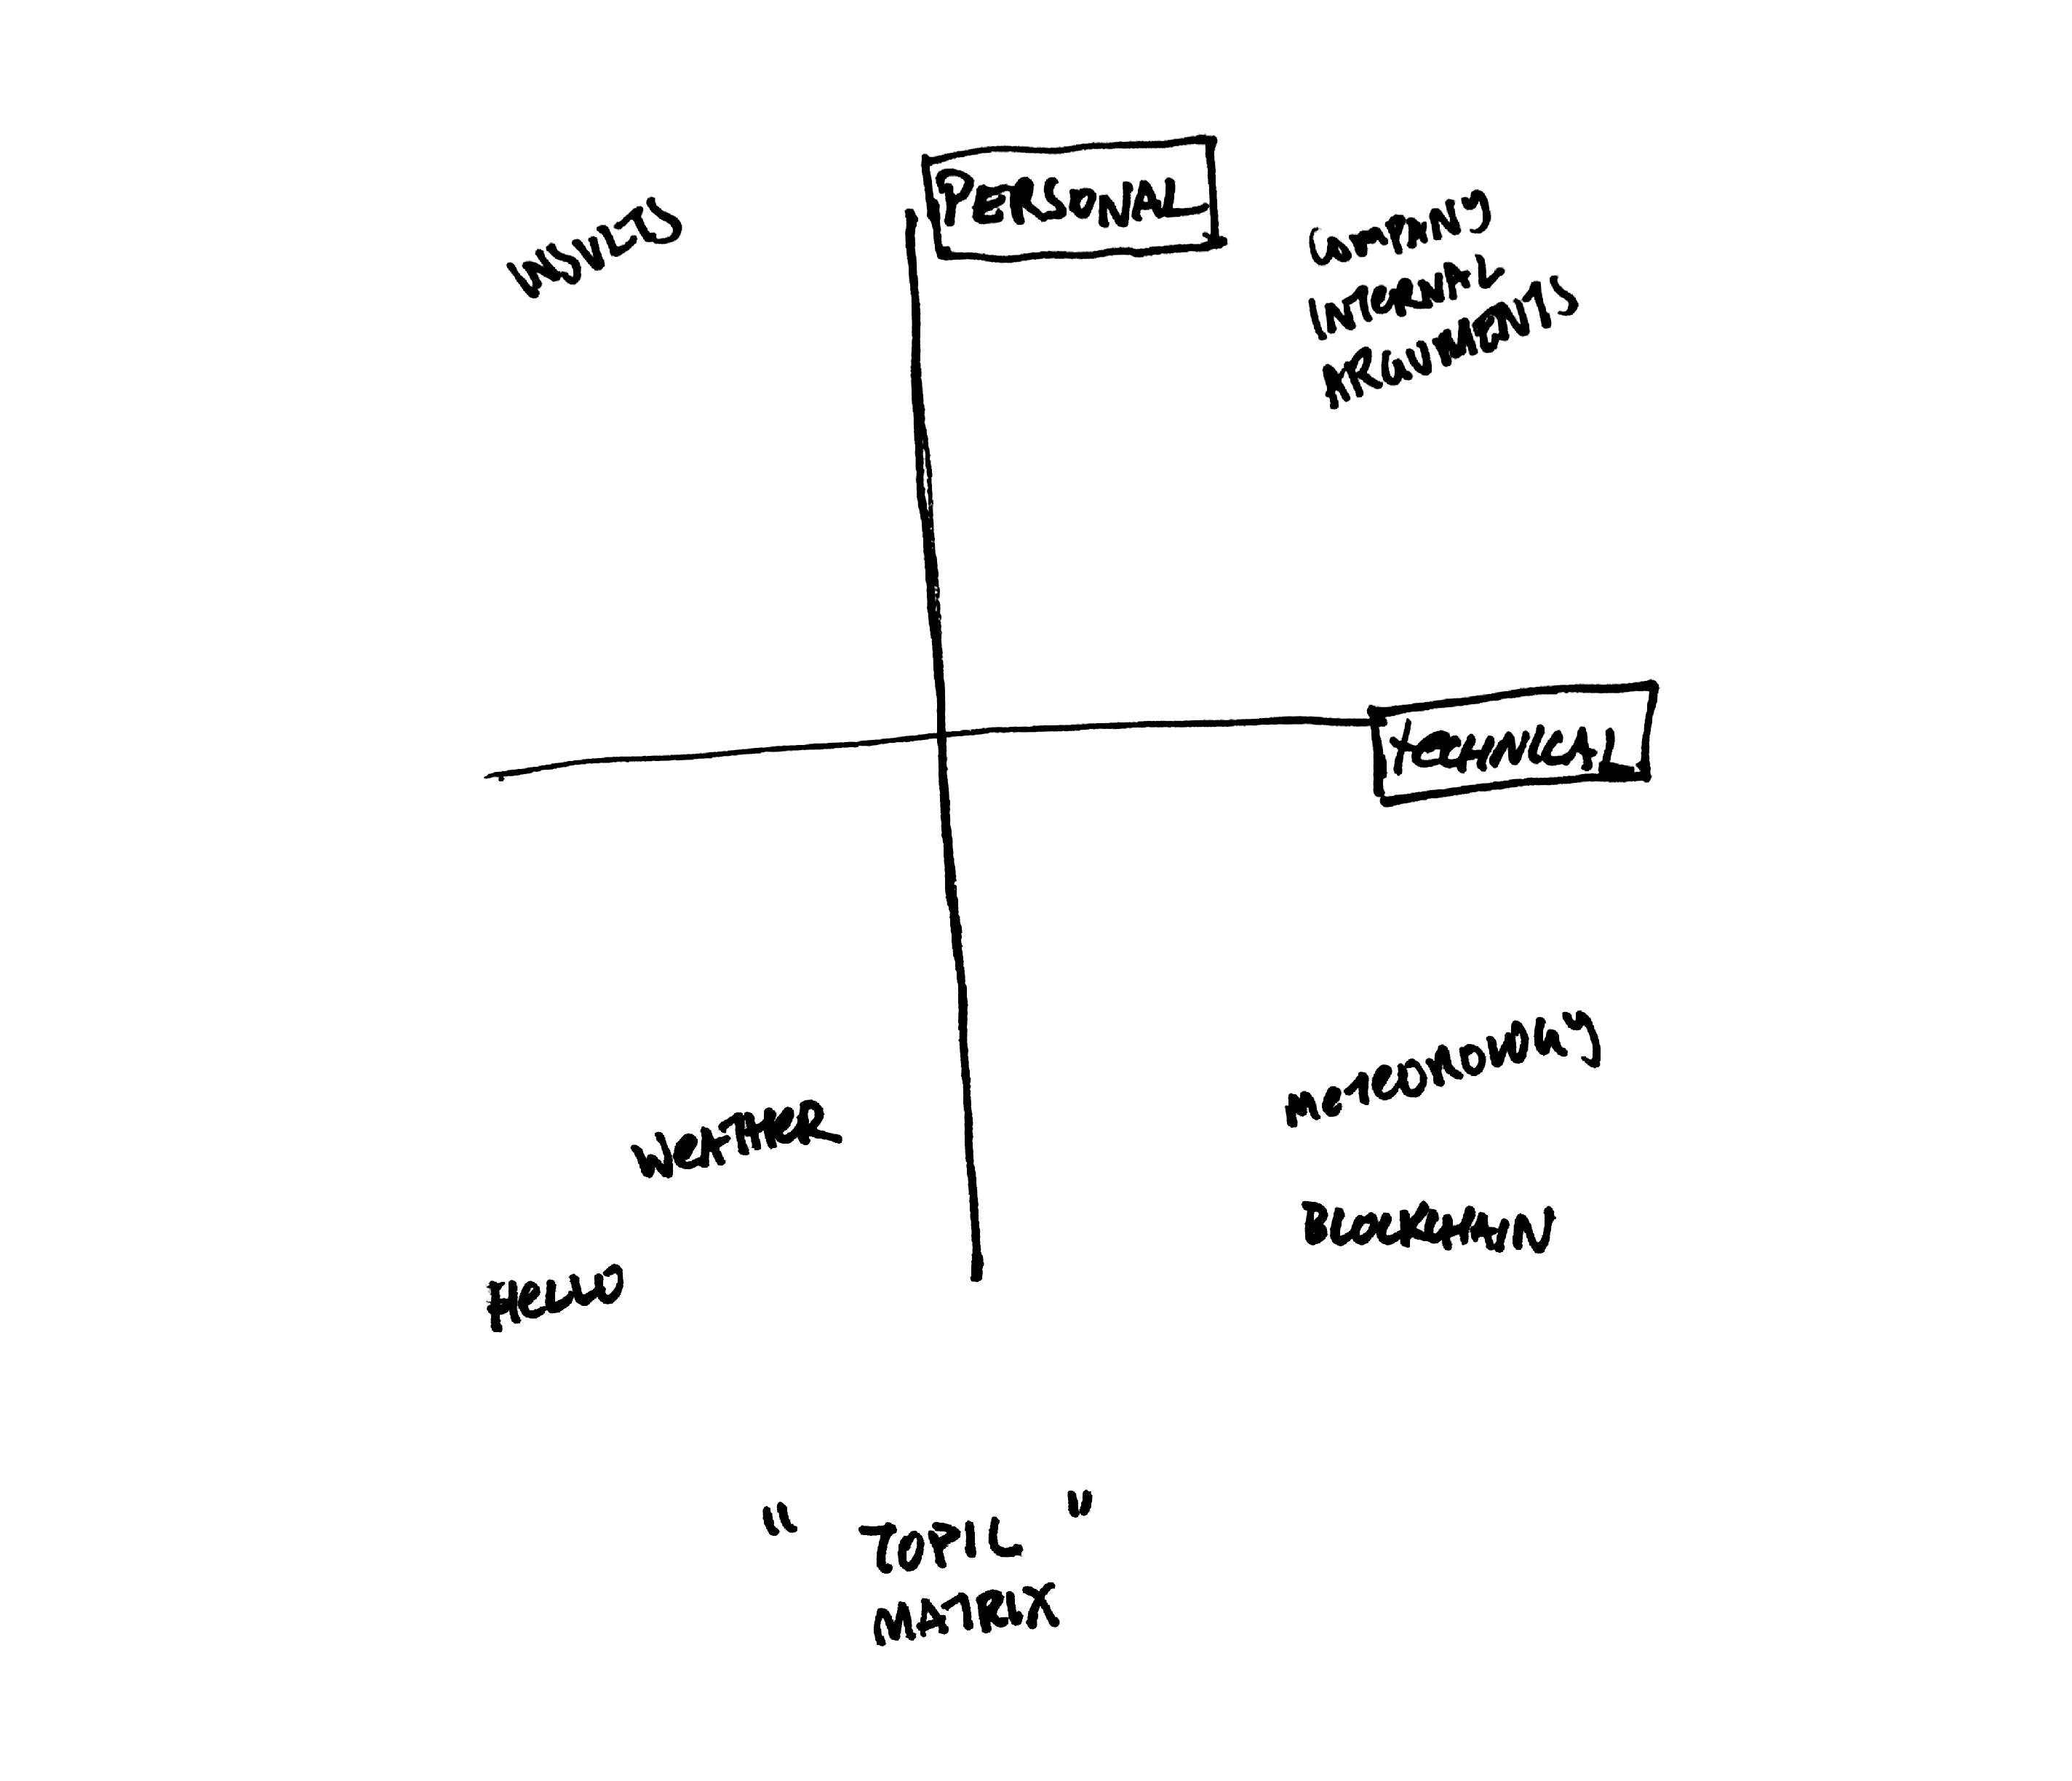
Since conversation is such an important part of parties we wanted to model it in higher fidelity than the other actions. This took the form of having varying topics of conversation and bestowing agents with preferences for particular topics.
We defined a 2D “topic space” or “topic matrix”, where one axis is how “technical” the topic is and the other is how “personal” the topic is. For instance, a low technical, low personal topic might be the weather. A high technical but low personal topic might be the blockchain.
Conversation topic space
Agents don’t know what topic to talk about with an agent they don’t know, but they a really basic conversation model which allows them to learn (kind of, this needs work). They’ll try different things and try to gauge how the other person responds, and try to remember this.
Social Network
As so far specified, our implementation of agents don’t capture, explicitly at least, the relationships between individual agents. In the context of a social simulation this is obviously pretty important.
For Party Fortress we implemented a really simple social network so we could represent pre-existing friendships and capture forming ones as well. The social network is modified through conversation and the valence and strength of modification is based on what topics people like. For example, if we talk about a topic we both like, our affinity increases in the social graph.
Narrative
It’s not very interesting to watch the simulation with no other indicators of what’s happening. These are people we’re supposed to be simulating and so we have some curiosity and expectations about their internal states.
We implemented a narrative system where agents will report what exactly their doing in colorful ways.
Agents talking and thinking
Closing the loop
Our plan for the party was to project the simulation on the wall as the party went on. But that introduces an anomaly where our viewing of the simulation may influence our behavior. We needed the simulation itself to capture this possibility - so we integrated a webcam stream into the simulation and introduced a new action for agents: “gawk”. Now they are free to come and watch us, the “real” world, just as we can watch them.
Agents talking and thinking
We have a few other ideas for “closing the loop” that we weren’t able to implement in time for Party Fortress I, such as more direct communication with simulants (e.g. via SMS).
We hosted Party Fortress at Prime Produce, a space that Dan has been working on for some time.
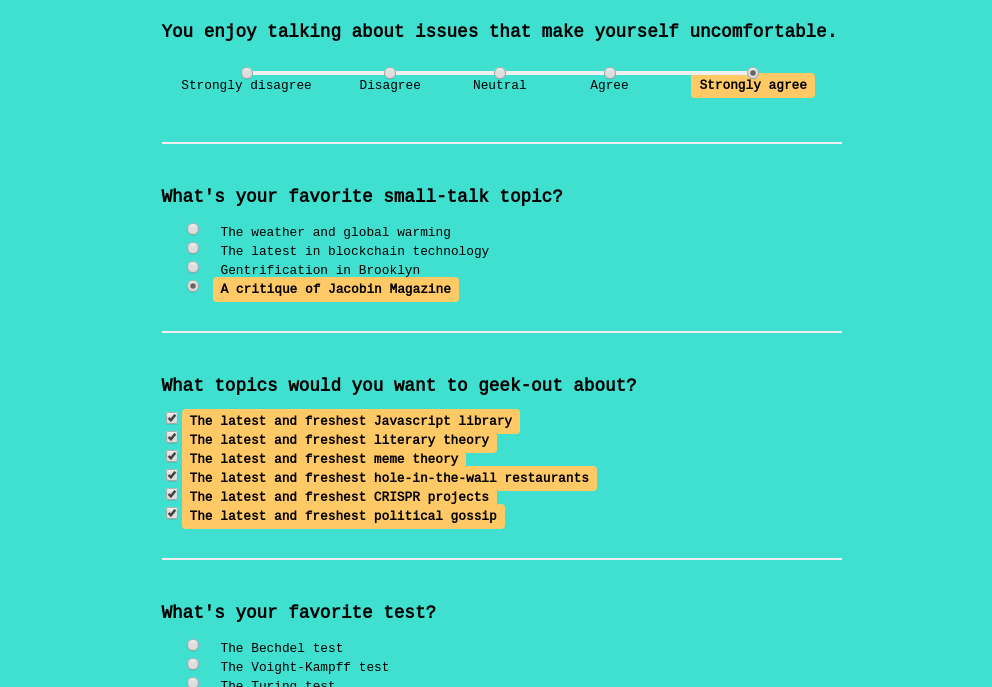
We had guests fill out a questionnaire as they arrived, designed to extract some important personality features. When they submitted questionnaire a version of themselves would appear in the simulation and carry on partying.
Questionnaire
There were surprisingly several moments of synchronization between the “real” party and the simulated one. For instance, people talking or eating when the simulation “predicted” it. Some of the topics that were part of the simulation came up independently in conversation (most notably “blockchain”, but that was sort of a given with the crowd at the party). And of course seeing certain topics come up in the simulation spurned those topics coming up outside of it too.
The Party
Afterwards our attendees had a lot of good feedback on the experience. Maybe the most important bit of feedback was that the two parties felt too independent; we need to incorporate more ways for party-goers to feel like they can influence the simulated party and vice versa.
It was a good first step - we’re looking to host more of these parties in the future and expand highrise so that it can encompass weirder and more bizarre parties.
Yesterday I started working on a new game, tentatively titled “Trolley Problems: A Eulogy for Social Norms”. This will be my second game with Three.js and Blender (though the first, The Founder, is still not totally finished) and I thought it’d be helpful to document this process.
The game isn’t very far at this point. This video shows its current state:
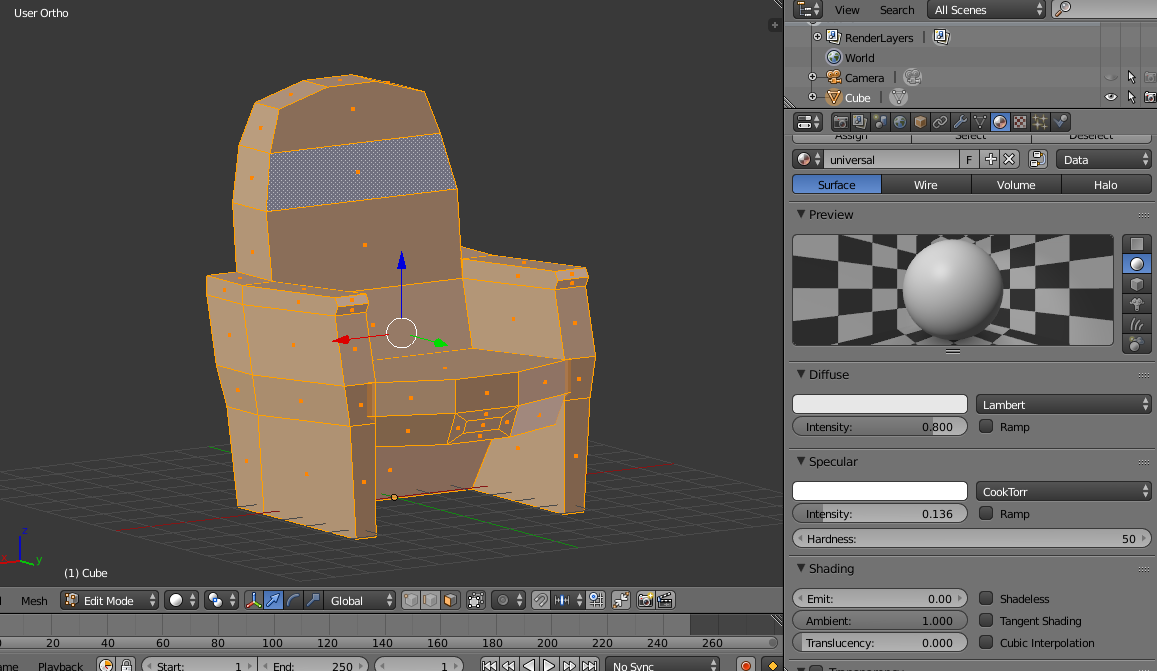
The basic process was: 1) create the chair model in Blender and 2) load the chair into Three.js.
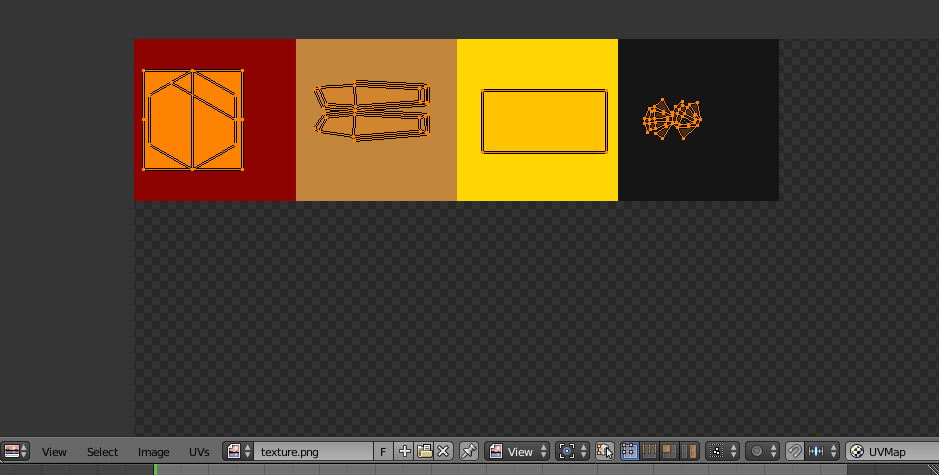
A lot of the model’s character comes out in the texturing. I like to keep textures really simple, just combinations of solid colors. The way I do it is with a single texture file that I gradually add to throughout a project. Each pixel is a color, so the texture is basically a palette.
In Blender I just select the faces I want to have a particular color, use the default UV map unwrapping (while in Edit Mode, hit U and select Unwrap) and then in UV/Image Editor (with the texture file selected in the dropdown, see image below) I just drag the unwrapped faces onto the appropriate colors.
UV mapping/applying the texture. Each color block is one pixel
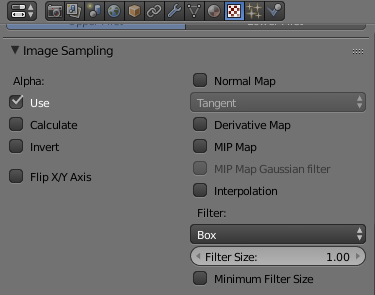
There is one thing you have to do to get this texture rendering properly. By default, Blender (like almost every other 3D program) will try to scale your textures.
In the texture properties window (select the red-and-white checker icon in the Properties window, see below), scroll down and expand the Image Sampling section. Uncheck MIP Map and Interpolation, then set Filter to Box (see below for the correct settings). This will stop Blender from trying to scale the texture and give you the nice solid color you want.
The texture properties window. Here’s where you set what image to use for the texture
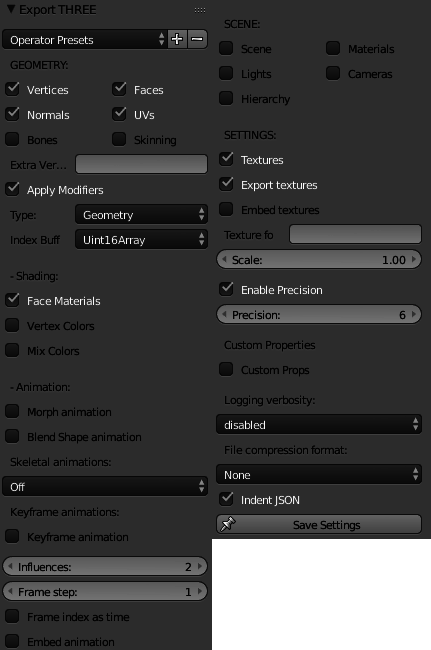
To export a Blender object to JSON, select your object (in Object Mode) and select from the menu File > Export > Three (.json).
The export options can be a bit finicky, depending on what you want to export the model for. For a basic static model like this chair the following settings should work fine:
Three.js provides a JSONLoader class which is what loads the exported Blender model. You could just use that and be done with it, but there are a few modifications I make to the loaded model to get it looking right.
constmeshLoader=newTHREE.JSONLoader();meshLoader.load('assets/theater_chair.json',function(geometry,materials){// you could just directly use the materials loaded from JSON,// but I like to make sure I'm using the proper material.// we extract the texture from the loaded material and pass it to// the MeshLambertMaterial herevartexture=materials[0].map,material=newTHREE.MeshLambertMaterial({map: texture}),mesh=newTHREE.Mesh(geometry,material);// material adjustments to get the right lookmaterial.shininess = 0;material.shading =THREE.FlatShading;// basically what we did with blender to prevent texture scalingmaterial.map.generateMipmaps =false;material.map.magFilter =THREE.NearestFilter;material.map.minFilter =THREE.NearestFilter;// increase saturation/brightnessmaterial.emissiveIntensity = 1;material.emissive ={r: 0, g: 0, b: 0};material.color ={
r: 2.5,
g: 2.5,
b: 2.5
};mesh.position.set(0,5,0);scene.add(mesh);});
The above code won’t work until we create the scene. I like to bundle the scene-related stuff together into a Scene class:
And the previous code for loading the chair should place the chair into the scene.
First-person interaction
So far you won’t be able to look or walk around the scene, so we need to add some first-person interaction. There are two components to this:
movement (when you press WASD or the arrow keys, you move forward/backwards/left/right)
looking around (when you move the mouse)
Movement
In the Scene class the onKeyDown and onKeyUp methods determine, based on what keys you press and release, which direction you should move in. The render method includes some additional code to check which directions you’re supposed to be moving in and adds the appropriate velocity.
The velocity x value moves you right (positive) and negative (negative), the y value moves you up (positive) and down (negative), and the z value moves you forward (negative) and backwards (positive). It’s important to note that the z value is negative in the forward direction because this confused me for a while.
We also keep track of how much time elapsed since the last frame (delta) so we scale the velocity appropriately (e.g. if the last frame update was 0.5s ago, you should move only half as far as you would if it had been 1s ago).
You’ll notice that you can walk through objects which is probably not what you want…we’ll add simple collision detection later to fix this.
Looking around
The key to looking around is the browser’s pointer lock API. The pointer lock API allows you to capture your mouse cursor and its movement.
In the Scene class the important method is setupPointerLock, which sets up the pointer lock event listeners. It is pretty straightforward, but basically: there’s an instructions element that, when clicked on, locks the pointer and puts the game into fullscreen.
The onPointerLockChange method toggles the pointer lock controls, so that the controls are only listening when the pointer lock is engaged.
The meat of the actual pointer movement is handled in PointerLock.js. This is directly lifted from the Three.js example implementation. It’s also pretty sparse; it adjusts the yaw and pitch of the camera according to how you move your mouse.
We have to properly initialize these controls though. In the Scene’s constructor the following are added:
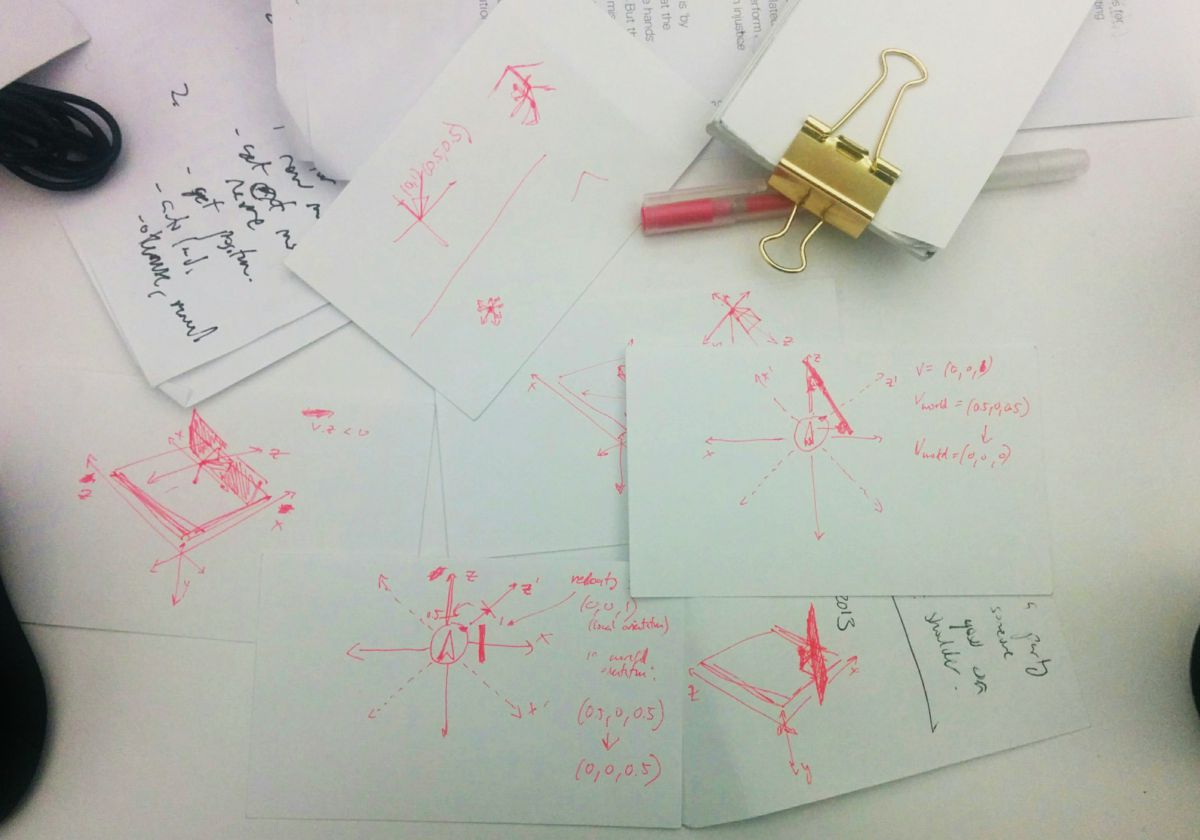
So the last bit here is to prevent the player from walking through stuff. I have a terrible intuition about 3D graphics so this took me way too long. Below are some of my scribbles from trying to understand the problem.
Ugghhh
The basic approach is to use raycasting, which involves “casting” a “ray” out from a point in some direction. Then you can check if this ray intersects with any objects and how far away those objects are.
Below are an example of some rays. For example, the one going in front of the object points to (0,0,1). That sounds like it contradicts what I said earlier about the front of the object being in the negative-z direction…it doesn’t quite. This will become important and confusing later.
Note that the comments in the example on GitHub are incorrect (they have right and left switched…like I said, this was very confusing for me).
Every update we cast these rays and see if they intersect with any objects. We check if those objects are within some collision distance, and if they are, we zero out the velocity in that direction. So, for instance, if you’re trying to move in the negative-z direction (forward) and there’s an object in front of you, we have to set velocity.z = 0 to stop you moving in that direction.
That sounds pretty straightforward but there’s one catch - the velocity is relative to where you’re facing (i.e. the player’s axis), e.g. if velocity.z is -1 that means you’re moving in the direction you’re looking at, which might not be the “true” world negative-z direction.
These rays, unlike velocity, are cast in directions relative to the world axis.
This might be clearer with an example.
Say you’re facing in the positive-x direction (i.e. to the right). When you move forward (i.e. press W), velocity.z will be some negative value and velocity.x will be zero (we’ll say your velocity is (0,0,-1)). This is because according to your orientation, “forward” is always negative-z, even though in the context of the world your “forward” is technically positive-x. Your positive-x (your right) is in the world’s negative-z direction (see how this is confusing??).
Now let’s say an object is in front of you. Because our raycasters work based on the world context, it will say there’s an obstacle in the positive-x direction. We want to zero-out the velocity in that direction (so you’re blocked from moving in that direction). However, we can’t just zero-out velocity.x because that does not actually correspond to the direction you’re moving in. In this particular example we need to zero-out velocity.z because, from your perspective, the obstacle is in front of you (negative-z direction), not to your right (positive-x direction).
Orientation problem example
The general approach I took (and I’m not sure if it’s particularly robust, but it seems ok for now) is to take your (“local”) velocity, translate it to the world context (i.e. from our example, a velocity of (0,0,-1) gets translated to (1,0,0)). Then I check the raycasters, apply the velocity zeroing-out to this transformed (“world”) velocity (so if there is an obstacle in the positive-x direction, I zero out the x value to get a world velocity of (0,0,0)), then re-translate it back into the local velocity.
Ok, so here’s how this ends up getting implemented.
First I add the following initialization code to the Scene’s constructor:
Whenever you add a mesh and the player shouldn’t be able to walk through it, you need to add that mesh to this.collidable.
Then I add a detectCollisions method onto the Scene class:
detectCollisions(){// the quaternion describes the rotation of the playervarquaternion=this.controls.getObject().quaternion,adjVel=this.velocity.clone();// don't forget to flip that z-axis so that forward becomes positive againadjVel.z *=-1;// we detect collisions about halfway up the player's height// if an object is positioned below or above this height (and is too small to cross it)// it will NOT be collided withvarpos=this.controls.getObject().position.clone();pos.y -=this.height/2;// to get the world velocity, apply the _inverse_ of the player's rotation// effectively "undoing" itvarworldVelocity=adjVel.applyQuaternion(quaternion.clone().inverse());// then, for each ray_.each(RAYS,(ray,i)=>{// set the raycaster to start from the player and go in the direction of the raythis.raycaster.set(pos,ray);// check if we collide with anythingvarcollisions=this.raycaster.intersectObjects(this.collidable);if(collisions.length > 0 &&collisions[0].distance <=this.collisionDistance){switch(i){case 0:
// console.log('object in true back');if(worldVelocity.z > 0)worldVelocity.z = 0;break;case 1:
// console.log('object in true back-left');if(worldVelocity.z > 0)worldVelocity.z = 0;if(worldVelocity.x > 0)worldVelocity.x = 0;break;case 2:
// console.log('object in true back-right');if(worldVelocity.z > 0)worldVelocity.z = 0;if(worldVelocity.x < 0)worldVelocity.x = 0;break;case 3:
// console.log('object in true front');if(worldVelocity.z < 0)worldVelocity.z = 0;break;case 4:
// console.log('object in true front-left');if(worldVelocity.z < 0)worldVelocity.z = 0;if(worldVelocity.x > 0)worldVelocity.x = 0;break;case 5:
// console.log('object in true front-right');if(worldVelocity.z < 0)worldVelocity.z = 0;if(worldVelocity.x < 0)worldVelocity.x = 0;break;case 6:
// console.log('object in true left');if(worldVelocity.x > 0)worldVelocity.x = 0;break;case 7:
// console.log('object in true right');if(worldVelocity.x < 0)worldVelocity.x = 0;break;case 8:
// console.log('object in true bottom');if(worldVelocity.y < 0)worldVelocity.y = 0;break;}}});// re-apply the player's rotation and re-flip the z-axis// so the velocity is relative to the player againthis.velocity =worldVelocity.applyQuaternion(quaternion);this.velocity.z *=-1;}
This is working for me so far. The code can probably be more concise and I suspect there’s a much more direct route (involving matrix multiplication or something) to accomplish this. But I can wrap my head around this approach and it makes sense :)
In Free to Choose, Milton Friedman presents a pencil (the idea is borrowed from a poem) in order to sort of marvel at the wonder of the free market, how all these disparate people and resources were coordinated to produce something as simple as a pencil, and he’s sort of coming from the angle of it’s great because you don’t have to think about that production process at all, it’s totally abstracted away from you, and he doesn’t seem to be interested in acknowledging how fraught the politics of production is (or maybe he just doesn’t care).
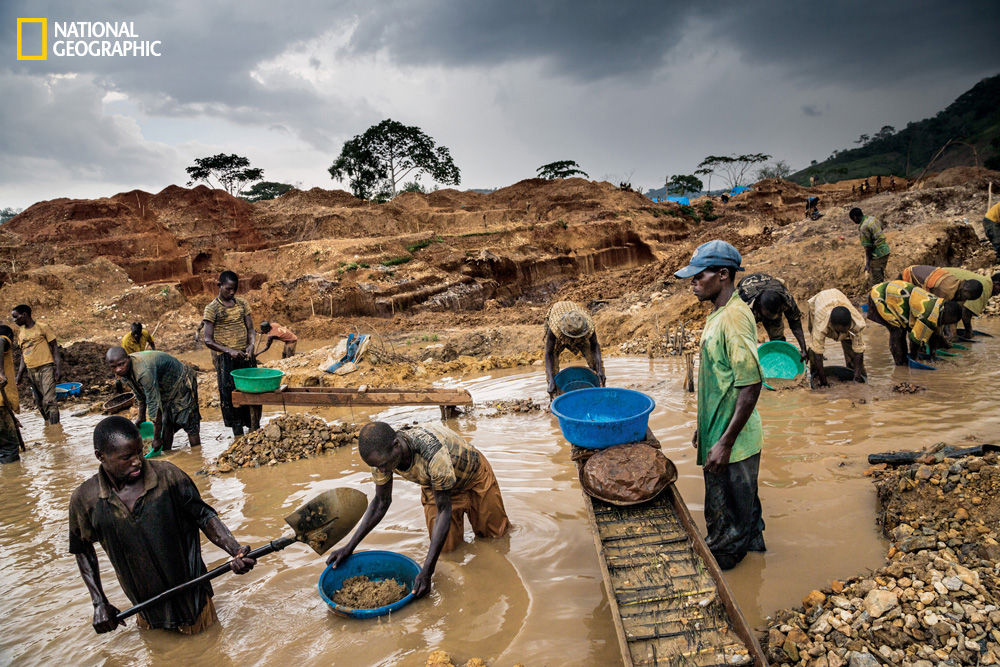
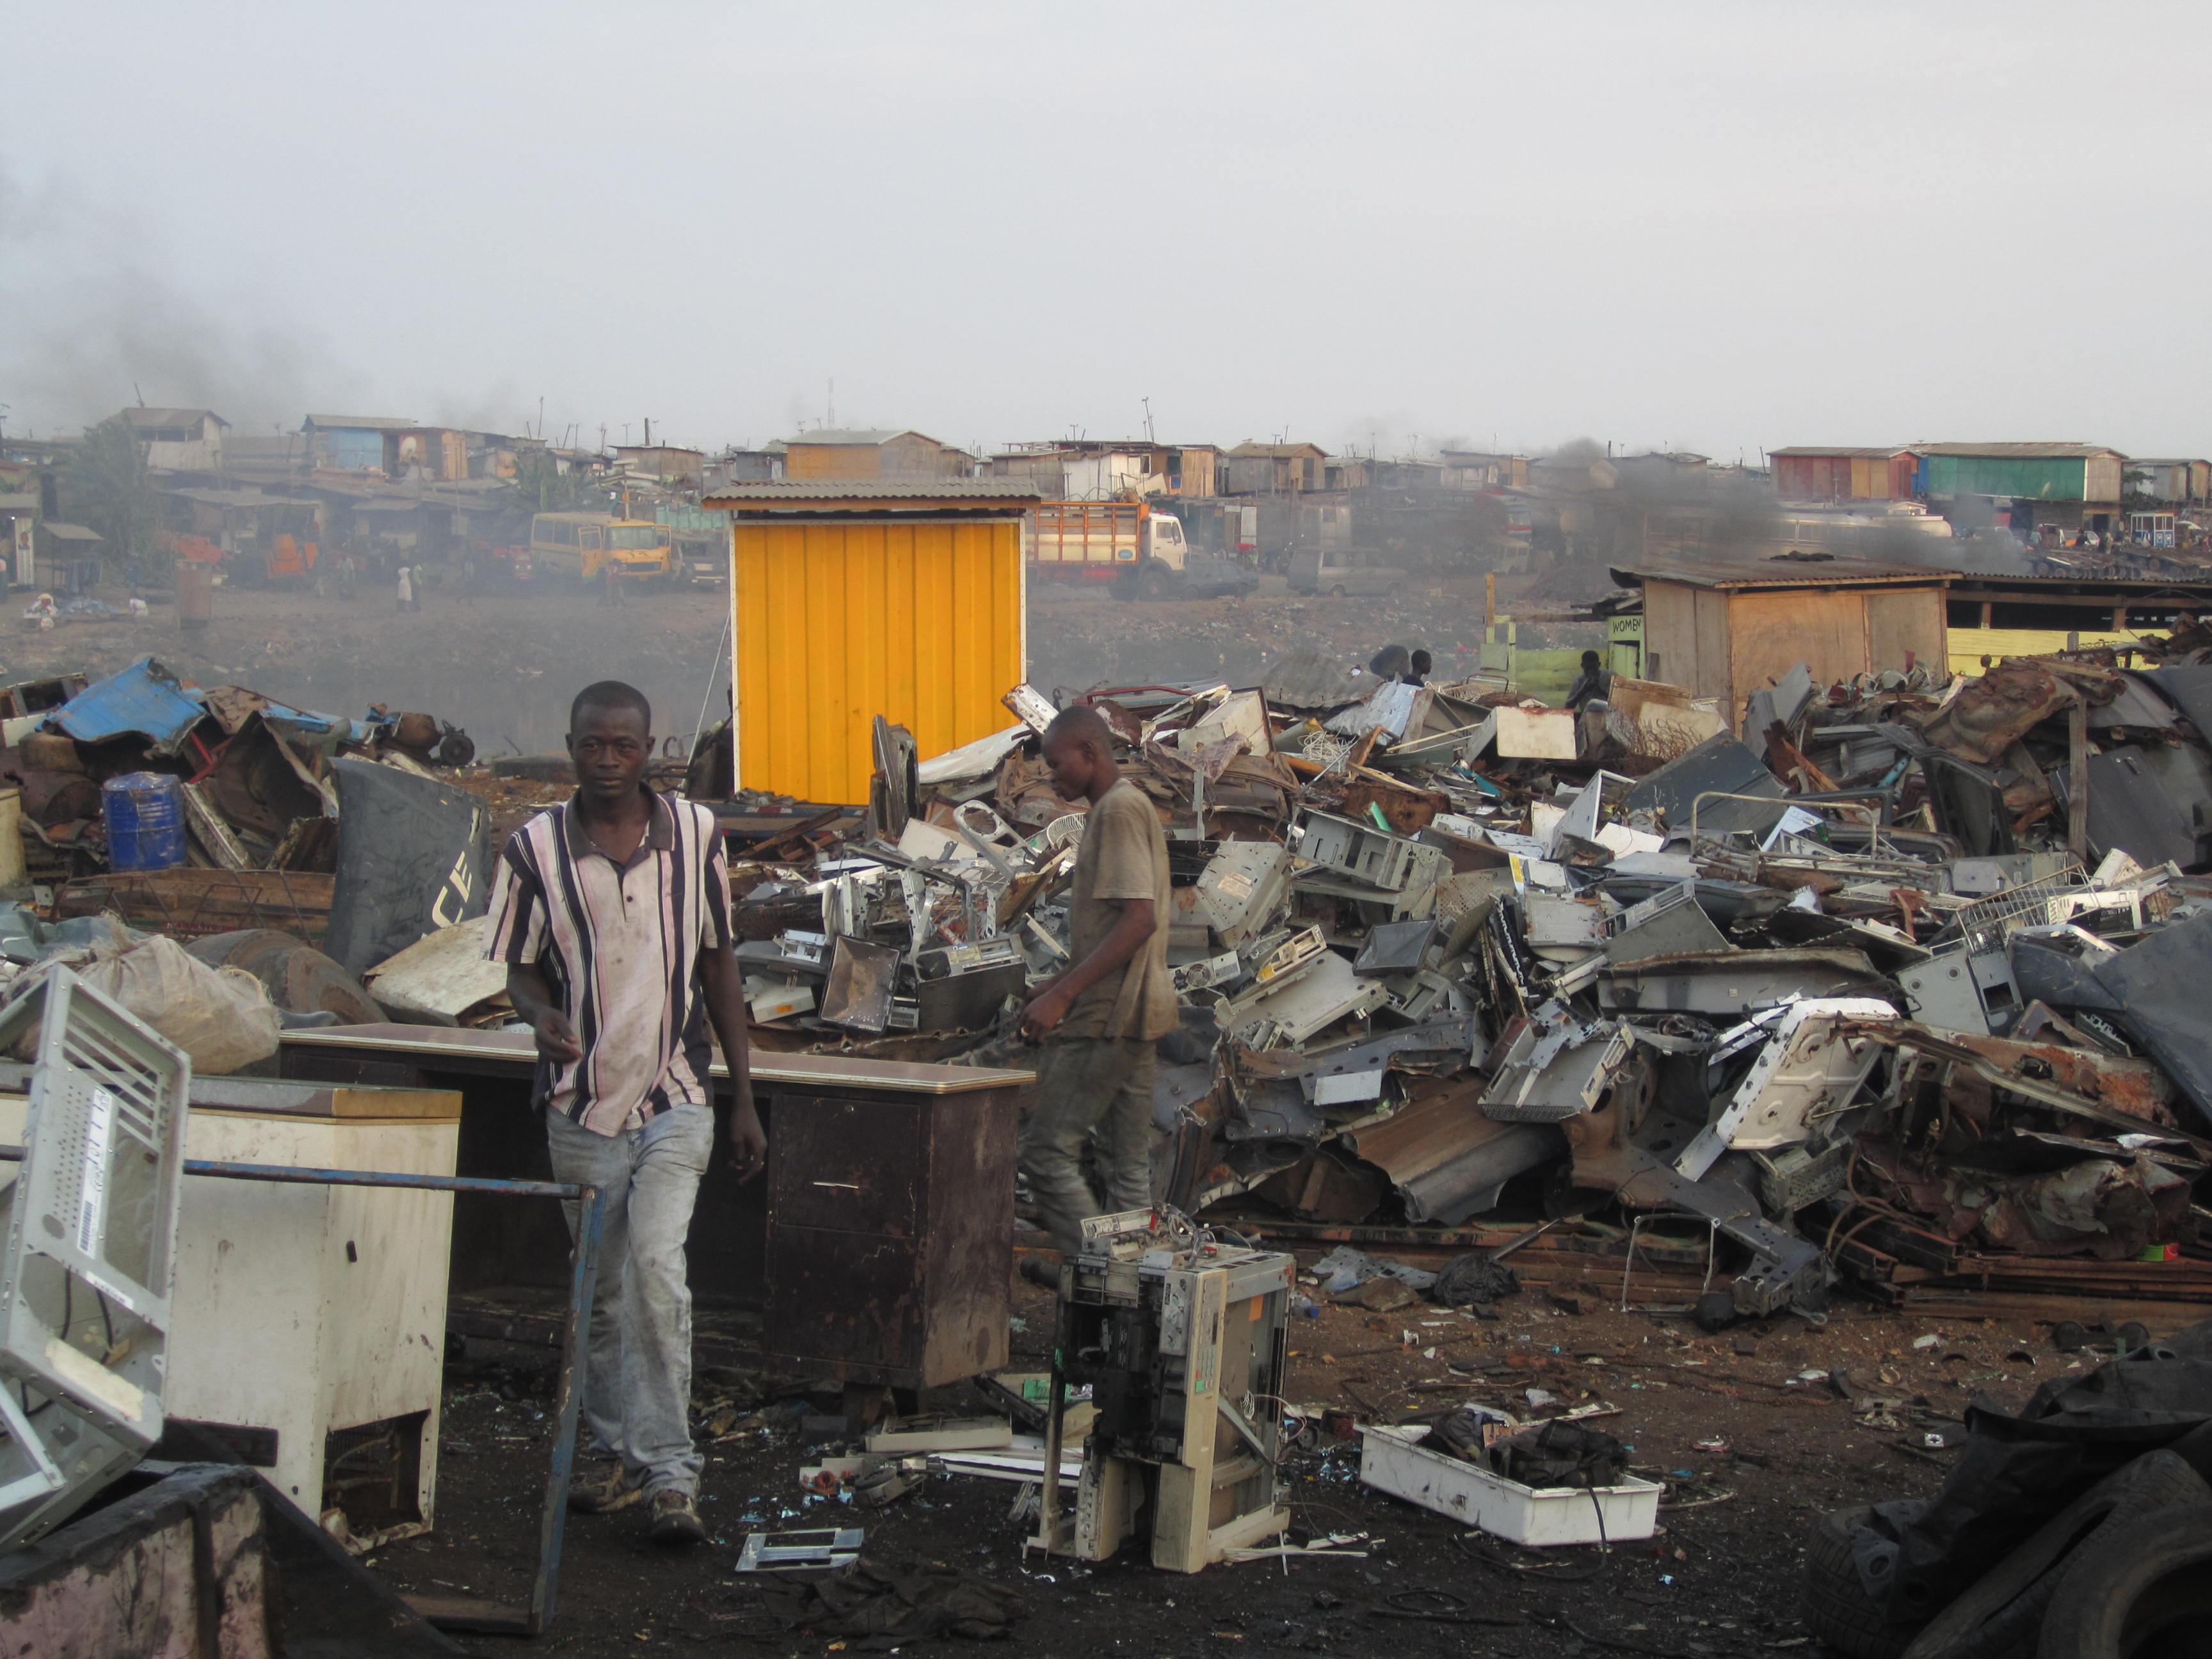
Is there a way to do the opposite? To make the production process of say your smartphone - conflict mining and poor working conditions and publicly-funded research and so on - undeniably obvious in the object itself? To really make that whole production network felt (“real”) to the end user? And going a step further, what happens after the consumer is done with it? For example, e-waste dumps in Ghana and China.
Smartphone mineral mining (Congo; Marcus Bleasdale/National Geographic)
Foxconn production (Bloomberg)
E-waste (Agbogbloshie, Ghana; Wikipedia)
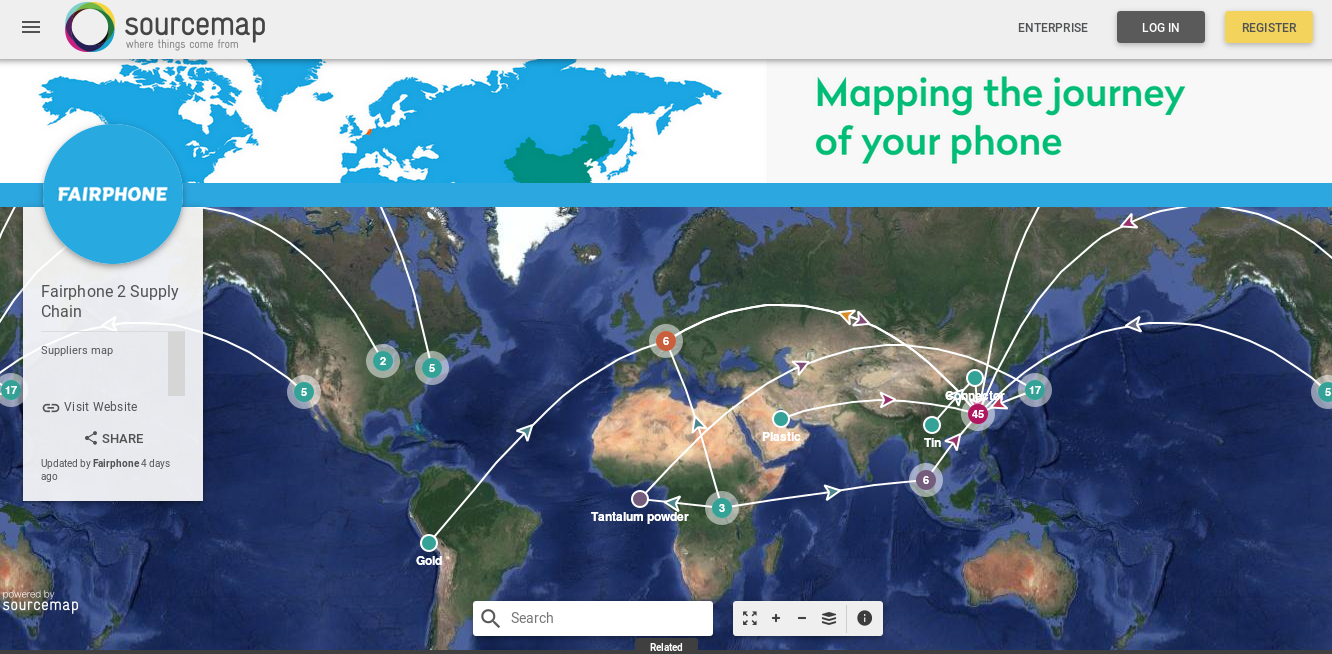
Sourcemap maps out the supply chains of various products and I wonder what can be built on top of it.


